This page describes how to review pages on this wiki, to ensure they look as good or better than they did on the old wiki. It was originally part of the “Great Wiki Launch” editing sprint of June 1-4, 2021, but the instructions remain useful for vetting pages that still have not been checked.
Project goals
- Fix content and syntax errors with existing wiki pages.
- Improve or expand the content of existing pages, as time and interest allows.
- Standardize the categories for plugins. (Check out the list-of-extensions. It’s cleaner than before, but further suggestions for consolidation are still welcome!)
- Get familiar with the new wiki, and provide feedback: what works, what doesn’t, etc.
Before you begin
Please keep the following in mind:
We are focusing on the content, not the
style. We must keep a clean separation between the actual
information and how it is presented. If you don’t like the way something looks,
that’s OK—but raise an issue in the chat room or
on GitHub.
Please do not hack in custom styles just to tweak things like an improper
margin or an ugly table. And don’t invent your own custom navigation or other
fancy web feature, just for one page or site section. If you feel something
should be fixed or enhanced, let’s do it for the whole site, so that all pages
reap the benefits. When in doubt, discuss in the
chat room or on the
Fiji gather.town island
on GitHub or
on the Image.sc Forum.
Thank you so much for tolerating my rant above! 🙏 I hope you aren’t offended; we software developers like to keep things well-organized, so that everything keeps running smoothly. I know it can be annoying, but there are innumerable benefits to consistency.
Things to watch out for
In many ways, this new wiki is much more powerful than the old site. However, there are some major downsides you should know about:
-
Whenever an edit to the site is made, it must be rebuilt by GitHub. This takes a couple of minutes, so you won’t see your changes go live instantly. Furthermore, certain kinds of syntax errors will break the build, causing the entire site not to update until the error is corrected.
-
The Preview tab in GitHub’s online editor is very useful for sanity checking your edits, but cannot be completely trusted. It renders most Markdown syntax correctly, but it does not understand Liquid directives (i.e. the
{% include ... %}syntax), and there are edge cases around mixed Markdown + HTML looking different in the preview versus on the actual live site. If you find yourself getting frustrated by this, there is a way to build the site locally to test your changes before committing them, but it uses some command line and a bit of Git. If you’re not comfortable with that, then just keep it simple, do your best, and choose pages with less complex problems. You could also focus on improving the content itself more than fixing syntactical issues. -
Markdown tables are not as powerful as MediaWiki tables. Fortunately, you can mix in HTML if you really need a super-fancy table. But writing tables as HTML is verbose and ugly compared to the MediaWiki syntax. For now, we live with it; perhaps we can find a nicer solution later.
-
Not a permanent downside, but be aware that there are still a few pages that have not been organized into their proper places. Any page that is in the top-level
_pagesfolder and starts with a capital letter still needs to be renamed and moved into the right place. See question 4 below for more about this. -
Another temporary issue is that we are not 100% done fixing the media includes:
img,video, andgallery. Theimgandvideoincludes are pretty nice already, but their handling of figures (when to wrap content with<figure>tags, and when not, and exactly how these are styled) still needs a little work. Andgallerystill needs significant cleanup. You are welcome to use any of the media includes, but we may need to do some additional cleanup later en masse as these includes evolve.
Questions to consider
-
What should the official categories be for plugins? Right now, people can tag whatever they want for the categories, and it shows in the list of extensions. Do you have opinions? Or know of any kind of community standard we could use here? Start a conversation
in the chatroom oron the Image.sc Forum! -
/update-sitescontains pages documenting what update sites are and how to use them, whereas/sitescontains pages describing individual update sites (like/peoplefor people,/orgsfor organizations,/softwarefor software packages,/libsfor software libraries). This naming is confusing; do you have any better ideas?
Resolution:/sites/*moved into/update-sites/(imagej/imagej.github.io@3c6c255d). -
/tutorialscontains tutorials about ImageJ, but they are not currently rated by level of experience. It would be nicer if we rated each tutorial something like: 1-introductory (e.g. learning the GUI), 2-intermediate (e.g. recording and tweaking ImageJ macros), 3-advanced (e.g. scripting with the Script Editor), 4-expert (e.g. programming plugins in Java).Would it make sense to divide the tutorials folder into subfolders in this manner? How should we name it?/tutorials/level1/through/tutorials/level4/? Better ideas? Maybe the scripting tutorials in/scripting/examplesshould move into/tutorials/level3if we do this scheme? And maybe some things currently in/learncould move to/tutorials/level1then?Or would it better to make the existing folder structure contain tutorials at each level:/learnfor level 1,/scriptingfor levels 2 and 3, and/developfor level 4? That’s mostly how it is now, except we then also have articles the/tutorialsfolder… should we parcel out what’s there into the other locations instead?
Now that I’ve written all this out, I’m liking the latter approach, but please think it over and discuss!
Resolution:/scripting/examples/*was moved to/tutorials/(imagej/imagej.github.io@11595491), and all tutorials are now listed on/tuturials/index(imagej/imagej.github.io@d942e84b). We should still consider adding a rating system for tutorials (imagej/imagej.github.io#162). -
The 11 not-yet-renamed pages in the root directory are:Command_Line_Tips_and_TricksDiadem_Challenge_DataFind_Maxima…Finer_Grained_Debian_PackagesFirst-instar_brain_6.3MBImageJ1-ImageJ2_cheat_sheetImprintJava_OptionsJava_Tricks_and_QuirksLinux_command_line_tutorialMamed
Where should each one go? Please propose locations for them in the chat.
Resolution: All of these pages are now located appropriately! -
Are there any cards on the Road to Production project board in the “To do - crowdsource!” column that interest you? If so, please feel warmly invited to work on them!
Resolution: The “Road to Production” board is now complete and closed! But you are still welcome to browse the issue tracker for issues of interest to work on!
Setting up
-
The only technical requirement is that you have a GitHub account. This is the account you will use to make edits. If you don’t have an account yet, create one! If you don’t know how to use Git, don’t worry—you don’t need it to make edits to this wiki. (Although if you do know Git, you might want to check out the Advanced editing guide to clone the wiki repository and make changes locally; it’s a very powerful way to work!)
- Once you have a GitHub account, do the following:
Open the first page of the sign-up sheet and make sure your GitHub ID is listed next to your name in the first column.Open the chat room in a browser tab, and sign in with your GitHub account.- If you don’t already have write access to the wiki, post a message
in the chat roomon the Image.sc Forum or on GitHub introducing yourself, and asking to be granted write access. Hopefully someone can grant it to you quickly, but if not, don’t worry: it’s still possible to submit edits to the wiki even without write access, via a mechanism called “pull requests.” Either way, you just click the “Edit page” link on the page you with to edit as usual, make your changes, and submit them.
-
Head to the wiki editing guide to learn the basics of editing. Since this project is all about fixing up existing pages, you can skip the “Creating a new page” section for now, and jump straight to Adding + editing page content.
- Finally, it’s time for your first project! You’re going to create (or edit
if it already exists) your own personal page! Navigate into the
_pages/peopledirectory. Check whether a page exists with the same name as your GitHub ID, plus the.mdfile extension. (Hint! Press the T key to engage the quick search filter, type your GitHub ID, and see if there’s a match.)- If so, click on it, then click the pencil icon just right of the “Raw” and “Blame” buttons. You’re off to the races!
- If not, click the “Add file” dropdown button, choose “Create new file”,
and type your GitHub ID followed by
.mdin the “Name your file” box.
-
Either way, you now have a text area into which your content will be placed. Here is template to cut-and-paste into the body to start you off:
---
title: Chuckles McGuffin
name: Chuckles McGuffin
website: https://example.com/
affiliation:
  - Andromeda Lunar Clown College | https://www.nasa.gov/moon/
  - New Lunar City, The Moon, Space | https://www.space.com/
forum: clowningandimaging
github: clowningandcoding
stackoverflow: 123456789/clowningandcoding
openhub: clowningandcoding
twitter: clowningandtweeting
linkedin: pub/chuckles-mcguffin/123/456/abc
researchgate: Chuckles_McGuffin
orcid: 9999-8888-7777-6666
arxiv: mcguffin_c_1
scholar: ZyZxwZvABCDZ
loop: 987654321
researcherid: C-9999-1234
scopus: 99887766554
---
Hello, my name is Chuckles. I love juggling and handstands.

I maintain the following ImageJ plugins:

| [CreamPie](/plugins/cream-pie)  | For when you're hungry. Delicious! |
| [Cartwheel](/plugins/cartwheel) | For spinning round and round.      |
You’ll then want to change the details to match your information, removing any fields that you don’t have or don’t want to share.
- Once you’re happy with your page, scroll down and type a short description, then click the green “Commit changes” button. Congratulations, you’re ready to start editing more pages!
Choosing a page to work on
Look over the list of pages remaining.
Pick one, then go to
page two of the sign-up sheet
and put your name next to that page before you start working on it.
Otherwise, you might clash making edits at the same time as someone else.
As for which pages to work on, here are some suggestions:
- Start with any pages you wrote yourself. Take ownership!
- Then move on to pages whose subject matter you know well.
- Alternately, choose pages on topics that interest you. Learn something while you work!
- Pick shorter, less complex pages sometimes, to feel a burst of productivity!
- Once you’ve learned how to fix a particular kind of problem, pick more pages
with that same problem, to apply your expertise. However: if you see many
pages with the same problem, it might be fixable programmatically. Speak up
in the chaton the forum, and someone with developer skills can help cross them all off the list at once. If your inner voice is telling you: “This is boring and repetitive—I feel like a mindless robot,” it’s a hint that maybe what you are doing could be done with a script instead.
Reviewing a page
- Open the page you are reviewing.
- Look at the links on the top right (“Page history”, “Edit this page”). There is probably a link there that says “Original MediaWiki page”. There might even be multiple numbered links. These link to the old wiki, with which you will be comparing the new content for correctness and formatting.
- Open the MediaWiki page link(s) using additional browser tabs or windows. If your monitor is large enough, you can place the old MediaWiki page on one half of your screen, and the new wiki page on the other half, to have them side by side.
- Scroll through both browser tabs, comparing what you see. You do not have to
scrutinize in excruciating detail; the prose is likely to be the same, since
it was all automatically converted. Rather, you are looking for things like:
- Any big chunks of missing text. E.g., text formatted as an aside on the
old wiki and floated to one side could potentially be completely missing
from the new site. If you see anything like this, please report it
in the chaton the forum, so that a software developer can scan the whole site for the same problem across all pages. - Bad or ugly layout, such as images and text being badly misaligned, or otherwise incorrectly oriented, especially compared to the old page.
- Anything else that jumps out at you as a step backward from how it was.
- Any big chunks of missing text. E.g., text formatted as an aside on the
old wiki and floated to one side could potentially be completely missing
from the new site. If you see anything like this, please report it
- For plugin pages, check the
categories:in the front matter, to see if they match the standard ones. - Once you are finished making changes to the page, and you are satisfied,
remove the
mediawiki:field from the front matter at the top. This is how we mark a page as complete, and what will cause it to disappear from the pages remaining list.
Finally, discuss early and often
on the Image.sc Forum and/or
on GitHub
in the chat room!
Asking questions is a good way to facilitate rapid progress, especially during
times when other knowledgeable people are online (check the sign-up sheet for
everyone’s availability).
Addressing common problems
Let’s grow this section as we encounter solutions to things!
MathJax appearing inappropriately
You can write MathJax math expressions by bracketing the text with $$
symbols. But some pages have formatting that gets interpreted as MathJax,
even though it wasn’t intended.
Once we know more, we’ll document here how to fix it.
Use code fences for multiple code lines
If the page uses multiple code lines, you should use fenced code blocks. This helps increase readability and
also allows you to potentially use syntax highlighting to futher improve readability. Checkout
code fences for more details.
Old info-box tables
We are retiring the include info-box in favor of using the wiki’s statbox
feature. Unfortunately, the statbox is not documented well enough yet on the
wiki—although the include itself describes it, including all supported
front matter fields.
Do you like writing documentation? You could add the mapping from info-box
fields to statbox fields here in this section! It would help all of us.
Automatic statbox
If the page describes a plugin corresponding to a particular JAR file published
on maven.scijava.org, you can add the artifact front matter field with the
groupId:artifactId of that JAR file. E.g., the
3D Viewer page declares:
artifact: sc.fiji:3D_Viewer
And then the “Vital statistics” box on the right gets populated automatically
by some JavaScript magic. However, there are many plugins documented on the
wiki that still use the old-style info-box include with hardcoded information,
rather than declaring the artifact and letting it get filled in automatically.
Here’s how to figure out which artifact code goes with a particular plugin. We’ll use the MorphoLibJ plugins as an example.
-
Launch Fiji.
- If the plugin you want to find is not already installed, install it.
- In our example, that means enabling the IJPB-plugins update site, and then restarting ImageJ.
-
Once your Fiji has the requisite plugin installed, search for it using the search bar. For example:
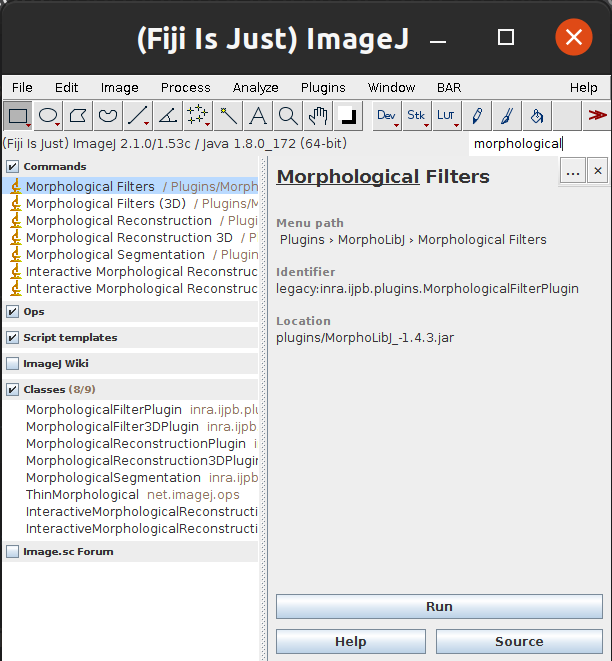
Above, we found the “Morphological Filters” plugin, part of MorphoLibJ.
-
Select the Identifier, minus the prefix (
legacy:orcommand:). The rest of the string is a known as a “fully qualified Java class name”, and we will use it to find the artifact string, which is colon-separated pair ofgroupId:artifactId. (As you might have guessed,groupIdrepresents the group that produced the plugin, and is typically a reversed domain name. So, for example, core ImageJ artifacts are in the groupnet.imagej. And theartifactIdis the name of the artifact itself, typically matching the.jarfilename.) -
Navigate to the SciJava Maven repository in your browser, and into the search box there, paste the string you copied—in our example, it is
inra.ijpb.plugins.MorphologicalFilterPlugin. Then press ↵ Enter to search for the class. You should see results like this appear: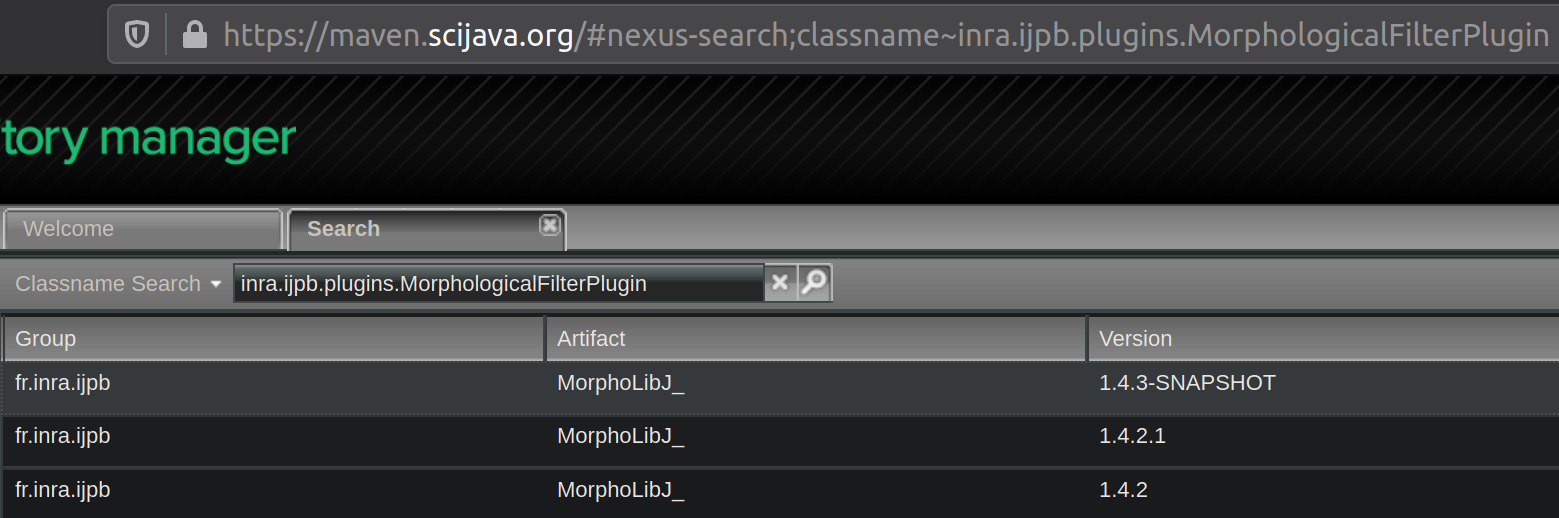
Notice how it says “Classname Search” in the lefthand dropdown box? If it says something else, click it and change it to “Classname Search” and try pasting the class string again. Above, we have found our artifact string! The group is
fr.inra.ijpb, and the artifact isMorphoLibJ_. So the front matter we should add is:artifact: fr.inra.ijpb:MorphoLibJ_Some day, we’ll improve the ImageJ search bar to show each plugin’s artifact string directly in the results pane. But it doesn’t do that yet.
- If you don’t have good luck with the maven.scijava.org search, here is
another approach: when you find the plugin of interest via the ImageJ
search bar, try clicking the Source button. If the plugin is well-designed,
it will open up the plugin’s source code on GitHub. You can then navigate
to the top of that repository, click on the
pom.xmlfile, and read thegroupIdandartifactIdout of that XML file.
If you are unable to locate the Maven artifact string for any particular
plugin, please ask in the chat room on the forum,
and someone will help you out!
Manual statbox
Some plugins do not have Maven artifacts, because the developer did not publish the plugin to maven.scijava.org. In that case, you can migrate all the info-box fields manually into the front matter. Here is a before-and-after example for the DHM Utilities/Reconstruction plugin: before (info-box) / after (statbox).
The Cross Sectional Analyzer provides
another example of using the statbox fields manually.
Table cells not being in the right places
Some tables converted from the old wiki lost their rowspan and colspan
info, resulting in cells skewed across rows or columns. Compare against the
old wiki, and add e.g. colspan=5 or rowspan=3 as appropriate to the cells
that need it.
Missing chunks of content
For now, speak up in the chat on the forum if you find any. In particular,
it may be that some content from sideboxes did not carry over from the original
page. Once we have a better grasp on which sorts of pages have missing content,
we can outline the best ways of fixing those scenarios here.
Filing issues on GitHub
A page might have a problem that you don’t know how to fix. Or you might notice a problem with the site infrastructure or layout, that affects more than only a single page. In those cases, it’s good to make a note of the issue, so that it is not forgotten, and can be fixed later, ideally by someone with sufficient expertise.
To file an issue, follow this link:
Type in a subject and description. Be sure to answer:
- Which page has the problem?
- Where on the page is the problem?
- Another other relevant details?
If it’s something you think needs to be fixed before we launch the site on
Friday, you can click the gear symbol next to Milestone and add it to the
production milestone.
Then click “Submit new issue” when ready.