This page explains how to write and edit wiki pages. The simplest way to create or modify a page is using GitHub’s online file editor. Each page has an “Edit page” link at the top right with a direct link to this interface.
Advanced users can make edits via a local clone of the site repository; see the advanced editing guide for setup instructions.
Requirements
As this wiki is completely hosted on GitHub, you will need to be logged into a GitHub account to make edits (this replaces the old system of registering for an ImageJ-wiki-specific account). If you don’t have an account yet, you can create one freely.
When making edits through the GitHub web UI, first-time contributors will likely be prompted to fork this repository. Make your edits to your fork as described below, and then create a pull request.
An admin will review your pull request, merge it, and add you as a collaborator. Any future edits can then be made directly to this wiki. You can delete your fork at that point.
You can also manually create forks at any time, and are welcome to continue using the Pull Request mechanism if you prefer.
Creating a new page
Let’s dive in to how to create a new page on the site. If you are looking to edit an existing page, skip to adding and editing page content below. See also the general GitHub guide to editing files.
-
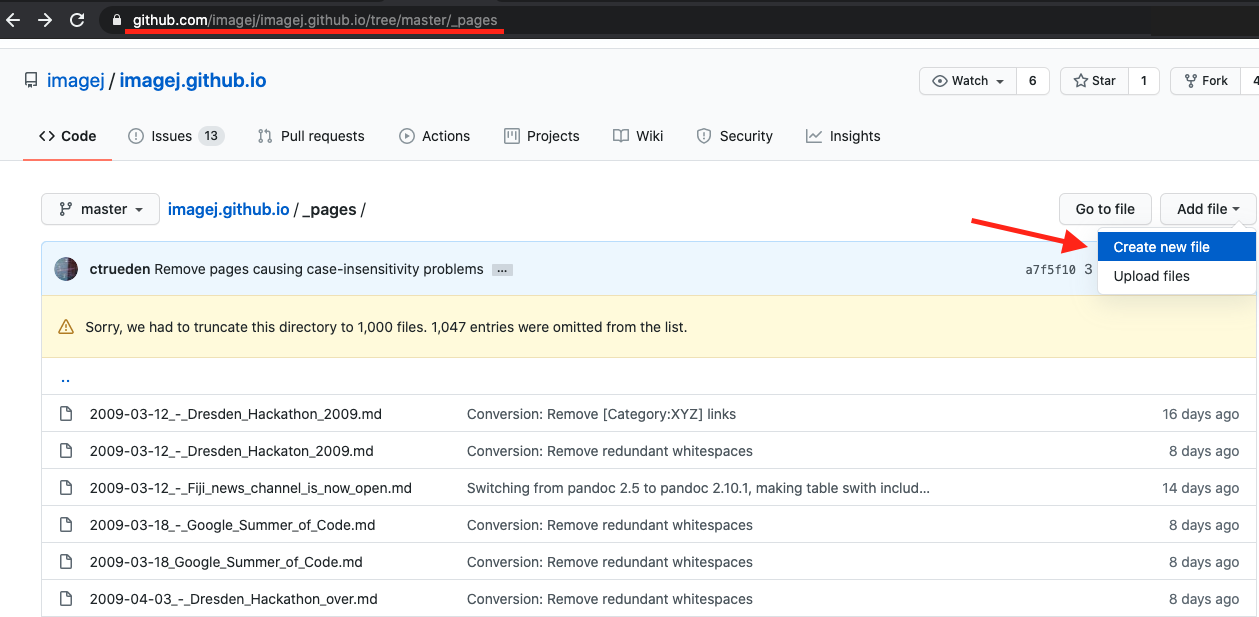
Navigate to an appropriate sub-directory of the pages section of the repository. For example, if you are creating a page about a plugin, you would go to _pages/plugins/. Note: if you need to create a new sub-directory, it can be specified in the file name below.
-
Click then from the drop-down:
-
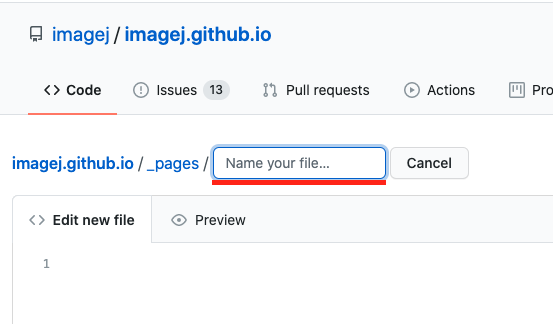
Add a name for your file. Note: this is not the page title; the page title will be applied in the next section, front matter. File names should be:
- all lower case
- use the file extension
.md - optionally prefixed with new sub-directory name(s), separated with
/ - avoid symbols and spaces, and separate words using dashes (
-):
Front matter
Every page begins with a block of front matter: a sequence of parameters that configure your page. Without the front matter, your page will not render correctly. The following table lists front matter fields you can use:
| Field | Purpose |
|---|---|
| title | The title of your page. (Required) |
| description | A short description of your page. Also used for the site’s search engine. When omitted, the first sentence of the page content is used. |
| section | Main menu section that should be open when this page first loads, if any. Nested sections to expand should be separated by colons (:). For example, this page’s section is Contribute:Editing the Wiki. |
| categories | For pages describing extensions (e.g. a plugin, script, or update site) of ImageJ: a comma-separated list of categories, enclosed in square brackets ([ and ]). Pages with categories appear in the List of extensions. For example, [Segmentation, Registration] would put your page in the Segmentation and Registration categories. |
| statbox* | A collection of individual fields that are used to populate the “Vital statistics” sidebar; see this comment for a list. Including at least one of these fields will cause the statbox to appear; otherwise, there will be no statbox for the page. (*note there is no field called “statbox”) |
| icon | A link (internal or external) to an icon that will be used for the page across the wiki, e.g. in the list of extensions or search bar results. |
| project | Used to identify project affiliation. See the list of available projects |
| nav-links | Adds a top navigation bar for related pages. See the Navigation guide for examples. |
Below is a minimal example front matter block. You can copy and paste this code into the editor of a new page (see above).
Replace My Awesome Page with the title for the new page.
---
title: My Awesome Page
---
Adding + editing page content
This section covers how to populate the content of your page.
Markdown
Markdown is plain-text syntax formatting, allowing you to easily and cleanly modify text with italics, bold, ordered or bulleted lists, etc. This wiki, as a Jekyll site, uses kramdown. A quick-reference can be found here, and a general Jekyll support reference here. Also helpful is GitHub Flavored Markdown (GFM) guide found here.
Text
Here are some common kinds of text formatting:
| Formatting | Markup |
|---|---|
| italic text | *italic text* |
| bold text | **bold text** |
| bold and italic text | ***bold and italic text*** |
fixed width text/code |
`fixed width text/code` |
~~struck-out text~~ |
|
| Hyperlink | [Hyperlink](https://example.com/) |
| red text | <span style="color: var(--fg-red)">red text</span> |
Note that the last example, colored text, is not really Markdown, but rather plain HTML. However, Markdown does not have a syntax for changing text color, and it supports mixing in HTML, so you can use the technique above if you need text in different colors.
Colors
Rather than hardcoding colors, it is better to use preset theme-sensitive color variables, as shown above. The following color presets achieve sufficient color contrast to meet accessibility standards:
- fg-red, fg-orange, fg-yellow, fg-lime, fg-green, fg-cyan, fg-light-blue, fg-blue, fg-purple, fg-magenta, fg-pink, fg-light-gray, fg-gray, fg-brown.
- bg-red, bg-orange, bg-yellow, bg-lime, bg-green, bg-cyan, bg-light-blue, bg-blue, bg-purple, bg-magenta, bg-pink, bg-light-gray, bg-gray, bg-brown.
Reference them using CSS’s var syntax. Example:
Code
<span style="color: var(--fg-blue);
background: var(--bg-red)">
→ blue on red ←</span>Result
→ blue on red ←
Images
Here are some common image uses:
| Image | Markup |
|---|---|
 |
|
{:width="64px"} |
Note that the last example includes inline styling, which is kramdown-specific.
Certain kinds of structures have dedicated pages of this guide:
- Images (using Liquid, not Markdown, for more complex image needs such as galleries, figures, etc…)
- Tables
- Math expressions
- Source code and syntax highlighting
- Footnotes
Liquid
On top of Markdown, the site uses a templating language called
Liquid to make page editing
more convenient than with Markdown alone. Liquid tags look
like {% ... %} or {{ ... }}. Many pages
on this site use Liquid to invoke functions called includes,
which enable insertion of images, figures, notices, and more.
(Think of this as: “I would like to include an image”.)
Here are a couple of examples:
| Markup | Result |
|---|---|
{% include icon name="imagej" %} |
|
{% include person id="rasband" %} |
Wayne Rasband |
Available includes
The following tables list all of this site’s general-purpose includes:
Citations and footnotes
| Include | Purpose |
|---|---|
| citation | Insert a citation |
| testimonial | Insert a personal quote |
Linking
| Include | Purpose |
|---|---|
| link-banner | Insert a large, obvious link |
| github | Link to a resource on GitHub |
| javadoc | Link to a javadoc resource |
| matlab | Link to MATLAB documentation |
| maven | Link to Maven artifacts |
| person | Link to a person’s user page |
| person-list | Link to a list of user pages |
| scholar | Link to an article on Google Scholar |
| wikipedia | Link to a Wikipedia page |
Symbols
| Include | Purpose |
|---|---|
| bc | Insert a menu breadcrumb |
| button | Insert a button |
| key | Insert a keyboard shortcut |
| icon | Insert an icon |
Media
| Include | Purpose |
|---|---|
| img | Insert an image |
| gallery | Insert an image gallery |
| video | Embed a video |
| spreadsheet | Embed a spreadsheet |
Notices
| Include | Purpose |
|---|---|
| notice | Insert an informational notice banner |
| aside | Float a right sidebar with commentary |
Source code
| Include | Purpose |
|---|---|
| code | Embed a code snippet from GitHub |
Miscellaneous
| Include | Purpose |
|---|---|
| quiz | Insert a Q&A with hidden answer |
| timeline | Insert a horizontal timeline |
| tooltip | Add a tooltip appearing on mouseover |
| echo | For debugging |
MARKED FOR REMOVAL
| Include | What needs to happen |
|---|---|
| thumbnail | Merge with img include |
| info-box | Delete after migrating to statbox |
| clear | Delete after purging all floats |
Finalizing your edits
Once you’re happy with your new page, click on the “Commit changes” button to save your work:
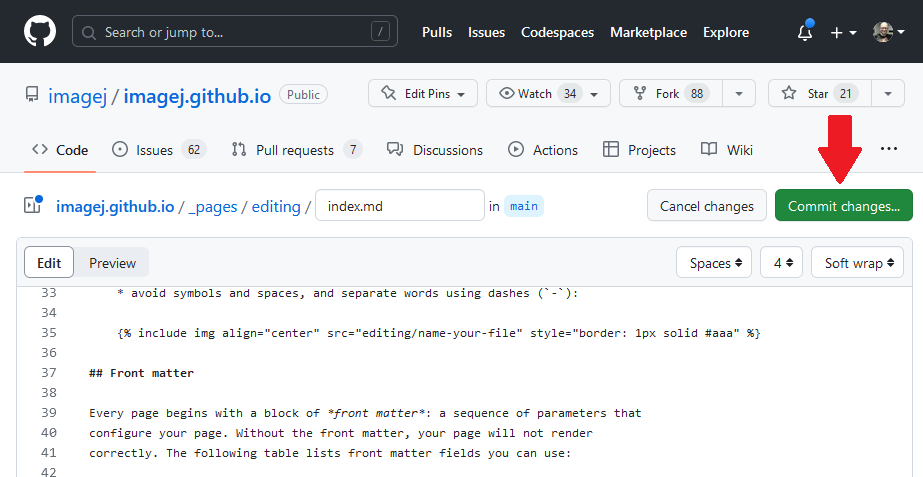
This will bring up a dialog where you can set the summary commit message, a more in-depth description of the changes, and verify the account used to make the changes.
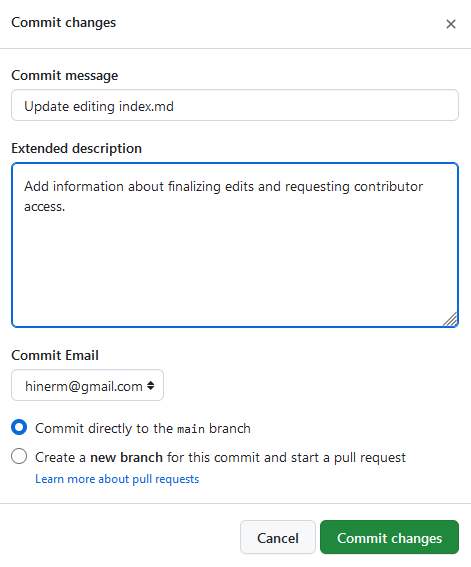
For most edits it makes sense to simply commit to the main branch directly. Just adding pages won’t break
anything. But if you are concerned you can always use the “branch and pull request” option. Just make sure to
assign or mention someone in the PR (pull request)! Otherwise we may not see it to merge it in a timely manner.
Good options for reviewer are Mark Hiner and Curtis Rueden.
If you aren’t sure what to write in your commit message, there are many guides out on the internet. You can even ask ChatGPT! Just don’t do this:

Once you are sufficiently happy with your message and click the “Commit changes” button, your edits will go onto the history of the site. This will trigger a rebuild of the site. Once that completes, your changes will show up on the live site! Thank you for your contribution!
Adding non-page files
If you need to add other types of files, you can use the “Upload files” option in the “Add files” button:
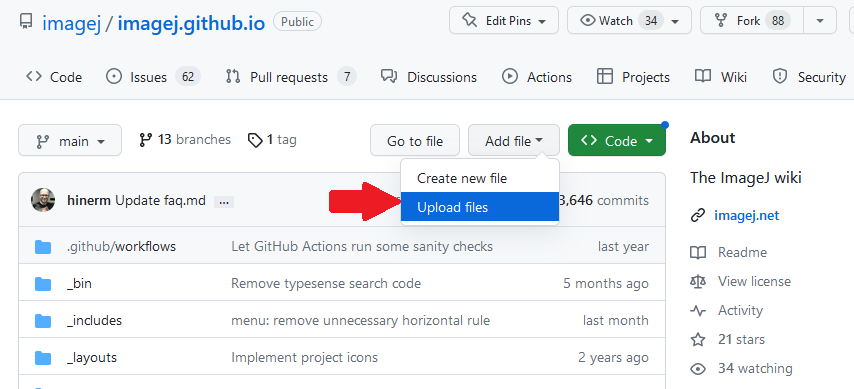
This will bring you to a drag-and-drop interface that allows you to create a new commit directly after you’ve uploaded your desired files.
If you want more control over the structure of the files you’re adding, it may be easier to go the Advanced Editing route. This also allows you to preview your changes before committing them.
FAQ
Why do I need to fork this repository to edit it?
If you go to edit a page and see this message, it means you are not listed as a collaborator in this repository.

Proceed with the forking as indicated (which creates a copy of the repository under your account, so that you can edit it). Make the edits you’d like to your fork, then submit a pull request. Upon completion of the pull request review you will be made a collaborator and can make future edits directly.