This page describes a detector module for TrackMate that relies on the Morphological Segmentation plugin shipped with the MorphoLibJ library. It is not included in the core of TrackMate and must be installed via its own update site.
Installation
We need to subscribe to both the MorphoLibJ library and the TrackMate-MorphoLibJ update sites.
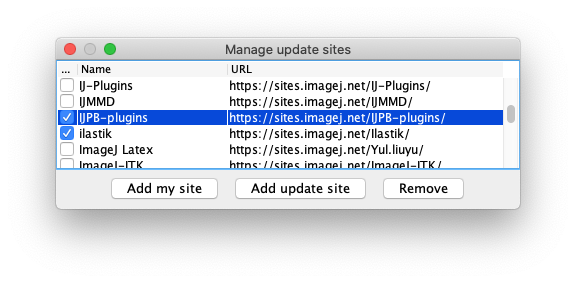
- First, subscribe to the IJPB-plugins update site, that contains the MorphoLibJ library:
- Then subscribe to the TrackMate-MorphoLibJ update site:

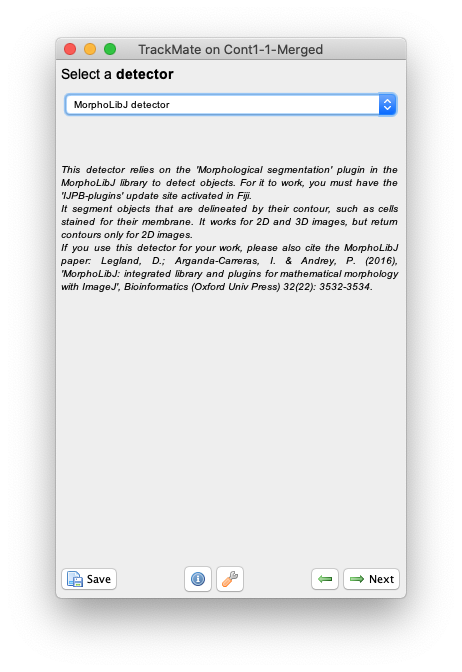
Relaunch Fiji. A new item should appear in the list of detectors in the 2nd panel of the TrackMate UI:
Usage
This detector module literally implements the Morphological Segmentation plugin. It will therefore have the same strengths and limitations. Also, it limits itself to dealing with Border images. That is: images in which the objects are labelled for their contours. For instance cells stained for their membranes. The best documentation for this segmentation tool is found on its dedicated page, but we will repeat the description of the key parameters in the tutorial below. One of the key advantage compared to using directly the plugin is that the TrackMate module version will properly process timelapses, while the core plugin treats everything as a Z-stack.
Tutorial: tracking cells in Xenopus tissue
Download the tutorial dataset from Zenodo.
![]()
It contains a movie of cells in a Xenopus tissue, imaged by and courtesy of Jakub Sedzinski (University of Copenhagen).
You will find two movies in the zip file: Cont1-1.tif and Cont1-1-Merged.tif.
The second one is simply a duplicate of the first one, but with a second channel contained a processed version of the raw image.
We will use this one for this tutorial.
- Lauch Fiji, and open the
Cont1-1-Merged.tiffile. Then launch TrackMate Plugins › Tracking › TrackMate.
- Click
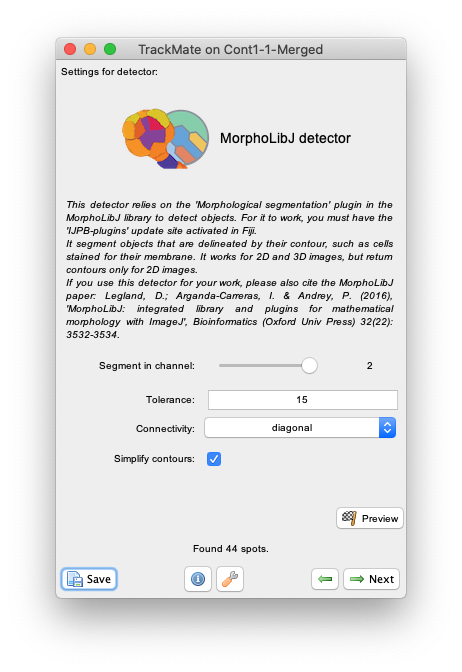
Nextand select theMorphLibJ detectorin the detector list (see the image above). ClickNextagain. - You now see the configuration panel for the detector.
-
Beyond the
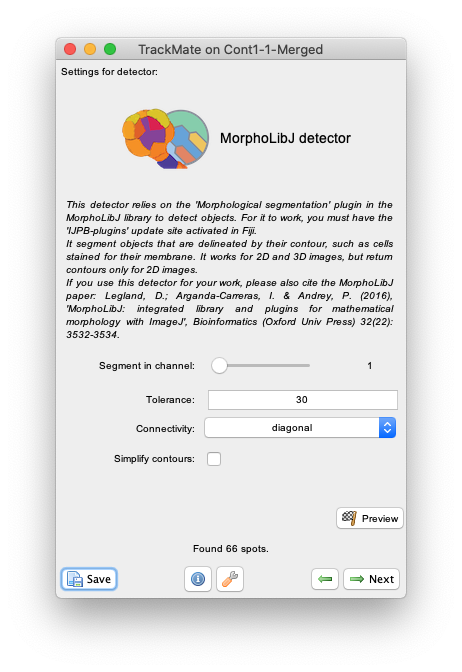
Segment in channelslider and theSimplify contourscheckbox that are specific to TrackMate, it offers to tune the two key parameters of the Morphological Segmentation plugin:-
The
Toleranceparameter. Copying from the plugin page: This is the dynamic of intensity for the search of regional minima (in the extended-minima transform, which is the regional minima of the H-minima transform, value of h). Increasing the tolerance value reduces the number of segments in the final result, while decreasing its value produces more object splits. Note: since the tolerance is an intensity parameter, it is sensitive to the input image type. A tolerance value of 10 is a good starting point for 8-bit images (with 0-255 intensity range) but it should be drastically increased when using image types with larger intensity ranges. For example to ~2000 when working on a 16-bit image (intensity values between 0 and 65535). -
The
Connectivityselector specifies the desired pixel connectivity.Diagonalspecifies the 8-connectivity (in 2D) andStraightspecifies the 4-connectivity. This parameter has a limited impact for large objects. Selecting non-diagonal connectivity (4 or 6) usually provides more rounded objects.
-
The Tolerance parameter is the one that matters the most.
If we play with some values on the first channel, you will see that we are kind of stuck in a not so nice place.
For large values of the tolerance, we end in missing some borders, fusing cells together.
For smaller values, we have the opposite effect and have many spurious small objects that appear.
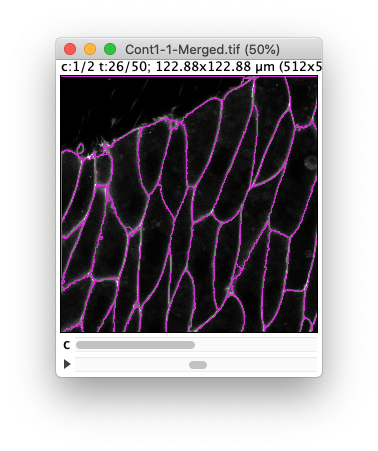
(Results of the preview with a tolerance of 30 and 10 respectively.) Ideally we want to find a value in between where there is not missed border and no spurious objects, but despite the high quality of this movie, this is not perfectly possible. (A value of 20 gives satisfactory results, but not through the whole movie).
Indeed, there is some noise in the image that negatively impacts the resulting segmentation.
A solution is to exploit the integration of TrackMate within Fiji to pre-process the movie to temper the effect of noise.
I have found out that a 3x3 median filter followed by a gaussian blue with σ=0.5 pixels gives satisfactory results with the least effort.
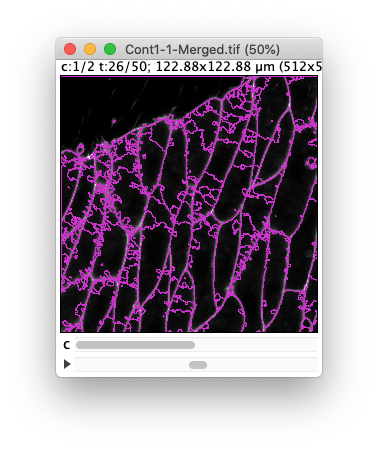
Because we want to go quick on this tutorial series, I have included the results on the preprocessing in the image we have been using in the second channel.
Therefore, simply set the Segment in channel slider to 2, use a tolerance value of 15 and select the Simplify contour checkbox.
Even with this our results are not 100% perfect.
We will have to discard some objects and tracks later.

-
Then click
Nextto let the processing of all frame proceed. In the end you should have about 2000 spots. -
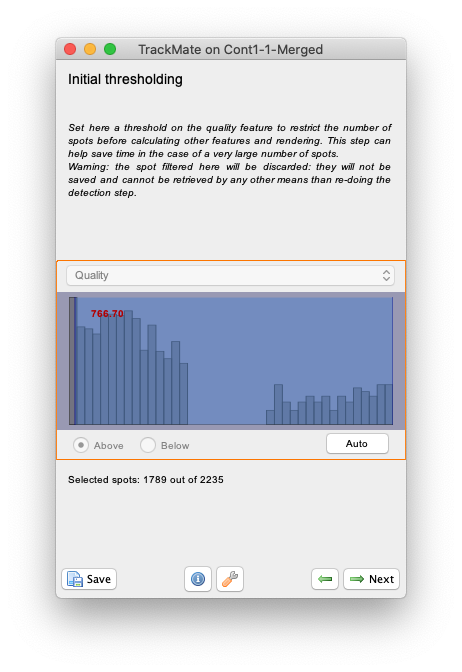
In the
Initial thresholdingpanel we can discard objects of low quality. For the MorphoMorphoLibJlibJ detector the object quality is simply the object area in pixels. So we can use this step to prune small objects resulting to catchment basins caused by remaining noise. Try to put the slider around 766 as below, which will leave about 1800 objects in the results.
- Then click
Next. TrackMate will first compute all the features of the retained objects, including morphological features. As our cells are relatively big this may take several seconds. - In many case, such as this one, you will have in all time-points a very large object corresponding to the background.
We want to filter it out so that it is not part of the tracking.
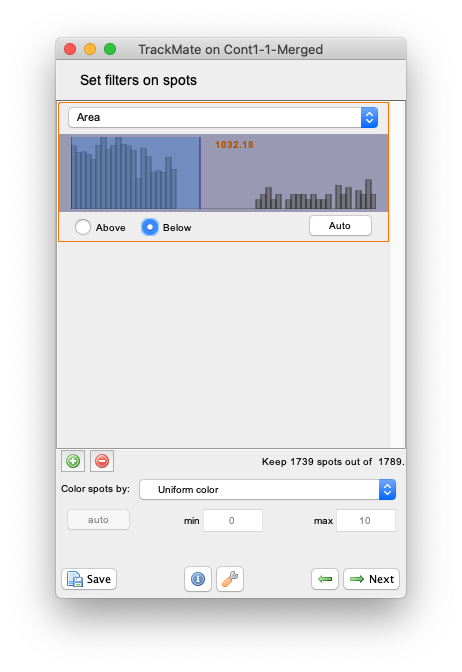
So in this panel, click on the greent
+button to add a filter, and in the filter panel that appear, chooseAreain the top list. The histogram of all the objects area appear. You can see that it is made of two parts well separated, one for small area around 500 µm² and a peak around 2000 µm². (Note that now the area is expressed in µm² and not in pixels as in the Initial thresholding panel.) The latter corresponds to the background objects, as you can check by setting the threshold line in between the two peaks. If the radio button below the histogram is set toAbove, TrackMate will hide all the smaller objects and only one object per frame should remain. We want to keep the smaller objects, so select theBelowradio button to hide the background objects.
- Click
Next. We need now to select a tracker. For this kind of large objects, that moves by less than their diameter, theOverlap trackeris will suited. Select it and clickNext. - The default parameter values are good enough in our case (
Precise,Min IoUof 0.3 andScale factorof 1), so clickNextdirectly. - We find 38 tracks with a quite large mean number of spots:
Starting tracking process.
Tracking done in 1.8 s.
Found 38 tracks.
  - avg size: 45.6 spots.
  - min size: 2 spots.
  - max size: 50 spots.
- Let’s skip filtering them and move on to the Display options panel, then to the Plot features panel.
We will inspect the tracking results and check what is the impact of the oversegmentation we had with our segmentation parameters.
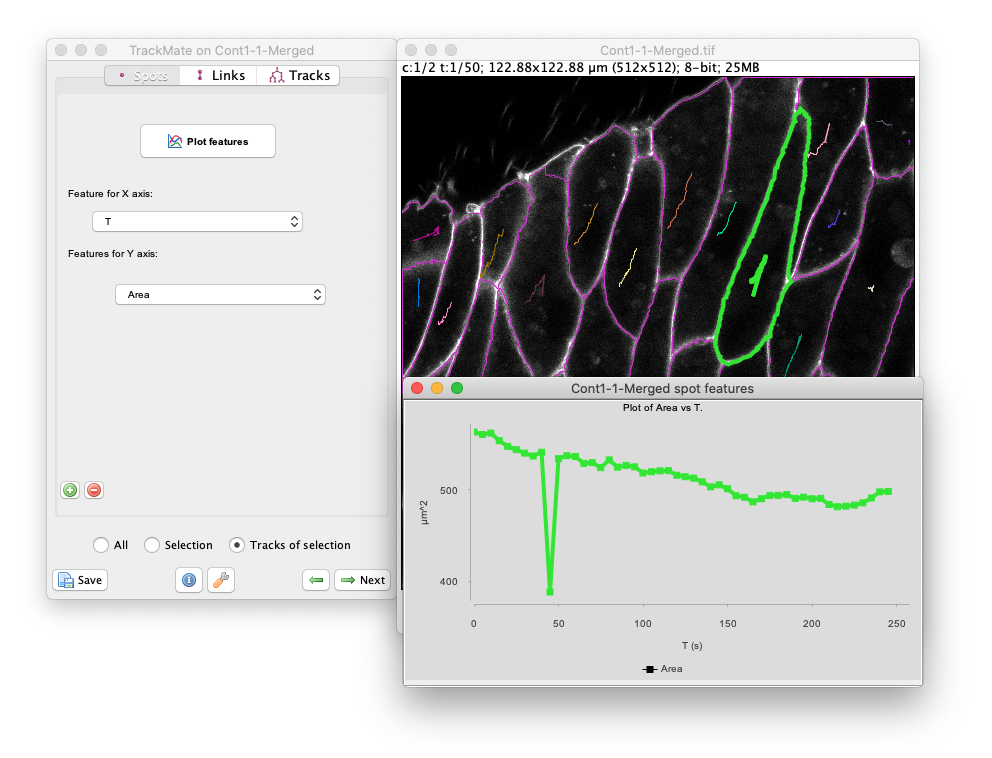
For instance, select the large object which is roughly 3rd starting from the top-right (see below).
At the farme 10, this cell was cut in two because of oversegmentation.
Let’s plot the resulting cell are over time.
- Make sure the
Spotspane is currently selected in the grapher panel. - Make sure that
Tis selected as a feature the X axis. - As feature for the Y axis, select
Area. - We don’t want to plot the values for all cells, just for the one we selected.
So at the bottom of the grapher panel, click on the
Track of selectionradio button. We see that around T=50s, the area drops brutally, showing that the corresponding object was cut in half at this time-point.
- Make sure the
A proper way to fix this would be to merge the two objects belonging to the same cell before tracking. But as of today TrackMate does not offer a way to do so, so we are left to post-processing results, or finding a pre-processing pipeline that gives a perfect segmentation.
But otherwise the few errors on this movie, the resulting segmentation is pleasing:
Here is how to generate this movie.
- Click the green left arrow key at the bottom of the TrackMate panel to move back to the
Display optionspanel. - Click on the
Edit settingsbutton in the top-right corner. The following display config panel shows up:
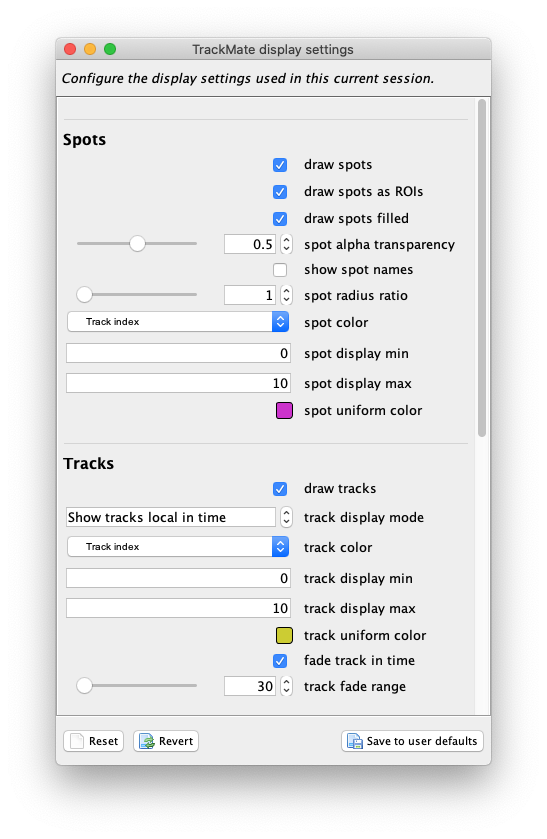

Let’s configure it as follow. From top to bottom:
- Select the
draw spot filledcheckbox so that in the overlay the objects are painted filled. - For
spot alpha transparency, put 0.5, so that we see the raw image by transparency. - In the
spot colorlist, selectTrack index, so that objects are colored by the track they belong to. - In the
track display mode, selectShow tracks local in time, so that we see tracks as a “dragon tail” backward and forward in time. - In
line thickness, put a value of 4, to stress the objects contour.
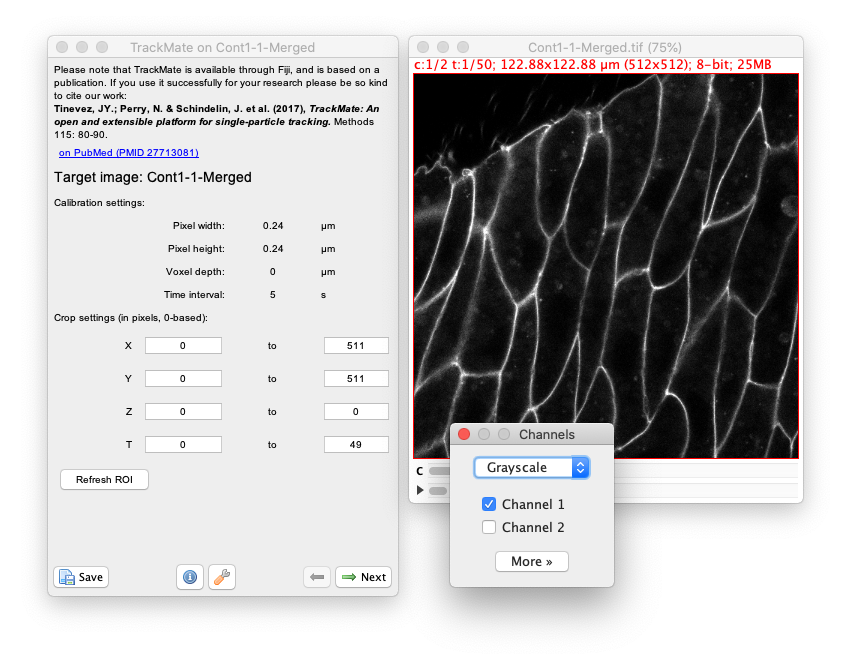
Now we also want to only display one channel in grayscale instead of the two channels in composite at once.
In the Fiji menu, show the channels tool dialog Image › Color › Channels Tool….
In the dialog that appears, select Grayscale and the Channel 1.
The image and TrackMate overlay should look like this:

- Close the TrackMate display settings panel.
- Now move back to the last panel of TrackMate, by clicking on the
Nextbutton two times in the TrackMate wizard. This should bring you to the Select an action panel. - Select the
Capture overlayaction and click theExecutebutton. - In the dialog that appears, click
OK. This will generate a new RGB movie that you can save to AVI for instance.
And that’s it for this tutorial.
Jean-Yves Tinevez August 2021