Please Note: This version of the software is outdated. We highly recommend using the new automated workflow. It is much more user friendly, efficient and versatile using full automation of the processing.
Latest release: May 2013
Introduction
Light sheet microscopy such as SPIM produces enormous amounts of data especially when used in long-term time-lapse mode. In order to view and in some cases analyze the data it is necessary to process them which involves registration of the views within time-points, correction of sample drift across the time-lapse registration, fusion of data into single 3d image per time-point which may require multiview deconvolution and 3d rendering of the fused volumes. Here we describe how to perform such processing in parallel on a cluster computer.
We will use data derived from the Lightsheet Z.1 a commercial realisation of SPIM offered by Zeiss. The Lightsheet Z.1 data can be truly massive and cluster computing may well be the only way to deal with the data deluge coming of the microscope.
Every cluster is different both in terms of the used hardware and the software running on it, particularly the scheduling system. Here we use a cluster computer at the MPI-CBG that consists of 44 nodes each with 12 Intel Xeon E5-2640 cores running @ 2.50 GHz and enjoying 128GB of memory. The cluster nodes have access to 200TB of data storage provided by a dedicated Lustre Server architecture. For more info on Lustre see here, suffice to say that it is optimised for high performance input/output (read/write) operations which is crucial for the SPIM data volumes.
Each node of this cluster runs CentOS 6.3 Linux distribution. The queuing system running on the MPI-CBG cluster is LSF - Load Sharing Facility. The basic principles of job submission are the same across queuing systems, but the exact syntax will of course differ.
Note on versions
The SPIM registration is a piece of software that undergoes ongoing development. The original version gathered under plugins SPIM registration has been replaced in 2014 by new set of plugins gathered under Multiview reconstruction. Moreover, the cluster pipeline has been changed to use a centralised Linux style master file. In 2015 this pipeline was reimplemented as automated workflow using the workflow manager Snakemake. Which allows to map and dispatch the workflow logic automatically either on a single maschine or on a HPC cluster. Therefore there are 4 versions available. We highly recommend using the latest version:
-
Original SPIM registration pipeline - contains the most detailed description of the cluster pipeline using SPIM registration plugins. If you do not have much HPC/Linux experience start here.
-
NEW PIPELINE - also uses SPIM registration plugins and introduces the master file, less verbose requiring some experience with command line and HPC.
-
New Multiview Reconstruction pipeline - builds on Multiview Reconstruction plugins, uses master file, written for experts
-
Automated workflow for parallel Multiview Reconstruction - automated workflow using the workflow manager Snakemake.
So, if you are new read a bit of the chapter 1 (original pipeline) to get familiar and then skip to chapter 3 (Multiview reconstruction pipeline) which is more up-to-date. To understand how the master file works refer to chapter 2 (NEW PIPELINE).
Original SPIM registration pipeline
Pre-requisites
Saving data on Lighsheet Z.1
The Lightsheet Z.1 data are saved into the proprietary Zeiss file format *.czi. Zeiss is working with Bio-Formats to make the .czi files compatible with Open Source platforms including Fiji. At the moment Fiji can only open .czi files that are saved as a single file per view where the left and right illumination images have been fused into one image inside the Zeiss ZEN software. This situation is going to change, for now, if you want to process the data with Fiji, save them in that way (TBD).
Getting familiar with Linux command line environment
It is very likely that the cluster computer does not run ANY Graphical User Interface and relies exclusively on the command line. Steering a cluster from the command line is fairly easy - I use about 10 different commands to do everything I need to do. Since the Linux command line may be unfamiliar to most biologists we start a separate Linux command line tutorial page that explains the bare essentials.
Transferring data
First we have to get the data to the cluster. This is easier said then done because we are potentially talking about terabytes of data. Moving data over 10Gb Ethernet is highly recommended otherwise the data transfer will take days.
Please note that currently the Zeiss processing computer does not support data transfer while the acquisition computer is acquiring which means that you need to include the transfer time when booking the instruments. Transferring 5TB of data over shared 1Gb network connection will take a while…
Installing Fiji on the cluster
In case you use the MPI-CBG cluster ‘madmax’ you might spare yourself some minutes and just hijack Pavel’s well maintained Fiji installation. Just skip the Fiji installation section and do not change the path to the Fiji executables (/sw/people/tomancak/packages/...) used in the example scripts shown below.)
Change to a directory where you have sufficient privileges to install software.
cd /sw/people/tomancak/packagesDownload Fiji nightly build from Fiji’s download page.
wget http://jenkins.imagej.net/job/Stable-Fiji/lastSuccessfulBuild/artifact/fiji-linux64.tar.gzor
curl -O http://jenkins.imagej.net/job/Stable-Fiji/lastSuccessfulBuild/artifact/fiji-linux64.tar.gzIn all likelihood you will need the Linux (64 bit) version (unless you are of course using some sort of Windows/Mac cluster). Unzip and unpack the tarball
gunzip fiji-linux64.tar.gz
tar -xvf fiji-linux64.tar
Change to the newly created Fiji-app directory and update Fiji from the command line
./ImageJ-linux64 --update updateThe output that follows may have some warnings and errors, but as long as it says somewhere “Done: Checksummer” and “Done: Downloading…” everything should be fine.
Done, you are ready to use Fiji on the cluster.
Renaming files
We need to change the file name from a simple index to a pattern that contains the time point and the angle information.
The output files of the Zeiss SPIM look like this:
cd /projects/tomancak_lightsheet/Christopher/29072013_HisRuby_Stock1
ls
29072013_HisRuby_Stock1.czi
29072013_HisRuby_Stock1(1).czi
29072013_HisRuby_Stock1(2).czi
29072013_HisRuby_Stock1(3).czi
29072013_HisRuby_Stock1(4).czi
...
In this example we have 5 angles. The files displayed show the first time point of this time series. The first file (does not contain a index) is the master file. This file would open all subsequent files in the Zeiss program, but also contains the first angle of the first time point. We need to give this file the index (0) in order to use it. Neglecting this file, will result in a frame shift in the data.
cd /projects/tomancak_lightsheet/Christopher/29072013_HisRuby_Stock1
ls
29072013_HisRuby_Stock1(0).czi
29072013_HisRuby_Stock1(1).czi
29072013_HisRuby_Stock1(2).czi
29072013_HisRuby_Stock1(3).czi
29072013_HisRuby_Stock1(4).czi
...
Now we can rename the files using the following shell script. Make a script with the name rename-zeis-files.sh Modify the angles, the last index and source pattern.
#num_angles=5
angles=( 320 32 104 176 248 )
#index
first_index=0
last_index=344

#timepoint
first_timepoint=1

#source_pattern
source_pattern=../29072013_HisRuby_Stock1\{index\}.czi
target_pattern=../spim_TL\{timepoint\}_Angle\{angle\}.czi

# --------------------------------------------------------

i=${first_index}
t=${first_timepoint}
while [ $i -le ${last_index} ]; do
#   a=1

#   while [ $a -le ${num_angles} ]; do
    for a in "${angles[@]}"; do
        source=${source_pattern/\{index\}/${i}}
        tmp=${target_pattern/\{timepoint\}/${t}}
        target=${tmp/\{angle\}/${a}}

        echo ${source} ${target}

        mv ${source} ${target}
        let i=i+1
    #   let a=a+1
    done
    let t=t+1
done

chmod a+x
./rename-zeiss_files.sh
The files should now be named like this:
cd /projects/tomancak_lightsheet/Christopher/29072013_HisRuby_Stock1
ls
spim_TL1_Angle32.czi
spim_TL1_Angle104.czi
spim_TL1_Angle176.czi
spim_TL1_Angle248.czi
spim_TL1_Angle320.czi
...
To check if all time points and angles of a time point are present, you can use the following script. Modify the time points and the number of angles.
#!/bin/bash

#timepoints
for i in `seq 1 72`
do

num=$(ls ../spim_TL"$i"_Angle*.czi |wc -l)

#number of angles
if [ $num  -ne 5 ]

then
echo "TL"$i" TP or angles missing"

fi

done
The script will return you the specific time points that are missing or the time points that have missing angles.
Saving data as tif
As a first step we will open the .czi files and save them as .tif. This is necessary because Fiji’s bead based registration currently cannot open the .czi files. Opening hundreds of files several GB each sequentially and re-saving them as tif may take a long time on a single computer. We will use the cluster to speed-up that operation significantly.
The Lustre filesystem on MPI-CBG cluster is made to be able to handle such situation, where hundreds of nodes are going to simultaneously read and write big files to it. If your cluster is using a Network File System (NFS) this may not be such a good idea…
We have an 240 time-point, 3 view dataset (angles 325, 235 and 280) in a directory
cd /projects/tomancak_lightsheet/Tassos/
ls -1
spim_TL1_Angle235.czi
spim_TL1_Angle280.czi
spim_TL1_Angle325.czi
spim_TL1_Angle235.czi
spim_TL1_Angle280.czi
spim_TL1_Angle325.czi
...
we create a subdirectory jobs/resaving and change to it
mkdir -p jobs/resaving
cd jobs/resaving
Now we create a bash script create-resaving-jobs that will generate the so called job files that will be submitted to the cluster nodes (I use nano but any editor will do. Using nano type nano create-resaving-jobs` and cut&paste the script from below into that file.)
#!/bin/bash
dir="/projects/tomancak_lightsheet/Tassos"
jobs="$dir/jobs/resaving"

mkdir -p $jobs

for i in `seq 1 240`
do
    job="$jobs/resave-$i.job"
        echo $job
        echo "#!/bin/bash" > "$job"
        echo "xvfb-run -a /sw/people/tomancak/packages/Fiji.app/ImageJ-linux64 \
             -Ddir=$dir -Dtimepoint=$i -Dangle=280 \
             -- --no-splash ${jobs}/resaving.bsh" >> "$job"
        chmod a+x "$job"
done
We customize the script by editing the parameters inside it. One can think of it as a template that is used as a starting point to adapt to the particular situation. For instance we can change the directory dir where the data are to be found, the place where the output will go jobs, the number of time-points to process for i in $(seq 1 240) and most importantly the angle to be processed -Dangle=280. The strategy we follow here is to create jobs to process one angle at a time for all available time-points.
In order to be able to run this (and other scripts we will create further below), you might have to execute the following command: chmod a+x create-resaving-jobs. Finally execute the script by calling ./create-resaving-jobs (you will have to be in the folder containing the script).
This will generate 240 resave-<number>.job files in the current directory
/projects/tomancak_lightsheet/Tassos/jobs/resaving/resave-1.job
/projects/tomancak_lightsheet/Tassos/jobs/resaving/resave-2.job
/projects/tomancak_lightsheet/Tassos/jobs/resaving/resave-3.job
...
/projects/tomancak_lightsheet/Tassos/jobs/resaving/resave-240.job
each one of those files looks like this
#!/bin/bash
xvfb-run -a /sw/people/tomancak/packages/Fiji.app/ImageJ-linux64
-Ddir=/projects/tomancak_lightsheet/Tassos
-Dtimepoint=38 -Dangle=280 -- --no-splash
 /projects/tomancak_lightsheet/Tassos/jobs/resaving/resaving.bsh
running this job a any cluster node will launch fiji in a so-called virtual frame buffer (the nodes don’t have graphics capabilities enabled but we can simulate that) and then inside Fiji it will launch a BeanShell script called resaving.bsh passing it thee parameters : the directory (/projects/tomancak_lightsheet/Tassos), the time-point (38) and the angle (280).
Lets create that script in the current directory
import ij.IJ;
import ij.ImagePlus;
import java.lang.Runtime;
import java.io.File;
import java.io.FilenameFilter;

runtime = Runtime.getRuntime();

dir = System.getProperty( "dir" );
timepoint = System.getProperty( "timepoint" );
angle = System.getProperty( "angle" );

IJ.run("Bio-Formats Importer", "open=" + dir + "spim_TL" + timepoint + "_Angle" + angle + ".czi" +
" autoscale color_mode=Default specify_range view=[Standard ImageJ] stack_order=Default
t_begin=1000 t_end=1000 t_step=1");
IJ.saveAs("Tiff ", dir + "spim_TL" + timepoint + "_Angle" + angle + ".tif");

/* shutdown */
runtime.exit(0);
The t_begin=1000 t_end=1000 are parameters passed to Bio-Formats Importer. This is a hack. The .czi files think that they are part of a long time-lapse despite the fact that they were saved as single, per angle .czi. In order to trick bioformats into opening just the timepoint which contains actual data we set the time coordinate way beyond the actual length of the time-course (in this case 240). This results in Bio-Formats importing the “last” timepoint in the series which contains the data. This will change!
Now we need to create yet another bash script (last one) called submit-jobs
#!/bin/bash

for file in `ls ${1} | grep ".job$"`
do
    bsub -q short -n 1 -R span[hosts=1] -o "out.%J" -e "err.%J" ${1}/$file
done
This will look into the current directory for all files ending with .job (we created them before) and submit all of them to the cluster with the bsub command.
bsub -q short -n 1 -R span[hosts=1] -o "out.123345" -e "err.123456" ./resave-1.job-q shortselects the queue to which the job will be submitted (this one allows jobs that run up to 4 hours on MPI-CBG cluster).-n 1specifies how many processors will the job request, in this case just one (we will only open and save one file)-R span[hosts=1]says that if we were requesting more than one processor, they would be on a single physical machine (host).-o "out.%J"will create output file calledout.<job_number>in the current directory-e "err.%J"will send errors to the file callederr.<job_number>in the current directory${1}/$filewill evaluate to./resave-<number>.jobi.e. the bash script that the cluster node will run - see above
Lets recapitulate. We have created create-resaving-jobs that, when executed, creates many resave-<number>.job files. Those are going to be submitted to the cluster using submit-jobs and on the cluster nodes will run resaving.bsh using Fiji and the specified parameters.
So let’s run it. We need to issue the following command
./submit-jobs .the dot at the end tells submit job where to look for .job files i.e. in the current directory. What you should see is something like this
[tomancak@madmax resaving]$ ./submit-jobs .
Job <445490> is submitted to queue <short>.
Job <445491> is submitted to queue <short>.
Job <445492> is submitted to queue <short>.
....
We can monitor running jobs with
bjobs -r
 JOBID   USER    STAT  QUEUE      FROM_HOST   EXEC_HOST   JOB_NAME   SUBMIT_TIME
 445490  tomanca RUN   short      madmax      n17         *ave-1.job May  1 11:36
 445491  tomanca RUN   short      madmax      n33         *ave-2.job May  1 11:36
 445492  tomanca RUN   short      madmax      n01         *ave-3.job May  1 11:36
 445493  tomanca RUN   short      madmax      n18         *ave-4.job May  1 11:36
 445494  tomanca RUN   short      madmax      n21         *ave-5.job May  1 11:36
or whatever your submission system offers. At the end of the run we will have a lot of err.<job_number> and out.<job_number> files in the working directory.
err.445490
out.445490
err.445491
out.445491
....
The err.* are hopefully empty. The out.* contain Fiji log output if any. In this case it should look something like this. Most importantly in the directory /projects/tomancak_lightsheet/Tassos we now have for each .czi file a corresponding .tif file which was the goal of the whole exercise
 ls *Angle280*
 spim_TL1_Angle280.czi
 spim_TL1_Angle280.tif
 spim_TL2_Angle280.czi
 spim_TL2_Angle280.tif
 spim_TL3_Angle280.czi
 spim_TL3_Angle280.tif
 ...
We can remove the .czi files (rm *.czi) as we do not need them anymore (but check some of the tifs first!).
Now we must repeat the whole procedure for the other two angles (325 and 235). Open create-resaving-jobs and change 280 to 325 and follow the recipe again. There are of course ways to automate that.
On our cluster powered by the Lustre filesystem the resaving operation takes only minutes. Imagine what is happening - up to 480 processors are accessing the file system reading .czi files and immediately resaving it to that very same filesystem as tif - all at the same time. The files are 1.8GB each. Beware: this may not work at all on lesser filesystems - the Lustre is made for this.
Registration
SPIM registration consists of within time-point registration of the views followed by across time-point registration of the time-series. Both are achieved using Fiji’s bead based SPIM registration plugin. The per-time-point registration is a pre-requisite for time-lapse registration. For detailed overview see here.
Bead-based multi-view registration
The first real step in the SPIMage processing pipeline, after re-saving as .tif, is to register the views within each timepoint. We will use for that the bead based registration plug-in in Fiji. The principle of the plug-in are described here while the parameters are discussed here.
This description focuses on cluster processing and is less verbose, for details see section on resaving as the principles are the same.
In a directory jobs/registration create bash script create-registration-jobs
#!/bin/bash
dir="/projects/tomancak_lightsheet/Tassos"
jobs="$dir/jobs/registration_integral_img"

mkdir -p $jobs

for i in `seq 1 240`
do
    job="$jobs/register-$i.job"
        echo $job
        echo "#!/bin/bash" > "$job"
        echo "xvfb-run -a /sw/people/tomancak/packages/Fiji.app/ImageJ-linux64 \
              -Ddir=$dir -Dtimepoint=$i -Dangles=325,280,235 \
              -- --no-splash ${jobs}/registration.bsh$
        chmod a+x "$job"
done
Run it to create 240 registration-<number>.job bash scripts
#!/bin/bash
xvfb-run -a /sw/people/tomancak/packages/Fiji.app/ImageJ-linux64
-Ddir=/projects/tomancak_lightsheet/Tassos -Dtimepoint=603
-Dangles=325,280,235,10,190 -- --no-splash
/projects/tomancak_lightsheet/Tassos/jobs/registration_integral_img/registration.bsh
which will run registration.bsh using Fiji
import ij.IJ;
import ij.ImagePlus;
import java.lang.Runtime;
import java.io.File;
import java.io.FilenameFilter;

runtime = Runtime.getRuntime();
System.out.println(runtime.availableProcessors() + " cores available for multi-threading");

dir = System.getProperty( "dir" );
timepoint = System.getProperty( "timepoint" );
angles = System.getProperty( "angles" );

IJ.run("Bead-based registration", "select_type_of_registration=Single-channel" + " " +
        "select_type_of_detection=[Difference-of-Mean (Integral image based)] " + " " +
        "spim_data_directory=" + dir + " " +
        "pattern_of_spim=spim_TL{t}_Angle{a}.tif" + " " +
        "timepoints_to_process=" + timepoint + " " +
        "angles_to_process=" + angles + " " +
        "bead_brightness=[Advanced ...]" + " " +
        "subpixel_localization=[3-dimensional quadratic fit (all detections)]" + " " +
        "specify_calibration_manually xy_resolution=1.000 z_resolution=3.934431791305542" + " " +
        "transformation_model=Affine" + " " +
        "channel_0_radius_1=2" + " " +
        "channel_0_radius_2=3" + " " +
        "channel_0_threshold=0.0069"
        );

/* shutdown */
runtime.exit(0);
on a cluster node when submitted by submit-jobs
#!/bin/bash

for file in `ls ${1} | grep ".job$"`
do
    bsub -q short -n 1 -R span[hosts=1] -o "out.%J" -e "err.%J" ${1}/$file
done
Some tips and tricks
- the bead based registration code is NOT multi-threaded, thus 1 processor is sufficient (
bsub -n 1) - the registration needs at least as much memory on the node to be able to simultaneously open all views (3x1.8GB here). Since our nodes have 128GB of shared memory it is not really an issue here, we can run registration using 12 cores on one machine at the same time.
- the crucial parameter for bead based registation is the
channel_0_threshold=0.0069; determine it on a local workstation using Fiji GUI. Clusters typically do not have graphical interface.
Time-lapse registration
Once the per-time-point registration is finished it is necessary to register all the time-points in the time-series to a reference time-point (to remove potential sample drift during imaging). The parameters for time series registration are described here.
The time-series registration is not really a cluster type of task as it is run on a single processor in a linear fashion. But since until now we have everything on the cluster filesystem it is useful to execute it here. Note: I do not mean that timelapse registration cannot be parallelized, we just have not implemented it because it runs fairly fast in the current, linear fashion.
It is a very bad idea to execute anything other then submitting jobs on a cluster head node. LSF offers a useful alternative - a special interactive queue allowing us to connect directly to a free node of the cluster and execute commands interactively.
bsub -q interactive -Is bash
Job <445547> is submitted to queue <interactive>.
<<Waiting for dispatch ...>>
<<Starting on n27>>
We are now on node 27 and can use the filesystem as if we were on the head node (not every queuing system will enable this).
We create a bash script timelapse.interactive
#!/bin/bash
xvfb-run -a /sw/people/tomancak/packages/Fiji.app/ImageJ-linux64 \
         -Ddir=/projects/tomancak_lightsheet/Tassos/ -Dtimepoint=1-240 \
         -Dangles=325,280,235 \
          -- --no-splash ./time-lapse.bsh
It calls time-lapse.bsh that will run fiji with the appropriate parameters for timelapse registration plug-in
import ij.IJ;
import java.lang.Runtime;

runtime = Runtime.getRuntime();
System.out.println(runtime.availableProcessors() + " cores available for multi-threading");

dir = System.getProperty( "dir" );
timepoint = System.getProperty( "timepoint" );
angles = System.getProperty( "angles" );

IJ.run("Bead-based registration", "select_type_of_registration=Single-channel" + " " +
        "select_type_of_detection=[Difference-of-Mean (Integral image based)]" + " " +
        "spim_data_directory=" + dir + " " +
        "pattern_of_spim=spim_TL{t}_Angle{a}.tif" + " " +
        "timepoints_to_process=" + timepoint + " " +
        "angles_to_process=" + angles + " " +
        "load_segmented_beads" + " " +
        "subpixel_localization=[3-dimensional quadratic fit (all detections)]" + " " +
        "specify_calibration_manually xy_resolution=1.000 z_resolution=3.934431791305542" + " " +
        "transformation_model=Affine" + " " +
        "channel_0_radius_1=2" + " " +
        "channel_0_radius_2=3" + " " +
        "channel_0_threshold=0.0098" + " " +
        "re-use_per_timepoint_registration" + " " +
        "timelapse_registration" + " " +
        "select_reference=[Manually (specify)]" + " " +
        "reference_timepoint=709"
        );

/* shutdown */
runtime.exit(0);
Executing the timelapse.interactive
./timelapse.interactivewill start a long stream of timelapse registration output. Its a good idea to redirect it to a file like this:
./timelapse.interactive > timelapse_reg.outWe can just as well run the timelapse registration from the head node by issuing
bsub -q short -n 1 -R span[hosts=1] -o "out.%J" -e "err.%J" ./timelapse.interactiveIn this case the output will go into out.<job_number> file in the working directory.
Tips and tricks
- The crucial parameter of timelapse registration is
reference_timepoint=709. It could be either a timepoint with low registration error or a timepoint in the middle of the time series. - It is important to specify the
z_resolutionintimelapse.bsh(specify_calibration_manually xy_resolution=1.000 z_resolution=3.934431791305542), otherwise the plugin will open every raw data file to read the metadata which can take quite long. - the
xy_resolutioncan be set to 1 since the plugin only uses the ratio between xy and z - For very long time-series where the sample potentially jumps in the field of view it may be necessary to register several segments of the series separately.
Fusion
In multi-view SPIM imaging fusion means combination of registered views into a single output image. Fiji currently implements two distinct fusion strategies: content based fusion and multi-view deconvolution. For detailed overview see SPIM registration page.
Content based multiview fusion
After registration we need to combine the views into a single output image. The content based fusion algorithm in Fiji solves that problem by evaluating local image entropy and weighing differentially the information in areas where several views overlap. For details see here.
As before we create a directory jobs/fusion and in there bash script create-fusion-jobs
#!/bin/bash
dir="/projects/tomancak_lightsheet/Tassos/"
jobs="$dir/jobs"

mkdir -p $jobs

for i in `seq 1 240`
do
    job="$jobs/fusion/fusion-$i.job"
        echo $job
        echo "#!/bin/bash" > "$job"
        echo "xvfb-run -a /sw/people/tomancak/packages/Fiji.app/ImageJ-linux64 \
              -Xms100g -Xmx100g -Ddir=$dir -Dtimepoint=$i -Dangles=325,280,235 \
              -Dreference=120 -Dx=0 -Dy=0 -Dz=0 -Dw=1936 -Dh=1860 -Dd=1868 \
              -- --no-splash /projects/tomancak_lightsheet/Tassos/jobs/fusion/fusion.bsh" \
              >> "$job"
        chmod a+x "$job"
done
that will generate many fusion-<number>.job scripts
#!/bin/bash
xvfb-run -a /sw/people/tomancak/packages/Fiji.app/ImageJ-linux64 -Xms100g -Xmx100g
-Ddir=/projects/tomancak_lightsheet/Tassos/ -Dtimepoint=10 -Dangles=325,280,235
-Dreference=120 -Dx=0 -Dy=0 -Dz=0 -Dw=1936 -Dh=1860 -Dd=1868 -- --no-splash
/projects/tomancak_lightsheet/Tassos/jobs/fusion/fusion.bsh
Each of these will run fusion.bsh
import ij.IJ;
import java.lang.Runtime;

runtime = Runtime.getRuntime();
System.out.println(runtime.availableProcessors() + " cores available for multi-threading");

dir = System.getProperty( "dir" );
timepoint = System.getProperty( "timepoint" );
angles = System.getProperty( "angles" );
reference = System.getProperty( "reference" );
x = System.getProperty( "x" );
y = System.getProperty( "y" );
z = System.getProperty( "z" );
w = System.getProperty( "w" );
h = System.getProperty( "h" );
d = System.getProperty( "d" );
iter = System.getProperty( "iter" );

IJ.run("Multi-view fusion", "select_channel=Single-channel" + " " +
"spim_data_directory=" + dir + " " +
"pattern_of_spim=spim_TL{t}_Angle{a}.tif timepoints_to_process=" + timepoint + " " +
"angles=" + angles + " " +
"fusion_method=[Fuse into a single image]" + " " +
"process_views_in_paralell=All" + " " +
"blending" + " " +
"content_based_weights_(fast," + " " +
"downsample_output=4" + " " +
"registration=[Time-point registration (reference=" + reference + ") of channel 0]" + " " +
"crop_output_image_offset_x=" + x + " " +
"crop_output_image_offset_y=" + y + " " +
"crop_output_image_offset_z=" + z + " " +
"crop_output_image_size_x=" + w + " " +
"crop_output_image_size_y=" + h + " " +
"crop_output_image_size_z=" + d + " " +
"fused_image_output=[Save 2d-slices, one directory per time-point]");

/* shutdown */
runtime.exit(0);
on a cluster node when submitted by submit-jobs
#!/bin/bash

for file in `ls ${1} | grep ".job$"`
do
    bsub -q short -n 12 -R span[hosts=1] -o "out.%J" -e "err.%J" ${1}/$file
done
Tips and tricks:
- Fusion is memory intensive no matter what.
- The content based fusion will necessarily degrade image quality. Thus it makes only sense to fuse the image for visualization purposes such as 3D rendering.
- It is not necessary or even possible to 3D render the full resolution data. Thus we use the
downsample_output=4option to make it 4 times smaller. - The downsampling also reduces the storage requirements for the fused data which can be unrealistic for full resolution data (tens of terabytes).
- The fusion code is multi-threaded, therefore we request 12 processors on one host
bsub -n 12 -R span[hosts=1]and request as much memory as possiblefiji-linux64 -Xms100g -Xmx100g. Requesting 12 hosts guarantees all the memory on a single node is available for the job (128GB). It may be difficult to get that when others are running small, single processor jobs on the cluster. - The integral image mediated weightening is much faster than the traditional gauss method, for large images it may be the only option as one can also run out of 128GB of RAM with this data.
Multiview deconvolution
Another, more advanced, way to fuse the registered data is multiview deconvolution which is described here.
The deconvolution can be executed either on the CPU (Central Processing Unit - i.e. the main processor of the computer) or on GPU (Graphical Processing Unit - i.e. the graphics card). The pre-requisite for the GPU processing is to have one or more graphics cards capable of CUDA such as NVIDIA Tesla or Quadro or GeForce. Since the GPU accelerated multi-view deconvolution is not yet published and the necessary C code has to be obtained from Stephan Preibisch by request we will focus for now on deconvolution using CPU.
The GPU mediated deconvolution is faster, but currently only by a factor of 2-3 and so the CPU version makes sense, especially when you have a big cluster of CPUs and no or few GPUs.
Multiview deconvolution on CPU
 200px
200px
In contrast to the multiview fusion plugin described above, Stephan Preibisch, in his infinite wisdom ;-), did not implement the option to scale down the data before deconvolution starts. Since deconvolution is a very expensive operation, it will take a very long time (hours) on full resolution data. If the sole purpose of fusing the data by deconvolution is to render them in 3D, the full resolution images are not necessary, ergo we need to downsample. Fortunately Stephan implemented a workaround in the form of a script that prepends a transformation (such as scaling) to the raw SPIM data.
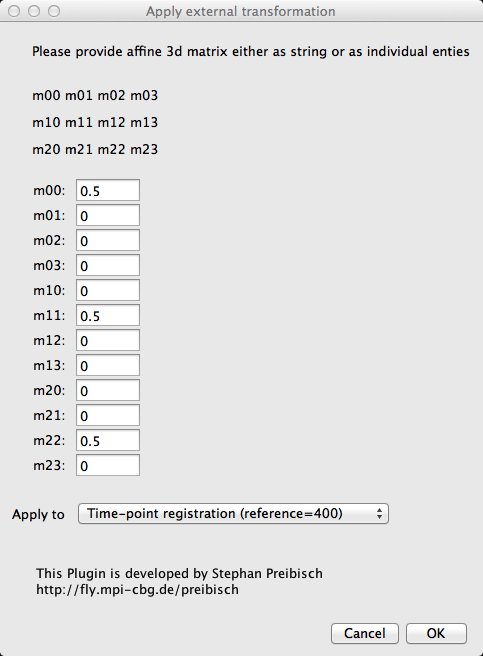
The script can be found under Plugins › SPIM registration › Utilities › Apply external transformation (or press L and type Apply external transformation). The initial dialog is reminiscent of SPIM registration, the screen that comes after that is not.
What we are looking at is the so called Affine Transformation Matrix that will be pre-concatenated to the transformation matrix in the registration files from bead based registration. The m00, m11 and m22 entries of the matrix represent the scaling of the image and so by setting all three of them to 0.5 we will downscale the image by a factor of 2.
The output of running the Apply external transformation will look like this:
Pre-concatenating model:
3d-affine: (0.5, 0.0, 0.0, 0.0, 0.0, 0.5, 0.0, 0.0, 0.0, 0.0, 0.5, 0.0)
Applying model to: spim_TL400_Angle1.tif.registration.to_400
Applying model to: spim_TL400_Angle2.tif.registration.to_400
Applying model to: spim_TL400_Angle3.tif.registration.to_400
Applying model to: spim_TL400_Angle4.tif.registration.to_400
Applying model to: spim_TL400_Angle5.tif.registration.to_400
Applying model to: spim_TL400_Angle6.tif.registration.to_400
and the registration files spim_TL400_Angle1.tif.registration.to_400 in the registration/ directory will now end with something like this:
Previous model: (0.996656, 0.0014411004, 0.003138572, -5.4490294, -0.0019162297, 0.9955152, -8.5441023E-4, -81.664116, -5.4249633E-4, -2.910602E-4, 0.9978538, 10.278229)
Pre-concatenated model: (0.5, 0.0, 0.0, 0.0, 0.0, 0.5, 0.0, 0.0, 0.0, 0.0, 0.5, 0.0)
Now this looks elegant, but there are several caveats. The pre-concatenation of transformation models is not reversible (or at least not easily in the current code framework) and so before applying external transformation we recommend to archive the old, unmodified registration files. For example by packaging them to a tar archive
tar -cvf all_to_400_regs.tar *.to_400and decompressing in order to get to the original, unaltered transformation models
tar -xvf all_to_400_regs.tarSecond issue, AND IMPORTANT ONE. The new transformation (scaling) must be applied to every timepoint in the registered time-series INCLUDING the reference time-point. For good measure, it is also necessary to apply the transformation to the original non-time-series .registration files of the reference time-point ONLY. Don’t ask me why… These two steps (pre-concatenating transformation models to reference time point just once) are really not clusterizable and so we recommend to do them manually in Fiji on a local machine and copy the modified registration files to the registration/ directory on the cluster. Yes, it is clunky, but its better than nothing.
Now we are ready for the cluster mediated deconvolution on the downscaled data. By now you should know the drill… Create a directory jobs/deconvolution and in there a bash script create-deconvolution-jobs
#!/bin/bash
dir="/projects/tomancak_lightsheet/Tassos"
jobs="$dir/jobs/deconvolution"

mkdir -p $jobs

for i in `seq 1 240`
do
    job="$jobs/deconvolution-$i.job"
        echo $job
        echo "#!/bin/bash" > "$job"
        echo "xvfb-run -a /sw/people/tomancak/packages/Fiji.app/ImageJ-linux64 \
      -Xms100g -Xmx100g -Ddir=$dir -Dtimepoint=$i -Dangles=1-6 -Dreference=714 \
      -Dx=36 -Dy=168 -Dz=282 -Dw=1824 -Dh=834 -Dd=810 -Diter=10 \
      -- --no-splash /projects/tomancak_lightsheet/Tassos/jobs/deconvolution/deconvolution.bsh" \
      >> "$job"
        chmod a+x "$job"
done
that will generate many deconvolution-<number>.job scripts
#!/bin/bash
xvfb-run -a /sw/people/tomancak/packages/Fiji.app/ImageJ-linux64 -Xms100g -Xmx100g
-Ddir=/projects/tomancak_lightsheet/Valia/Valia -Dtimepoint=1 -Dangles=1-6 -Dreference=714
-Dx=36 -Dy=168 -Dz=282 -Dw=1824 -Dh=834 -Dd=810 -Diter=10 -- --no-splash
/projects/tomancak_lightsheet/Tassos/jobs/deconvolution/deconvolution.bsh
Note the new parameter iter which specifies how many iterations of the multiview deconvolution we want to run. This should be determined empirically on a local GUI Fiji set-up.
Each of the *deconvolution-
import ij.IJ;
import java.lang.Runtime;

fiji.plugin.Multi_View_Deconvolution.psfSize = 31;
fiji.plugin.Multi_View_Deconvolution.isotropic = true;

runtime = Runtime.getRuntime();
System.out.println(runtime.availableProcessors() + " cores available for multi-threading");

dir = System.getProperty( "dir" );
timepoint = System.getProperty( "timepoint" );
angles = System.getProperty( "angles" );
reference = System.getProperty( "reference" );
x = System.getProperty( "x" );
y = System.getProperty( "y" );
z = System.getProperty( "z" );
w = System.getProperty( "w" );
h = System.getProperty( "h" );
d = System.getProperty( "d" );
iter = System.getProperty( "iter" );

//First we pre-concatenate a transformation matrix that downscales the image by a factor of 2,
//comment the following macro command out if you want to deconvolve full resolution data.

IJ.run("Apply external transformation",
    "spim_data_directory=" + dir + " " +
    "pattern_of_spim=spim_TL{t}_Angle{a}.tif" + " " +
    "timepoints_to_process=" + timepoint + " " +
    "angles=" + angles + " " +
    "how_to_provide_affine_matrix=[As individual entries]" +  " " +
    "m00=0.5 m01=0 m02=0 m03=0 m10=0 m11=0.5 m12=0 m13=0 m20=0 m21=0 m22=0.5 m23=0" +  " " +
    "apply_to=[Time-point registration (reference=" + reference + ")]");

IJ.run("Multi-view deconvolution", "spim_data_directory=" + dir + " " +
    "pattern_of_spim=spim_TL{t}_Angle{a}.tif" + " " +
    "timepoints_to_process=" + timepoint + " " +
    "angles=" + angles + " " +
    "registration=[Time-point registration (reference=" + reference + ") of channel 0]" + " " +
    "crop_output_image_offset_x=" + x + " " +
    "crop_output_image_offset_y=" + y + " " +
    "crop_output_image_offset_z=" + z + " " +
    "crop_output_image_size_x=" + w + " " +
    "crop_output_image_size_y=" + h + " " +
    "crop_output_image_size_z=" + d + " " +
    "type_of_iteration=[Conditional Probability (fast, precise)]" + " " +
    "number_of_iterations=" + iter + " " +
    "use_tikhonov_regularization tikhonov_parameter=0.0060" + " " +
    "imglib_container=[Array container]" + " " +
    "compute=[in 512x512x512 blocks]" + " " +
//  "blocksize_x=1024 blocksize_y=1024 blocksize_z=1024" + " " +
    "compute_on=[CPU (Java)]" + " " +
    "fused_image_output=[Save 2d-slices, one directory per time-point]"
    );

/* shutdown */
runtime.exit(0);
Stuff that matters here are the following parameters:
number_of_iterations=10specifies the number of iterations (10 is a good guess)compute_on=[CPU (Java)]here we indicate that we want to use CPUcompute=[in 512x512x512 blocks]most likely we will have to compute in blocks unless we have really a lot of memory available.fiji.plugin.Multi_View_Deconvolution.psfSize = 31;this parameter should be considered advanced for now, it specifies the size of the area used to extract the Point Spread Function (PSF) from the beads in the image. Default is 19.
otherwise the parameters are similar to content based fusion or constants.
on a cluster node when submitted by submit-jobs
#!/bin/bash

for file in `ls ${1} | grep ".job$"`
do
    bsub -q medium -n 12 -R span[hosts=1] -o "out.%J" -e "err.%J" ${1}/$file
done
Tips and tricks:
- Multiview deconvolution needs as much memory as possible.
- The memory requirements can be mitigated by using smaller blocks and the processing will take longer.
- The output deconvolved image will have extremely compressed dynamic range, i.e. will look pitch black upon opening. Set the min and max to 0.0 and 0.05 to see anything.
- The PSFs of the beads will become smaller (ideally points) but brighter.
- The image will appear much more noisy compared to content fused or raw data.
- The deconvolution.bsh script by default downscales the images before deconvolution commences. If you want to do that do not forget to first downscale manually the reference time-point (as described - both the original and the timelapse registration versions), use it to define the crop area on a local machine and transfer the
.registrationand.registration.to_<reference timepoint>files FOR THE REFERENCE TIME-POINT to the cluster. - In fact it is best to perform the entire deconvolution process of the reference time-point locally and transfer the results to the cluster. First of all its good to experiment with the number of iterations and to look at what the deconvolution does to the data. Second, since on the cluster we are applying the downscaling to ALL the time-points - this includes the reference to which we applied the transformation on our local machine (see tip above). Therefore the reference time-point ends up downscaled twice. If you don’t get it - call me ;-).
- In order to deconvolve full resolution data, no need to do the previous step however the pre-concatenation macro MUST BE commented out in the deconvolution script. Otherwise things will get really weird!
Multiview deconvolution on GPU
Coming soon.
3D rendering
Finally we want generate a beautiful 3D rendering of the downsampled, fused data and run it as movies at conferences… ;-).
The preparation phase of 3D rendering is a bit more complicated. We will use the interactive Stack Rotation plugin to position the specimen the way we want to render it and then send it to 3DViewer plugin. Here is the recipe:
-
Open fused image stack and launch Interactive Stack Rotation plugin (Plugins › Transform › Interactive Stack Rotation). Note: Familiarize yourself with the keystrokes that navigate the Interactive Stack Rotation. This is an extremely powerful way of looking at nearly isotropic 3D data coming from SPIM. More advanced version honoring these keystroke conventions is coming to Fiji soon (by Tobias Pietzsch).
-
Use the key commands to rotate the specimen into the position from which you want to 3D render it. Note that the top slice with the lower z-index will be facing towards you when rendering in 3d Viewer.
-
Record the transform by pressing E. The transformation matrix will appear in the Fiji log window.
-
Copy the transform into the
render.bshscript shown below into line 41 (read the comments if unsure). -
Press ↵ Enter to apply the transformation to the stack.
-
Now use the rectangle tool to define a crop area that will include the specimen with minimal background. Write down the x,ycoordinates width and height of the crop area and paste them into the
render.bshscript (line 128). Note: A more efficient way to capture the numbers is to start macro record before and simply copy and paste them from the macro recorder window. -
Apply crop (Image › Crop).
-
Determine the z-index where the specimen starts and ends and paste them into the render.bsh script (line 131).
-
Run Duplicate command (Image › Duplicate) and enter the z-index as range (for example 20-200). A tightly cropped specimen stack should be the result of this series of operations.
-
Adjust brightness and contrast on the stack to see the data well, perhaps slightly saturating and write the min and max into the render.bsh script (line 31).
-
Launch the 3d Viewer and experiment with threshold (3d Viewer then Edit › Adjust Threshold) and transparency (3DViewer then Edit › Change Transparency) and enter them into the render.bsh script (lines 154 and 156).
-
Finally modify the dimensions of the Snapshot that the 3D VIewer takes to match the dimensions of the crop area (width and height) on line 161.
We are ready to begin the cluster processing by creating our old friend, the create-render-job bash script in a directory jobs/3d_rendering
#!/bin/bash
dir="/projects/tomancak_lightsheet/Tassos/"
jobs="$dir/jobs"

mkdir -p $jobs

for i in `seq 1 241`
do
    job="$jobs/3d_rendering/render-$i.job"
    echo $job
    echo "#!/bin/bash" > "$job"
    echo "xvfb-run -as\"-screen 0 1280x1024x24\" \
             /sw/people/tomancak/packages/Fiji.app/ImageJ-linux64 \
             -Xms20g -Xmx20g -Ddir=$dir -Dtimepoint=$i -Dangle=1  \
             -- --no-splash $dir/jobs/3d_rendering/render.bsh" >> "$job"
    chmod a+x "$job"
done
who will create render-<number>.job
#!/bin/bash
xvfb-run -as"-screen 0 1280x1024x24" /sw/people/tomancak/packages/Fiji.app/ImageJ-linux64 -Xms20g -Xmx20g -Ddir=/projects/tomancak_lightsheet/Tassos \
  -Dtimepoint=1 -Dangle=1  -- --no-splash /projects/tomancak_lightsheet/Tassos/jobs/3d_rendering/render.bsh
Each bash script is passing a directory, timepoint and rendering angle parameters to render.bsh BeanShell script. The script is little more complicated than before. It combines Saalfeld’s BeanShell magic with my clumsy macro programming. It is necessary to change the parameters inside the script according to the recipe above for each individual rendering run.
import java.lang.Runtime;
import ij.ImagePlus;
import ij.ImageStack;
import ij.process.ImageProcessor;
import ij.IJ;
import ij.measure.Calibration;
import mpicbg.ij.stack.InverseTransformMapping;
import mpicbg.models.TranslationModel3D;
import mpicbg.models.AffineModel3D;
import mpicbg.models.InverseCoordinateTransformList;

runtime = Runtime.getRuntime();

dir = System.getProperty("dir");
timepoint = System.getProperty( "timepoint" );
angle = System.getProperty("angle");

System.out.println("Opening");
System.out.println(dir);
System.out.println(timepoint);

/*MACRO*/

/* opening the fused image stack*/
IJ.run("Image Sequence...", "open=" + dir + "/output_fusion/" + " " +
        "number=809 starting=1 increment=1 scale=100" + " " +
        "file=img_tl" + timepoint + "_" + " " +
        "or=[] sort");

/*  !!!!!!!!!! Adjust the min and max of the input image  !!!!!!!!!! */
ij.IJ.setMinAndMax(200, 600);

/* down scale if necessary with macro */
System.out.println("Scaling");
IJ.run("Scale...", "x=0.5 y=0.5 z=0.5 depth=405 interpolation=Bilinear average process create title=scaled");

System.out.println("Rotating");

/* !!!!!!!!!! paste the 3d transform matrix from Interactive Stack Rotation here. Remove any text, only numbers that must begin and end with curly brackets !!!!!!!!!! */
am = new float[]{
        0.97536975, -0.14100166, 0.16962992, 0.0, -0.18503368, -0.9416376, 0.28122446, 0.0, 0.12007594, -0.30568472, -0.9445343, 0.0};

imp = IJ.getImage();

System.out.println(imp);

/* un-scale */
c = imp.getCalibration();
zFactor = (float)(c.pixelDepth / c.pixelWidth);
unScale = new AffineModel3D();
unScale.set(
        1.0f, 0.0f, 0.0f, 0.0f,
        0.0f, 1.0f, 0.0f, 0.0f,
        0.0f, 0.0f, zFactor, 0.0f);

/* center shift */
centerShift = new TranslationModel3D();
centerShift.set(-imp.getWidth() / 2, -imp.getHeight() / 2, -imp.getStack().getSize() / 2 * zFactor);

/* center un-shift */
centerUnShift = new TranslationModel3D();
centerUnShift.set(imp.getWidth() / 2, imp.getHeight() / 2, imp.getStack().getSize() / 2 * zFactor);

/* rotation */
rotation = new AffineModel3D();
rotation.set(
        am[0], am[1], am[2], am[3],
        am[4], am[5], am[6], am[7],
        am[8], am[9], am[10], am[11]);

transform = new AffineModel3D();
transform.preConcatenate(unScale);
transform.preConcatenate(centerShift);
transform.preConcatenate(rotation);
transform.preConcatenate(centerUnShift);


/* bounding volume */
min = new float[]{0, 0, 0};
max = new float[]{imp.getWidth(), imp.getHeight(), imp.getStack().getSize()};
transform.estimateBounds(min, max);
w = (int)Math.ceil(max[0] - min[0]);
h = (int)Math.ceil(max[1] - min[1]);
d = (int)Math.ceil(max[2] - min[2]);

/* bounding volume offset */
minShift = new TranslationModel3D();
minShift.set(-min[0], -min[1], -min[2]);
transform.preConcatenate(minShift);

/* render target stack */
mapping = new InverseTransformMapping(transform);

ip = imp.getStack().getProcessor(1).createProcessor(imp.getWidth(), imp.getHeight());

System.out.println(ip);

targetStack = new ImageStack(w, h);

for (s = 0; s < d; ++s) {
        ip = ip.createProcessor(w, h);
        mapping.setSlice(s);
        try {
                mapping.mapInterpolated(imp.getStack(), ip);
        }
        catch (Exception e)        {
                e.printStackTrace();
        }
        targetStack.addSlice("", ip);
}

/* set proper calibration (it's isotropic at the former x,y-scale now) */
impTarget = new ImagePlus("target", targetStack);


System.out.println(impTarget);

calibration = imp.getCalibration().copy();
calibration.pixelDepth = calibration.pixelWidth;
impTarget.setCalibration(calibration);
impTarget.show();

/* MACRO */
System.out.println("Cropping");

IJ.run("Select Bounding Box");
/*  !!!!!!!!!!  Enter the x,y, width and height of the crop area. When working with up/downsampled images multiply or divide the numbers accordingly !!!!!!!!!! */
ij.IJ.makeRectangle(24, 170, 960, 362);
IJ.run("Crop");
/*  !!!!!!!!!!  Enter the z-index where the specimen starts and ends. When working with up/downsampled images multiply or divide the numbers accordingly !!!!!!!!!! */
IJ.run("Duplicate...", "duplicate range=146-480");

impdupl = IJ.getImage();   // catch the new window - who knows why....
impdupl.show();

IJ.run("8-bit");
IJ.run("Add...", "value=1 stack");   // because 3d viewer will re-scale the bounding box

System.out.println("Rendering");

IJ.run("3D Viewer");
ij.IJ.wait(1000);

ij3d.ImageJ3DViewer.setCoordinateSystem("false");
ij3d.ImageJ3DViewer.add("target-1", "None", "target-1", "0", "true", "true", "true", "1", "0");
ij.IJ.wait(1000);

ij3d.ImageJ3DViewer.select("target-1");
ij.IJ.wait(1000);
ij3d.ImageJ3DViewer.setTransform("1.0 0.0 0.0 0.0 0.0 1.0 0.0 0.0 0.0 0.0 1.0 -1050.0 0.0 0.0 0.0 1.0");
ij.IJ.wait(5000);

/*  !!!!!!!!!!  Enter the 3D Viewer threshold !!!!!!!!!! */
ij3d.ImageJ3DViewer.setThreshold("50");
/*  !!!!!!!!!!  Enter the 3D Viewer transparency !!!!!!!!!! */
ij3d.ImageJ3DViewer.setTransparency("0.15");
ij.IJ.wait(5000);

ij3d.ImageJ3DViewer.select("Dummy");
/*  !!!!!!!!!!  Enter the width and height of the crop area. !!!!!!!!!! */
ij3d.ImageJ3DViewer.snapshot("961", "356");

IJ.selectWindow("Snapshot");
IJ.saveAs("Tiff", dir + "/rendering/render_tp" + timepoint + "_Angle" + angle + ".tif");

/* shutdown */
runtime.exit(0);
We submit is as usual using ./submit-jobs .
#!/bin/bash

for file in `ls ${1} | grep ".job$"`
do
    bsub -q short -n 1 -R span[hosts=1] -o "out.%J" -e "err.%J" ${1}/$file
done
Tips and tricks
- This approach to making 3D rendering movies is still a hack, although its better than pure macro and TransformJ. We are working on a better solution.
- We are using an interplay of Interactive Stack Rotation to pre-process the image by rotating it to the desired position and then calling 3dVIewer to render it at that position while zooming in a bit.
- You can also use the TransformJ commands to rotate your fused stack to the orientation you like, possibly crop it if its too big and then open it in 3dViewer. Recording this as a macro and making it work (ala Stephan Preibisch) is possible, but it is incredibly laborious and nerve wracking.
- Whoever wants to rewrite the macro parts of
render.bshinto a real script is VERY welcome. - Even better would be, obviously, to pass the transformation matrix to the 3D Viewer, but it proved unreliable.
- The key to making it work on a cluster is to provide specific parameters about screen size to the
xvfb-runscript (-as"-screen 0 1280x1024x24"). Otherwise it doesn’t work. Thanks to Stephan Saalfeld for figuring it out. - The cluster makes it fairly easy to experiment with parameters and angles of view - on a single computer the same task would take days and since we are using ImageJ macro you would not be able to touch the computer. MPI-CBG cluster renders 800+ timepoints in half an hour even under full load from other users.
The 3D rendering is relatively complex (we are working on a simpler solution) but extremely rewarding. Drosophila embryogenesis movie coming soon here.
Processing 2 channels
This part will deal with the processing of SPIM data with 2 channels. The registration and fusion works very similar and needs only a few adjustments to the scripts above, which I will point out specifically. There are 2 main differences:
-
The Zeiss SPIM currently does not allow to export individual channels when acquiring 2 channels in fast frame mode. Thus we need to split the channels and save them as separate .tif files. When using the sequential mode you can skip this step.
-
In our case only 1 channel will have beads visible. Thus we will perform the registration only on this channel. The fusion program however, requires that registration files are present for both channels. To work around that, we will just duplicate the registration files from the channel that contains the beads.
Separating the channels
Rename and save the data as .tif following the steps described above. The data should be present now in the following format:
cd /projects/tomancak_lightsheet/Christopher/29072013_HisRuby_Stock1
ls
spim_TL1_Angle32.tif
spim_TL1_Angle104.tif
spim_TL1_Angle176.tif
spim_TL1_Angle248.tif
spim_TL1_Angle320.tif
...
Each file contains 2 channels, which we need to split into individual files before we can proceed. We will save the individual channels into a new subdirectory:
mkdir splitTo separate the channels we create a bash script create-split-jobs. Save this script in a new subdirectory in the jobs directory.
mkdir jobs/split_channels
cd jobs/split_channels
The creat-split-jobs will create the jobs that will be send to the cluster. You will need to edit the directory, the number of time points and the angles.
#!/bin/bash

#path of the directory where to find the files
dir="/projects/tomancak_lightsheet/Christopher/29072013_HisRuby_Stock1/"

#path where to find the job script
jobs="$dir/jobs/split_channels"

mkdir -p $jobs

#modify the number of time points
for i in `seq 1 72`

do

#modify the angles
for a in 32 104 176 248 320

do
            job="$jobs/split-$i-$a.job"
                echo $job
                echo "#!/bin/bash" > "$job"
                echo "xvfb-run -a /sw/people/tomancak/packages/Fiji.app/ImageJ-linux64 \
                     -Ddir=$dir -Dtimepoint=$i -Dangle=$a \
                     -- --no-splash ${jobs}/split.bsh" >> "$job"
                chmod a+x "$job"
        done
done
Run this script:
./create-split-jobsThe creat-split-jobs will use the split.bsh (written by Stephan Saalfeld). This script will split each file into individual channels and will save them into the directory split.
import ij.IJ;
import ij.ImagePlus;
import ij.ImageStack;
import java.lang.Runtime;
import java.io.File;
import java.io.FilenameFilter;


runtime = Runtime.getRuntime();

dir = System.getProperty( "dir" );
timepoint = System.getProperty( "timepoint" );
angle = System.getProperty( "angle" );

//open image

System.out.println( dir );
imp = new ImagePlus( dir + "spim_TL" + timepoint + "_Angle" + angle + ".tif" );
System.out.println( imp.getTitle() );

/* split channels */
stack = imp.getStack();
for ( c = 0; c < imp.getNChannels(); ++c )
{
    channelStack = new ImageStack( imp.getWidth(), imp.getHeight() );
    for ( z = 0; z < imp.getNSlices(); ++z )
        channelStack.addSlice(
            "",
            stack.getProcessor(
                imp.getStackIndex( c + 1, z + 1, 1 ) ) );
    impc = new ImagePlus( imp.getTitle() + " #" + ( c + 1 ), channelStack );

/*Save individual files in the directory /split*/
    IJ.save( impc, dir + "/split/" + imp.getTitle().replaceFirst( ".tif$", "_Channel" + ( c ) + ".tif" ) );
}

/* shutdown */
runtime.exit(0);
Using the script “submit-jobs” will send the jobs to the cluster.
It pays of to do a test run with a small set. You can then determine the rough runtime and memory requirements of the jobs by looking at the output files. This information will allow the queuing system to put you in faster and eliminates failed jobs. The splitting will be rather fast 1-2 min and will require very little memory.
#!/bin/bash

for file in `ls ${1} | grep ".job$"`
do
    bsub -q short -n 1 -W 00:05 -R span[hosts=1] -o "out.%J" -e "err.%J" ${1}/$file
done- “-W 00:05” will limit the wall time of the job to 5 minutes.
Run the script by:
./submit-jobs .Finally you should find the individual channels in the directory split. To the information of the time point and the angle, the channel information is added.
cd /projects/tomancak_lightsheet/Christopher/29072013_HisRuby_Stock1/split
ls
spim_TL1_Angle32_Channel0.tif
spim_TL1_Angle32_Channel1.tif
spim_TL1_Angle104_Channel0.tif
spim_TL1_Angle104_Channel1.tif
spim_TL1_Angle176_Channel0.tif
spim_TL1_Angle176_Channel1.tif
spim_TL1_Angle248_Channel0.tif
spim_TL1_Angle248_Channel1.tif
spim_TL1_Angle320_Channel0.tif
spim_TL1_Angle320_Channel1.tif
...
You can now remove the .tif files that contain both channels. Determine which channel contains the beads. The multi-view registration and the time-lapse registration will be performed only on this channel.
Multi-view registration for 2 channels
In this example the beads are visible in channel 1. Therefore, we will proceed to register this channel. Modify in the create-registration-jobs script the directory, the number of time points and the angles (-Dangles).
#!/bin/bash

#modify directory
dir="/projects/tomancak_lightsheet/Christopher/29072013_HisRuby_Stock1/split/"
jobs="/projects/tomancak_lightsheet/Christopher/29072013_HisRuby_Stock1/jobs/registration"

mkdir -p $jobs

#Number of time points
for i in `seq 1 72`

do
    job="$jobs/register-$i.job"
    echo $job
    echo "#!/bin/bash" > "$job"

#modify -Dangles
    echo "xvfb-run -a /sw/people/tomancak/packages/Fiji.app/ImageJ-linux64 \
              -Ddir=$dir -Dtimepoint=$i -Dangles=32,104,176,248,320 \
              -- --no-splash ${jobs}/registration.bsh" >> "$job"
    chmod a+x "$job"
done

./create-registration-jobs
The registration.bsh stays in principle the same as in the single channel. The only thing you need to modify is pattern_of_spim otherwise the program will not recognise the files. Just add the name of the channel to the file name.
As before you would change the z-resolution, radius channel_0_radius_1, channel_0_radius_2 and the channel_0_threshold according to the parameters you would have determined manually.
import ij.IJ;
import ij.ImagePlus;
import java.lang.Runtime;
import java.io.File;
import java.io.FilenameFilter;

runtime = Runtime.getRuntime();
System.out.println(runtime.availableProcessors() + " cores available for multi-threading");

dir = System.getProperty( "dir" );
timepoint = System.getProperty( "timepoint" );
angles = System.getProperty( "angles" );

IJ.run("Bead-based registration", "select_type_of_registration=Single-channel" + " " +
    "select_type_of_detection=[Difference-of-Mean (Integral image based)] " + " " +
    "spim_data_directory=" + dir + " " +
/*modify pattern of file*/
    "pattern_of_spim=spim_TL{t}_Angle{a}_Channel1.tif" + " " +
    "timepoints_to_process=" + timepoint + " " +
    "angles_to_process=" + angles + " " +
//  "load_segmented_beads" + " " +
    "bead_brightness=[Advanced ...]" + " " +
    "subpixel_localization=[3-dimensional quadratic fit (all detections)]" + " " +
    "specify_calibration_manually xy_resolution=1.000 z_resolution=3.4972729682922363" + " " +
    "transformation_model=Affine" + " " +
    "channel_0_radius_1=3" + " " +
    "channel_0_radius_2=5" + " " +
    "channel_0_threshold=0.0070"
    );

/* shutdown */
runtime.exit(0);
The submit-jobs script is modified for the requirements of the registration. Determine these parameters with a small set before you apply them to all files.
-n 5use one processor per angle.-W 00:15Walltime of the job restricted to 15 min.-R rusage[mem=10000]10000MB of memory is required.
#!/bin/bash

for file in `ls ${1} | grep ".job$"`
do
    bsub -q short -n 5 -W 00:15 -R rusage[mem=10000] -R span[hosts=1] -o "out.%J" -e "err.%J" ${1}/$file
done

./submit-jobs .
The registration files should now be written in the directory registration. For each angle of each time point 3 registration files should be present:
cd /projects/tomancak_lightsheet/Christopher/29072013_HisRuby_Stock1/split/registration
ls
spim_TL1_Angle32_Channel1.tif.beads.txt
spim_TL1_Angle32_Channel1.tif.dim
spim_TL1_Angle32_Channel1.tif.registration
...
Time-lapse registration for 2 channels
In the script timelapse.interactive modify -Ddir=, -Dtimepoint=, -Dreferencetp= (choose a good time point as reference) and -Dangles=.
#!/bin/bash
xvfb-run -a /sw/people/tomancak/packages/Fiji.app/ImageJ-linux64 \
-Ddir=/projects/tomancak_lightsheet/Christopher/29072013_HisRuby_Stock1/split/ \
-Dtimepoint=1-72 -Dreferencetp=1 -Dangles=32,104,176,248,320 \
-- --no-splash ./time-lapse.bsh
Analog to the Multi-view registration add the channel information to the name of the file in the pattern_of_spim part of the script.
Give the z-resolution, channel_0_radius_1, channel_0_radius_2 and the channel_0_threshold as before.
import ij.IJ;
import java.lang.Runtime;

runtime = Runtime.getRuntime();
System.out.println(runtime.availableProcessors() + " cores available for multi-threading");

dir = System.getProperty( "dir" );
timepoint = System.getProperty( "timepoint" );
angles = System.getProperty( "angles" );
referencetp = System.getProperty( "referencetp" );

IJ.run("Bead-based registration", "select_type_of_registration=Single-channel" + " " +
    "select_type_of_detection=[Difference-of-Mean (Integral image based)]" + " " +
    "spim_data_directory=" + dir + " " +
/*modify pattern_of_spim*/
        "pattern_of_spim=spim_TL{t}_Angle{a}_Channel1.tif" + " " +
        "timepoints_to_process=" + timepoint + " " +
        "angles_to_process=" + angles + " " +
        "load_segmented_beads" + " " +
    "subpixel_localization=[3-dimensional quadratic fit (all detections)]" + " " +
    "specify_calibration_manually xy_resolution=1.000 z_resolution=3.278693914413452" + " " +
    "transformation_model=Affine" + " " +
    "channel_0_radius_1=3" + " " +
    "channel_0_radius_2=5" + " " +
    "channel_0_threshold=0.007" + " " +
    "re-use_per_timepoint_registration" + " " +
    "timelapse_registration" + " " +
    "select_reference=[Manually (specify)]" + " " +
    "reference_timepoint=" + referencetp
    );

/* shutdown */
runtime.exit(0);
Again modify the submit-jobs script according to the need of your timelapse registration. For my example these modifications worked:
-W 0025-R rusage[mem=5000]
#!/bin/bash

bsub -q short  -n 12 -W 00:25 -R rusage[mem=5000] -R span[hosts=1] -o "out.%J" -e "err.%J" ./timelapse.interactive

./submit-jobs .
An additional registration file will be created in the directory registration.
cd /projects/tomancak_lightsheet/Christopher/29072013_HisRuby_Stock1/split/registration
ls
spim_TL1_Angle32_Channel1.tif.beads.txt
spim_TL1_Angle32_Channel1.tif.dim
spim_TL1_Angle32_Channel1.tif.registration
spim_TL1_Angle32_Channel1.tif.registration.to_1
...
Duplicate registration files
Since the fusion requires the presents of registration files for both channel, we will duplicate the existing files of channel 1 and save them as registration files for channel 0. The following script duplicate_rename_registration.bsh will do just that. Create this script in the jobs directory.
You will need to modify the time points, angles, the used reference time point in registration.to_{your reference} and the directory.
The script will copy the existing files and save them under a new name with just the channel name changed.
#!/bin/bsh

# modify time points
for i in `seq 1 72`
 do

#modify angles
 for a in 32 104 176 248 320
   do

#modify reference in time-lapse registration file ending
for end in "beads.txt" "dim" "registration" "registration.to_1"
    do

# modify directories accordingly
cd /projects/tomancak_lightsheet/Christopher/29072013_HisRuby_Stock1/split/registration/
cp ./spim_TL"$i"_Angle"$a"_Channel1.tif."$end" ./spim_TL"$i"_Angle"$a"_Channel0.tif."$end"
     done
   done
done

echo Duplication complete! Have a nice day!
exit 0
Execute the script:
sh duplicate_rename_registration.bshNow for each channel of each angle and timepoint registration files should be present.
cd /projects/tomancak_lightsheet/Christopher/29072013_HisRuby_Stock1/split/registration
ls
spim_TL1_Angle32_Channel0.tif.beads.txt
spim_TL1_Angle32_Channel0.tif.dim
spim_TL1_Angle32_Channel0.tif.registration
spim_TL1_Angle32_Channel0.tif.registration.to_1
spim_TL1_Angle32_Channel1.tif.beads.txt
spim_TL1_Angle32_Channel1.tif.dim
spim_TL1_Angle32_Channel1.tif.registration
spim_TL1_Angle32_Channel1.tif.registration.to_1
...
Fusion for 2 channels
The create_fusion_jobs for 2 channels works the same as for the single channel fusion. Just modify the directory, the number of time points, the angles under -Dangles and choose a cropping area (-Dx, -Dy, -Dz, -Dw, -Dh, -Dd).
#!/bin/bash

#modify directory
dir="/projects/tomancak_lightsheet/Christopher/29072013_HisRuby_Stock1/split"
jobs="/projects/tomancak_lightsheet/Christopher/29072013_HisRuby_Stock1/jobs/fusion"

mkdir -p $jobs

# modify number of timepoints
for i in `seq 1 72`

do
    job="$jobs/fusion-$i.job"
    echo $job
    echo "#!/bin/bash" > "$job"

#modify -Dangles and cropping area
    echo "xvfb-run -a /sw/people/tomancak/packages/Fiji.app/ImageJ-linux64 \
             -Xms100g -Xmx100g -Ddir=$dir -Dtimepoint=$i \
             -Dangles=32,104,176,248,320 -Dchannels=0,1 -Dreference=0 \
             -Dx=68 -Dy=250 -Dz=404 -Dw=1746 -Dh=846 -Dd=654 \
             -- --no-splash $jobs/fusion.bsh" >> "$job"
    chmod a+x "$job"
done
Execute script
./create-fusion-jobsThe fusion.bsh script needs to be set for multi channel registration. Under select_channel, Multi-channel registration=[Individual registration of channel 1] registration=[Individual registration of channel 1] will be set. downsample_output in this case is set to 4.
import ij.IJ;
import java.lang.Runtime;

runtime = Runtime.getRuntime();
System.out.println(runtime.availableProcessors() + " cores available for multi-threading");

dir = System.getProperty( "dir" );
timepoint = System.getProperty( "timepoint" );
angles = System.getProperty( "angles" );
channels = System.getProperty( "channels");
reference = System.getProperty( "reference" );
x = System.getProperty( "x" );
y = System.getProperty( "y" );
z = System.getProperty( "z" );
w = System.getProperty( "w" );
h = System.getProperty( "h" );
d = System.getProperty( "d" );
iter = System.getProperty( "iter" );

IJ.run("Multi-view fusion", "select_channel=Multi-channel registration=[Individual registration of channel 1] registration=[Individual registration of channel 1]" + " " +
"spim_data_directory=" + dir + " " +
"pattern_of_spim=spim_TL{t}_Angle{a}_Channel{c}.tif timepoints_to_process=" + timepoint + " " +
"angles=" + angles + " " +
"channels=" + channels + " " +
"fusion_method=[Fuse into a single image]" + " " +
"process_views_in_paralell=All" + " " +
"blending" + " " +
"content_based_weights_(fast," + " " +
"downsample_output=4" + " " +
"registration=[Individual registration of channel 0]" + " " +
"crop_output_image_offset_x=" + x + " " +
"crop_output_image_offset_y=" + y + " " +
"crop_output_image_offset_z=" + z + " " +
"crop_output_image_size_x=" + w + " " +
"crop_output_image_size_y=" + h + " " +
"crop_output_image_size_z=" + d + " " +
"fused_image_output=[Save 2d-slices, one directory per time-point]");

/* shutdown */
runtime.exit(0);
The submit-jobs script is modified according to the requirements of the fusion:
-W 00:20-R rusage[mem=50000]
Worked in my example, but again I would recommend that you modify this with the information from a small set of your own data.
#!/bin/bash

for file in `ls ${1} | grep ".job$"`
do
    bsub -q short -n 12 -W 00:20 -R rusage[mem=50000] -R span[hosts=1] -o "out.%J" -e "err.%J" ${1}/$file
done

./submit-jobs .
The fused images will be saved into separate subdirectories for each time point into the output directory.
NEW PIPELINE
The new pipeline is centered around a configuration file, the master file, that contains all the relevant processing parameters. It increases the efficiency of the processing significantly since mainly this file is manipulated for each dataset, instead of the scripts in each processing step individually.
The master file has two parts. The first part contains all the relevant processing parameters for each individual processing step. The second part contains some more advanced settings and the links for the job scripts and directories.
The new pipeline also comes with a new set of scripts that are specifically modified to be used with the master file. The general idea is to have these job scripts together with the master file independent from the dataset. The scripts will use the master file as a source for the processing parameters. The jobs will be created and executed within the job directories just as before, the success of the jobs can be assessed with the output and the error files. The master file can be saved and can serve as a documentation for the processing.
Currently the master file is useable for the following steps.
- Single-channel processing:
- Rename
.czifiles - Resave
.czifiles - Resave
.ome.tifffiles - Multi-view registration
- Timelapse registration
- Content based multi-view fusion
- External transformation
- Multi-view deconvolution
- 3D-rendering
- Export to hdf5 format
- Rename
- Multi-channel processing:
- Rename
.czifiles - Resave
.czifiles - Registration
- Timelapse registration
- Content based multi-view fusion
- 3D-rendering for 2 channels
- Export to hdf5 format
- Rename
All the scripts work with padded zeros.
At the moment this tutorial is written for advanced users that already used the previous pipeline. For a more detailed introduction please read into the description of the previous pipeline.
Master file
There are two parts in this file:
-
Processing Parameters
-
Directories for scripts and advanced settings for processing
The first part contains everything relevant for processing and will be modified for each dataset. It is further structured according to each processing step.
The second part contains the links for the working directories and scripts. Since the jobs scripts should rest at one particular location these links need to be changed the first time you start processing. This part also contains more advanced settings for registration, fusion and deconvolution. Which should only be touched when fully understanding these steps.
We will discuss each section of this file with the associated processing step.
#!/bin/bash

####============================= Processing Parameters ==============================

####--------------------------------- General Parameters ---------------------------------
###Data directory
dir="/projects/tomancak_lightsheet/Christopher/Test_scripts/single-channel/"

###Dataset core parameters
timepoint="`seq 1 3`"
angles="1,2,3"
num_angles="3"

###pattern of spim data:
pattern_of_spim="spim_TL{tt}_Angle{a}.tif"
#pattern_of_spim="spim_TL{tt}_Angle{a}_Channel{c}.tif"
##change pattern for single-channel: (e.g. spim_TL{tt}_Angle{a}.tif)
##or multi-channel processing: (e.g. spim_TL{tt}_Angle{a}_Channel{c}.tif)
##for padded zeros use tt as place holder

###Timelapse registration
referencetp="1"

###Manual calibration
xy_resolution="1"
z_scaling="3.2643520832"

###---------- Renaming .czi files ----------
first_index="0"
last_index="8"
first_timepoint="1"
angles_renaming=(1 2 3)

##For padded zero 2 = 01; 3 = 001
pad_rename_czi="2"

##Change directory and pattern
source_pattern=/2013-11-14_His-YFP\(\{index\}\).czi
target_pattern=/spim_TL\{timepoint\}_Angle\{angle\}.czi

###---------- Resaving .czi or ome.tiff as .tif ----------
##use ometiff_resave for ome.tiff and czi_resave for .czi
angle_resaving="1 2 3"

##For padded zero 2 = 01; 3 = 001
pad_resave="2"

###---------- Split Channels (Only for multi-channel data) ----------
##Outputs channls as spim_TL{tt}_Angle{a}_Channel0,spim_TL{tt}_Angle{a}_Channel1 ...
angles_split="1 2 3 4 5"

##Target directory
target_split="/channel_split/"

###---------- Multi-view registration (Difference of mean or Difference of Gaussian) ----------
##Specify the Pattern for Detection of the beads single channel: spim_TL{t}_Angle{a}.tif
##multi-channel: spim_TL{t}_Angle{a}_Channel1.tif were 1 is the Channel that contains the beads
channel_pattern_beads="spim_TL{tt}_Angle{a}.tif"
#channel_pattern_beads="spim_TL{tt}_Angle{a}_Channel1.tif"

##Difference of mean (Comment out Difference of Gaussian parts in registration.bsh script)
type_of_detection="\"Difference-of-Mean (Integral image based)\""
radius1="2"
radius2="3"
threshold="0.008"

##Difference of Gaussian (Comment out Differnce of Mean parts in registration.bsh script)
#type_of_detection="\"Difference-of-Gaussian\""
#initial_sigma="1.8000"
#threshold_gaussian="0.0080"

###---------- Timelapse registration ----------
timelapse_timepoint="1-3"

###---------- Dublicate Registration files (Only for multi-channel data) ----------
#Channel that contain the beads
channel_source="1"
channel_target="0"

###---------- Multi-view content based fusion ----------
##Change between Single-Channel or Mulit-channel fusion
##If single channel then comment out 2nd fusion command in fusion.bsh script
select_channel="Single-channel"
#select_channel="Multi-channel"

##Use timelapse registration or Individual registration
##For timelapse registration specify reference timepoint:
registration_fusion="\"Time-point registration (reference=1) of channel 0\""
##Individual registration:
#registration_fusion="\"Individual registration of channel 0\""
downsample_output="2"

##Cropping parameters of full resolution
x="100"
y="226"
z="355"
w="1731"
h="820"
d="755"

###---------- External transformation for multi-view deconvolution ----------
##Caution: Before applying the exteranl transformation make a copy of the registration files
##Only single channel, use external transformation for each individual channel
pattern_extrans="spim_TL{tt}_Angle{a}.tif"
#pattern_extrans="spim_TL{tt}_Angle{a}_Channel1.tif"

##timepoints:
external_transformation_timepoint="1-3"

##For downsampling 2x use 0.5
m00="0.5"
m11="0.5"
m22="0.5"

###---------- Multi-view deconvolution ----------
##Only for single channel, use deconvolution for each individual channel
pattern_deconvo="spim_TL{tt}_Angle{a}.tif"
#pattern_deconvo="spim_TL{tt}_Angle{a}_Channel1.tif"
iter="1"

##Cropping parameters: if downsampled divid fusion cropping parameters by this factor
decox="50"
decoy="113"
decoz="177"
decow="865"
decoh="410"
decod="377"

###---------- Rendering ----------
##Two different sets of scripts, one for single channel and one for multi-channel; choose:
##Working directory
jobs_rendering="/projects/pilot_spim/Christopher/pipeline/jobs_master_beta_2.0/3d_rendering_cpu"

##Working script
#rendering="/projects/pilot_spim/Christopher/pipeline/jobs_master_beta_2.0/3d_rendering_cpu/single-render-mov.bsh"
rendering="/projects/pilot_spim/Christopher/pipeline/jobs_master_beta_2.0/3d_rendering_cpu/multi-render-mov.bsh"

##source
source_rendering="/output_fusion"

##target directory
target_rendering="/rendering"

nframes="6"

##Min Max single channel
#minimum_rendering="0.6"
#maximum_rendering="0.005"

##Min Max multi channel
min_ch0=0.9
max_ch0=0.01

min_ch1=0.9
max_ch1=0.01

##For multi-channel rendering:
zSlices="369"

##Orientation or rotation
#still needs to be put into the script directly
#under construction

###---------- hdf5 export ----------
##Target directory
target_hdf5="/hdf5/"

##Number of jobs
num_export_job="`seq 0 3`"

#Path directory
path="\"/projects/pilot_spim/Christopher/Test_scripts/single-channel\""
#path="\"/projects/pilot_spim/Christopher/Test_scripts/multi-channel/channel_split\""

#Xml filename
exportXmlFilename="\"/hdf5/Test_single.xml\""

##Spim pattern
##For single channel:spim_TL{tt}_Angle{a}.tif
##For 2 channel: spim_TL{tt}_Angle{a}_Channel{c}.tif
inputFilePattern="\"spim_TL{tt}_Angle{a}.tif\""
#inputFilePattern="\"spim_TL{tt}_Angle{a}_Channel{c}.tif\""

##Channels: change for 2 channel data
channels_export="\"0\""
#channels_export="\"0,1\""

angles_export="\"1,2,3\""
timepoint_export="\"1-3\""
referencetp_export="\"1\""

filepath="\"/output_fusion/\""
filepattern="\"%1\\\$d/img_tl%1\\\$d_ch%2\\\$d_z%3\\\$03d.tif\""

export_numSlices="376"
sliceValueMin="0"
sliceValueMax="60000"

cropOffsetX="100"
cropOffsetY="226"
cropOffsetZ="355"
scale="2"

####============== Directories for scripts and advanced settings for processing ==============

####--------------------------------- Fiji settings ---------------------------------

XVFB_RUN="/sw/bin/xvfb-run"
Fiji="/sw/people/tomancak/packages/Fiji.app/ImageJ-linux64"

####--------------------------------- Pre-processing ---------------------------------
### Resaving .czi into .tif files
##Working directory
jobs_resaving="/projects/tomancak_lightsheet/Christopher/pipeline/jobs_master_beta_2.0/czi_resave/"

##Working script
resaving="/projects/tomancak_lightsheet/Christopher/pipeline/jobs_master_beta_2.0/czi_resave/resaving.bsh"

###Resaving ome.tiff into .tif files
##Working directory
jobs_resaving_ometiff="/projects/tomancak_lightsheet/Christopher/pipeline/jobs_master_beta_2.0/ometiff_resave/"

##Working script
resaving_ometiff="/projects/tomancak_lightsheet/Christopher/pipeline/jobs_master_beta_2.0/ometiff_resave/resaving-ometiff.bsh"

###Split channels
##Working directory
jobs_split="/projects/tomancak_lightsheet/Christopher/pipeline/jobs_master_beta_2.0/split_channels/"

##Working script
split="/projects/tomancak_lightsheet/Christopher/pipeline/jobs_master_beta_2.0/split_channels/split.bsh"


####--------------------------------- Multi-view Registration ---------------------------------
##Working directory
jobs_registration="/projects/tomancak_lightsheet/Christopher/pipeline/jobs_master_beta_2.0/registration/"

##Working script
registration="/projects/tomancak_lightsheet/Christopher/pipeline/jobs_master_beta_2.0/registration/registration.bsh"

##registration parameters
type_of_registration="Single-channel"
bead_brightness="\"Advanced ...\""
subpixel_localization="\"3-dimensional quadratic fit (all detections)\""
transformation_model="Affine"
imglib_container="\"Array container (images smaller ~2048x2048x450 px)\""

####--------------------------------- Timelapse registration ---------------------------------
##Working directory
jobs_timelapse="/projects/tomancak_lightsheet/Christopher/pipeline/jobs_master_beta_2.0/timelapse_registration/"

##Working script
timelapse_registration="/projects/tomancak_lightsheet/Christopher/pipeline/jobs_master_beta_2.0/timelapse_registration/time-lapse.bsh"

####--------------------------------- Multi-view fusion ----------------------------------------
##Working directory
jobs_fusion="/projects/tomancak_lightsheet/Christopher/pipeline/jobs_master_beta_2.0/fusion/"

##Working script
fusion="/projects/tomancak_lightsheet/Christopher/pipeline/jobs_master_beta_2.0/fusion/fusion.bsh"

##Fusion parameters
fusion_method="\"Fuse into a single image\""
process_views_in_paralell="All"
blending="blending"
weights="\"content_based_weights_(fast,\""
fused_image_output="\"Save 2d-slices, one directory per time-point\""

####--------------------------------- External transformation ---------------------------------
##Working directory
jobs_external_transformation="/projects/tomancak_lightsheet/Christopher/pipeline/jobs_master_beta_2.0/external_transformation/"

##Working script
external_transformation="/projects/tomancak_lightsheet/Christopher/pipeline/jobs_master_beta_2.0/external_transformation/external_transformation.bsh"

####--------------------------------- Multi-view deconvolution ---------------------------------
##Working directory
jobs_deconvolution="/projects/tomancak_lightsheet/Christopher/pipeline/jobs_master_beta_2.0/deconvolution/"

##Working script
deconvolution="/projects/tomancak_lightsheet/Christopher/pipeline/jobs_master_beta_2.0/deconvolution/deconvolution.bsh"

##Deconvolution parameters
type_of_iteration="\"Efficient Bayesian - Optimization I (fast, precise)\""
osem_acceleration="\"1 (balanced)\""
use_tikhonov_regularization="use_tikhonov_regularization"
Tikhonov_parameter="0.0006"
compute="\"in 512x512x512 blocks\""
compute_on="\"CPU (Java)\""
psf_estimation="\"Extract from beads\""

psf_display="\"Do not show PSF's\""
load_input_images_sequentially="load_input_images_sequentially"
fused_image_output="\"Save 2d-slices, one directory per time-point\""

####--------------------------------- Rendering ---------------------------------
##Fiji for rendering
Fiji_rendering="/sw/people/tomancak/packages/Fiji.app.render/ImageJ-linux64"

####--------------------------------- hdf5 export ---------------------------------

##fiji-tobias
Fiji_export="/sw/users/pietzsch/packages/Fiji.app/ImageJ-linux64"

##Working directory
jobs_export="/projects/pilot_spim/Christopher/pipeline/jobs_master_beta_2.0/hdf5/"

##Working script
export="/projects/pilot_spim/Christopher/pipeline/jobs_master_beta_2.0/hdf5/export.bsh"
First time using the master file
Upon using the master file the first time please change the links for Fiji, the working directories and scripts in the second part of the file:
####============== Directories for scripts and advanced settings for processing ==============

####--------------------------------- Fiji settings ---------------------------------

XVFB_RUN="/sw/bin/xvfb-run"
Fiji="/sw/people/tomancak/packages/Fiji.app/ImageJ-linux64"

####--------------------------------- Pre-processing ---------------------------------
### Resaving .czi into .tif files
##Working directory
jobs_resaving="/projects/tomancak_lightsheet/Christopher/pipeline/jobs_master_beta_2.0/czi_resave/"

##Working script
resaving="/projects/tomancak_lightsheet/Christopher/pipeline/jobs_master_beta_2.0/czi_resave/resaving.bsh"

###Resaving ome.tiff into .tif files
##Working directory
jobs_resaving_ometiff="/projects/tomancak_lightsheet/Christopher/pipeline/jobs_master_beta_2.0/ometiff_resave/"

##Working script
resaving_ometiff="/projects/tomancak_lightsheet/Christopher/pipeline/jobs_master_beta_2.0/ometiff_resave/resaving-ometiff.bsh"

###Split channels
##Working directory
jobs_split="/projects/tomancak_lightsheet/Christopher/pipeline/jobs_master_beta_2.0/split_channels/"

##Working script
split="/projects/tomancak_lightsheet/Christopher/pipeline/jobs_master_beta_2.0/split_channels/split.bsh"

####--------------------------------- Multi-view Registration ---------------------------------
##Working directory
jobs_registration="/projects/tomancak_lightsheet/Christopher/pipeline/jobs_master_beta_2.0/registration/"

##Working script
registration="/projects/tomancak_lightsheet/Christopher/pipeline/jobs_master_beta_2.0/registration/registration.bsh"

##registration parameters
type_of_registration="Single-channel"
bead_brightness="\"Advanced ...\""
subpixel_localization="\"3-dimensional quadratic fit (all detections)\""
transformation_model="Affine"
imglib_container="\"Array container (images smaller ~2048x2048x450 px)\""

####--------------------------------- Timelapse registration ---------------------------------
##Working directory
jobs_timelapse="/projects/tomancak_lightsheet/Christopher/pipeline/jobs_master_beta_2.0/timelapse_registration/"

##Working script
timelapse_registration="/projects/tomancak_lightsheet/Christopher/pipeline/jobs_master_beta_2.0/timelapse_registration/time-lapse.bsh"

####--------------------------------- Multi-view fusion ----------------------------------------
##Working directory
jobs_fusion="/projects/tomancak_lightsheet/Christopher/pipeline/jobs_master_beta_2.0/fusion/"

##Working script
fusion="/projects/tomancak_lightsheet/Christopher/pipeline/jobs_master_beta_2.0/fusion/fusion.bsh"

##Fusion parameters
fusion_method="\"Fuse into a single image\""
process_views_in_paralell="All"
blending="blending"
weights="\"content_based_weights_(fast,\""
fused_image_output="\"Save 2d-slices, one directory per time-point\""

####--------------------------------- External transformation ---------------------------------
##Working directory
jobs_external_transformation="/projects/tomancak_lightsheet/Christopher/pipeline/jobs_master_beta_2.0/external_transformation/"

##Working script
external_transformation="/projects/tomancak_lightsheet/Christopher/pipeline/jobs_master_beta_2.0/external_transformation/external_transformation.bsh"

####--------------------------------- Multi-view deconvolution ---------------------------------
##Working directory
jobs_deconvolution="/projects/tomancak_lightsheet/Christopher/pipeline/jobs_master_beta_2.0/deconvolution/"

##Working script
deconvolution="/projects/tomancak_lightsheet/Christopher/pipeline/jobs_master_beta_2.0/deconvolution/deconvolution.bsh"

##Deconvolution parameters
type_of_iteration="\"Efficient Bayesian - Optimization I (fast, precise)\""
osem_acceleration="\"1 (balanced)\""
use_tikhonov_regularization="use_tikhonov_regularization"
Tikhonov_parameter="0.0006"
compute="\"in 512x512x512 blocks\""
compute_on="\"CPU (Java)\""
psf_estimation="\"Extract from beads\""

psf_display="\"Do not show PSF's\""
load_input_images_sequentially="load_input_images_sequentially"
fused_image_output="\"Save 2d-slices, one directory per time-point\""

####--------------------------------- Rendering ---------------------------------
##Fiji for rendering
Fiji_rendering="/sw/people/tomancak/packages/Fiji.app.render/ImageJ-linux64"

####--------------------------------- hdf5 export ---------------------------------

##fiji-tobias
Fiji_export="/sw/users/pietzsch/packages/Fiji.app/ImageJ-linux64"

##Working directory
jobs_export="/projects/pilot_spim/Christopher/pipeline/jobs_master_beta_2.0/hdf5/"

##Working script
export="/projects/pilot_spim/Christopher/pipeline/jobs_master_beta_2.0/hdf5/export.bsh"
Then you need to change in each shell script particulary in the create-jobs scripts the link to the master file.
This link is given in the 3rd line of each shell script. For example in the rename-zeiss-files.sh:
#!/bin/bash

source /projects/tomancak_lightsheet/Christopher/pipeline/master

source_pattern=${dir}${source_pattern}
target_pattern=${dir}${target_pattern}

# --------------------------------------------------------

i=${first_index}
t=${first_timepoint}
t=`printf "%0${pad_rename_czi}d" "$t"`

while [ $i -le $last_index ]; do

    for a in "${angles_renaming[@]}"; do
        source=${source_pattern/\{index\}/${i}}
        tmp=${target_pattern/\{timepoint\}/${t}}
        target=${tmp/\{angle\}/${a}}

        echo ${source} ${target}

        mv ${source} ${target}
        #cp ${source} ${target}
        let i=i+1

    done
    let t=t+1
    t=`printf "%0${pad_rename_czi}d" "$t"`

done
Or the create-resaving-jobs file:
#!/bin/bash

source /projects/tomancak_lightsheet/Christopher/pipeline/master

mkdir -p $jobs_resaving

for i in $timepoint

do
    for a in $angle_resaving
    do
        job="$jobs_resaving/resave-$i-$a.job"
        echo $job
        echo "$XVFB_RUN -a $Fiji -Ddir=$dir -Dtimepoint=$i -Dangle=$a \
            -Dpad=$pad_resave -- --no-splash $resaving" >> "$job"
        chmod a+x "$job"
    done
done
These settings only need to be changed once, if the job scripts and the master file stay in the same directories.
Single-channel Processing
First steps
We start by defining the general parameters of the spim dataset in the master file. First we give the directory that contains the data. Then we define the number of timepoints and angles, our example has 3 timepoints and 3 angles. Finally we need to modify the pattern of the spim data, define the reference timpoint and the calibration. For the sake of demonstration we included padded zeros in the pattern and will use padded zeros throughout the tutorial:
####--------------------------------- General Parameters ---------------------------------
###Data directory
dir="/projects/tomancak_lightsheet/Christopher/Test_scripts/single-channel/"

###Dataset core parameters
timepoint="`seq 1 3`"
angles="1,2,3"
num_angles="3"

###pattern of spim data:
pattern_of_spim="spim_TL{tt}_Angle{a}.tif"
#pattern_of_spim="spim_TL{tt}_Angle{a}_Channel{c}.tif"
##change pattern for single-channel: (e.g. spim_TL{tt}_Angle{a}.tif)
##or multi-channel processing: (e.g. spim_TL{tt}_Angle{a}_Channel{c}.tif)
##for padded zeros use tt as place holder

###Timelapse registration
referencetp="1"

###Manual calibration
xy_resolution="1"
z_scaling="3.2643520832"
Rename .czi files
The example dataset is in the aforementioned directory:
cd /projects/tomancak_lightsheet/Christopher/Test_scripts/single-channel
ls
2013-11-14_His-YFP.czi
2013-11-14_His-YFP(1).czi
2013-11-14_His-YFP(2).czi
2013-11-14_His-YFP(3).czi
2013-11-14_His-YFP(4).czi
2013-11-14_His-YFP(5).czi
2013-11-14_His-YFP(6).czi
2013-11-14_His-YFP(7).czi
2013-11-14_His-YFP(8).czi
It is very important to note that the Lightsheet Z.1 writes the first angle of the first timepoint without index. Thus we need to add (0) as the first index to this file. Forgetting this step will lead to a frameshift in the dataset during renaming.
mv 2013-11-14_His-YFP.czi 2013-11-14_His-YFP(0).czi
ls
2013-11-14_His-YFP(0).czi
2013-11-14_His-YFP(1).czi
2013-11-14_His-YFP(2).czi
2013-11-14_His-YFP(3).czi
2013-11-14_His-YFP(4).czi
2013-11-14_His-YFP(5).czi
2013-11-14_His-YFP(6).czi
2013-11-14_His-YFP(7).czi
2013-11-14_His-YFP(8).czi
For renaming the .czi files the relevant section in the master file looks like this:
###---------- Renaming .czi files ----------
first_index="0"
last_index="8"
first_timepoint="1"
angles_renaming=(1 2 3)

##For padded zero 2 = 01; 3 = 001
pad_rename_czi="2"

##Change directory and pattern
source_pattern=/2013-11-14_His-YFP\(\{index\}\).czi
target_pattern=/spim_TL\{timepoint\}_Angle\{angle\}.czi
The first index is 0. Since we have 3 timepoints with 3 angles, we have 9 timepoints in total. Thus the last index is 8. Then we define how the new name will start. The first timepoint will be 1 and there are three angles, thus (1 2 3). For demonstration we will use padded zeros. pad_rename_czi="2" means the output will look like this: 01. The “source pattern” states how the old .czi are named and the target_pattern defines how the new files will be named. It is important that these patterns are correct.
For renaming the .czi files we use the rename-zeiss-files.sh script:
#!/bin/bash

source /projects/tomancak_lightsheet/Christopher/pipeline/master

source_pattern=${dir}${source_pattern}
target_pattern=${dir}${target_pattern}

# --------------------------------------------------------

i=${first_index}
t=${first_timepoint}
t=`printf "%0${pad_rename_czi}d" "$t"`

while [ $i -le $last_index ]; do

    for a in "${angles_renaming[@]}"; do
        source=${source_pattern/\{index\}/${i}}
        tmp=${target_pattern/\{timepoint\}/${t}}
        target=${tmp/\{angle\}/${a}}

        echo ${source} ${target}

        mv ${source} ${target}
        #cp ${source} ${target}
        let i=i+1

    done
        t="$(( 10#$t ))"
    let t=t+1
    t=`printf "%0${pad_rename_czi}d" "$t"`

done
The script should now get all the necessary parameters from the master file. Execute the script (use chmod a+x when executing a script the first time).
chmod a+x rename-zeiss_files.sh
./rename-zeiss_files.sh
The .czi files are now renamed accordingly:
cd /projects/tomancak_lightsheet/Christopher/Test_scripts/single-channel
ls
spim_TL01_Angle1.czi
spim_TL01_Angle2.czi
spim_TL01_Angle3.czi
spim_TL02_Angle1.czi
spim_TL02_Angle2.czi
spim_TL02_Angle3.czi
spim_TL03_Angle1.czi
spim_TL03_Angle2.czi
spim_TL03_Angle3.czi
Resave .czi files
The next step is to resave the .czi files as .tif files. In the relevant part in the master file we just need to specify the angles and if we used padded zeros:
###---------- Resaving .czi or ome.tiff as .tif ----------
##use ometiff_resave for ome.tiff and czi_resave for .czi
angle_resaving="1 2 3"

##For padded zero 2 = 01; 3 = 001
pad_resave="2"
For creating the jobs for resaving use the create-resaving-jobs scripts:
#!/bin/bash

source /projects/tomancak_lightsheet/Christopher/pipeline/master

mkdir -p $jobs_resaving

for i in $timepoint

do
    for a in $angle_resaving
    do
        job="$jobs_resaving/resave-$i-$a.job"
        echo $job
        echo "$XVFB_RUN -a $Fiji -Ddir=$dir -Dtimepoint=$i -Dangle=$a \
            -Dpad=$pad_resave -- --no-splash $resaving" >> "$job"
        chmod a+x "$job"
    done
done
Execute this script:
./create-resaving-jobsThis should create jobs for each .czi file.
cd /projects/tomancak_lightsheet/Christopher/pipeline/jobs_master_beta_2.0/czi_resave/
ls
create-resaving-jobs
resave-1-1.job
resave-1-2.job
resave-1-3.job
resave-2-1.job
resave-2-2.job
resave-2-3.job
resave-3-1.job
resave-3-2.job
resave-3-3.job
resaving.bsh
submit-jobs
Each job file should contain the relevant parameters for the job, where to find Fiji and the actual job script:
cd /projects/tomancak_lightsheet/Christopher/pipeline/jobs_master_beta_2.0/czi_resave/
cat resave-1-1.job
/sw/bin/xvfb-run -a /sw/people/tomancak/packages/Fiji.app/ImageJ-linux64 -Ddir=/projects/tomancak_lightsheet/Christopher/Test_scripts/single-channel/ -Dtimepoint=1 -Dangle=1
-Dpad=2 -- --no-splash /projects/tomancak_lightsheet/Christopher/pipeline/jobs_master_beta_2.0/czi_resave/resaving.bsh
The necessary parameters are passed from the jobs file to the resaving.bsh script upon processing the job. The script resaving.bsh looks as follows:
import ij.IJ;
import ij.ImagePlus;
import java.lang.Runtime;
import java.io.File;
import java.io.FilenameFilter;

runtime = Runtime.getRuntime();

dir = System.getProperty( "dir" );
int timepoint = Integer.parseInt( System.getProperty( "timepoint" ) );
angle = System.getProperty( "angle" );
int pad = Integer.parseInt( System.getProperty( "pad" ) );

System.out.println( "timepoint" );
System.out.println( "pad" );

//resave as tif

IJ.run("Bio-Formats Importer", "open=" + dir + "spim_TL" + IJ.pad( timepoint, pad ) + "_Angle" + angle + ".czi" +
" autoscale color_mode=Default specify_range view=[Standard ImageJ] stack_order=Default t_begin=1000 t_end=1000 t_step=1");
IJ.saveAs("Tiff ", dir + "spim_TL" + IJ.pad( timepoint, pad ) + "_Angle" + angle + ".tif");

/* shutdown */
runtime.exit(0);
Submit the job by executing the submit script submit-jobs:
#!/bin/bash

for file in `ls ${1} | grep ".job$"`
do
    bsub -q short -n 1 -R span[hosts=1] -o "out.%J" -e "err.%J" ${1}/$file
done

./submit-jobs .
The .tif files can now be found in the data directory together with the .czi files:
cd /projects/tomancak_lightsheet/Christopher/Test_scripts/single-channel
ls
spim_TL01_Angle1.czi
spim_TL01_Angle1.tif
spim_TL01_Angle2.czi
spim_TL01_Angle2.tif
spim_TL01_Angle3.czi
spim_TL01_Angle3.tif
spim_TL02_Angle1.czi
spim_TL02_Angle1.tif
spim_TL02_Angle2.czi
spim_TL02_Angle2.tif
spim_TL02_Angle3.czi
spim_TL02_Angle3.tif
spim_TL03_Angle1.czi
spim_TL03_Angle1.tif
spim_TL03_Angle2.czi
spim_TL03_Angle2.tif
spim_TL03_Angle3.czi
spim_TL03_Angle3.tif
After this step inspect the .tif files and check if all of them are present and that they correspond to the .czi files. If that is the case transfer the .czi files onto tape for long term storage.
To check if all the files are present use the checkpoint.sh script:
#!/bin/bash

source /projects/tomancak_lightsheet/Christopher/pipeline/master


for i in $timepoint

        do
            i=`printf "%0${pad_resave}d" "$i"`
                num=$(ls $dir/spim_TL"$i"_Angle*.tif |wc -l)

                        if [ $num  -ne $num_angles ]

        then
                echo "TL"$i": TP or angles missing"

        else
                echo "TL"$i": Correct"

fi

done
This script will return the number of the timepoint that is missing or has missing angles.
Resave .ome.tiff files
To resave .ome.tiff files as .tif we use the same part in the master file as when you would resave .czi files. In the relevant part in the master file we just need to specify the angles and if there are padded zeros:
###---------- Resaving .czi or ome.tiff as .tif ----------
##use ometiff_resave for ome.tiff and czi_resave for .czi
angle_resaving="1 2 3"

##For padded zero 2 = 01; 3 = 001
pad_resave="2"
The create create-ometiff-jobs file. Create the resaving jobs by executing this script:
#!/bin/bash

source /projects/tomancak_lightsheet/Christopher/pipeline/master

mkdir -p $jobs_resaving

for i in $timepoint

do
    for a in $angle_resaving
    do
        job="$jobs_resaving_ometiff/resave-$i-$a.job"
        echo $job
        echo "$XVFB_RUN -a $Fiji -Ddir=$dir -Dtimepoint=$i -Dangle=$a \
            -Dpad=$pad_resave -- --no-splash $resaving_ometiff" >> "$job"
        chmod a+x "$job"
    done
done
The resaving-ometiff.bsh script:
import ij.IJ;
import ij.ImagePlus;
import java.lang.Runtime;
import java.io.File;
import java.io.FilenameFilter;

runtime = Runtime.getRuntime();

dir = System.getProperty( "dir" );
int timepoint = Integer.parseInt( System.getProperty( "timepoint" ) );
angle = System.getProperty( "angle" );
int pad = Integer.parseInt( System.getProperty( "pad" ) );

//resave as tif

IJ.open( dir + "spim_TL" + IJ.pad( timepoint, pad ) + "_Angle" + angle + ".ome.tiff" );
IJ.saveAs("Tiff", dir + "spim_TL" + IJ.pad( timepoint, pad ) + "_Angle" + angle + ".tif");

/* shutdown */
runtime.exit(0);
Submit the job files using the submit-jobs script:
#!/bin/bash

for file in `ls ${1} | grep ".job$"`
do
    bsub -q short -n 1 -R span[hosts=1] -o "out.%J" -e "err.%J" ${1}/$file
done
Multi-view registration
For the registration use the relevant part in the master file. Change the pattern of the spim data accordingly. You can choose between Difference of mean and Difference of gaussian registration, change the parameters accordingly. It is important to comment out for example the Difference of Gaussian parts in the registration.bsh script when you want to use the Difference of mean registration. There will be an error otherwise.
###---------- Multi-view registration (Difference of mean or Difference of Gaussian) ----------
##Specify the Pattern for Detection of the beads single channel: spim_TL{t}_Angle{a}.tif
##multi-channel: spim_TL{t}_Angle{a}_Channel1.tif were 1 is the Channel that contains the beads
channel_pattern_beads="spim_TL{tt}_Angle{a}.tif"
#channel_pattern_beads="spim_TL{tt}_Angle{a}_Channel1.tif"

##Difference of mean (Comment out Difference of Gaussian parts in registration.bsh script)
type_of_detection="\"Difference-of-Mean (Integral image based)\""
radius1="2"
radius2="3"
threshold="0.008"

##Difference of Gaussian (Comment out Differnce of Mean parts in registration.bsh script)
#type_of_detection="\"Difference-of-Gaussian\""
#initial_sigma="1.8000"
#threshold_gaussian="0.0080"
The create-registration-jobs script. Execute this script for creating the registration jobs.
#!/bin/bash
source /projects/tomancak_lightsheet/Christopher/pipeline/master

mkdir -p $jobs_registration

for i in $timepoint

do
    job="$jobs_registration/register-$i.job"
    echo $job
    echo "#!/bin/bash" > "$job"
    echo "$XVFB_RUN -a $Fiji -Dtype_of_registration=$type_of_registration \
        -Dtype_of_detection=$type_of_detection -Ddir=$dir -Dpattern=$channel_pattern_beads \
        -Dtimepoint=$i -Dangles=$angles -Dbead_brightness=$bead_brightness \
        -Dsubpixel_localization=$subpixel_localization -Dxy_resolution=$xy_resolution \
        -Dz_scaling=$z_scaling -Dtransformation_model=$transformation_model \
        -Dimglib_container=$imglib_container -Dradius1=$radius1 -Dradius2=$radius2 \
                -Dthreshold=$threshold -Dinitial_sigma=$initial_sigma \
                -Dthreshold_gaussian=$threshold_gaussian \
        -- --no-splash $registration" >> "$job"
    chmod a+x "$job"
done
The registration.bsh script. Important here is to comment out the indicated parts depending on the registration method. Otherwise the script may not work properly. For the Difference of Mean registration comment out Difference of Gaussian with Line 33-34 and 68-69. For Difference of Gaussian comment out Line 28-30 and Line 65-67.
import ij.IJ;
import ij.ImagePlus;
import java.lang.Runtime;
import java.io.File;
import java.io.FilenameFilter;

runtime = Runtime.getRuntime();
System.out.println(runtime.availableProcessors() + " cores available for multi-threading");


type_of_registration = System.getProperty( "type_of_registration" );
type_of_detection = System.getProperty( "type_of_detection" );

dir = System.getProperty( "dir" );
pattern = System.getProperty( "pattern" );
timepoint = System.getProperty( "timepoint" );
angles = System.getProperty( "angles" );

bead_brightness = System.getProperty( "bead_brightness" );
subpixel_localization = System.getProperty( "subpixel_localization" );

int xy_resolution = Integer.parseInt(System.getProperty( "xy_resolution" ));
float z_scaling = Float.parseFloat( System.getProperty( "z_scaling" ) );
transformation_model = System.getProperty( "transformation_model" );
imglib_container = System.getProperty( "imglib_container" );

//Parameters for difference of mean !!Comment out for Difference of Gaussian!!
int radius1 = Integer.parseInt( System.getProperty( "radius1" ) );
int radius2 = Integer.parseInt( System.getProperty( "radius2" ) );
float threshold = Float.parseFloat( System.getProperty( "threshold" ) );

//Parameters for difference of gaussian !!Comment out for Differnence of Mean!!
//float initial_sigma = Float.parseFloat( System.getProperty( "initial_sigma" ) );
//float threshold_gaussian = Float.parseFloat( System.getProperty( "threshold_gaussian" ) );

System.out.println( "type_of_registration=" + type_of_registration );
System.out.println( "type_of_detection=" + type_of_detection );
System.out.println( "dir=" + dir );
System.out.println( "pattern_of_spim=" + pattern );
System.out.println( "timepoint=" + timepoint );
System.out.println( "angles=" + angles );
System.out.println( "bead_brightness=" + bead_brightness );
System.out.println( "subpixel_localization=" + subpixel_localization );
System.out.println( "xy_resolution=" + xy_resolution );
System.out.println( "z_resolution=" + z_scaling );
System.out.println( "transformation_model=" + transformation_model );
System.out.println( "imglib_container=" + imglib_container );
System.out.println( "radius1=" + radius1 );
System.out.println( "radius2=" + radius2 );
System.out.println( "threshold=" + threshold );
System.out.println( "initial_sigma=" + initial_sigma );
System.out.println( "threshold_gaussian=" + threshold_gaussian );

IJ.run("Bead-based registration", "select_type_of_registration=" + type_of_registration + " " +
    "select_type_of_detection=[" + type_of_detection + "]" + " " +
    "spim_data_directory=" + dir + " " +
    "pattern_of_spim=" + pattern + " " +
    "timepoints_to_process=" + timepoint + " " +
    "angles_to_process=" + angles + " " +
    "bead_brightness=[" + bead_brightness + "]" + " " +
    "subpixel_localization=[" + subpixel_localization + "]" + " " +
    "specify_calibration_manually xy_resolution=" + xy_resolution + " z_resolution=" + z_scaling + " " +
    "transformation_model=" + transformation_model + " " +
//  "imglib_container=[" + imglib_container + "]" + " " +
    "channel_0_radius_1=" + radius1 + " " +         //Comment out for Difference of Gaussian
    "channel_0_radius_2=" + radius2 + " " +         //Comment out for Difference of Gaussian
    "channel_0_threshold=" + threshold + " "        //Comment out for Difference of Gaussian
//  "channel_0_initial_sigma=" + initial_sigma + " " +  //Comment out for Difference of Mean
//  "channel_0_threshold=" + threshold_gaussian + " "  //Comment out for Difference of Mean
    );

/* shutdown */
runtime.exit(0);
Submit the jobs by using the submit-jobs script:
#!/bin/bash

for file in `ls ${1} | grep ".job$"`
do
    bsub -q short -n 1 -W 00:15 -R rusage[mem=50000] -R span[hosts=1] -o "out.%J" -e "err.%J" ${1}/$file
done
Timelapse registration
The timelapse registration is using the registration parameters specified before and the reference timepoint specified in the general parameters. The part in the master file for timelapse registration looks like this:
###---------- Timelapse registration ----------
timelapse_timepoint="1-3"
For creating the timelapse registration job (only one job) execute the create-timelapse-jobs script:
#!/bin/bash
source /projects/tomancak_lightsheet/Christopher/pipeline/master

mkdir -p $jobs_timelapse

    job="$jobs_timelapse/register-timelapse.job"
        echo $job
        echo "#!/bin/bash" > "$job"
    echo "$XVFB_RUN -a $Fiji -Dtype_of_registration=$type_of_registration \
        -Dtype_of_detection=$type_of_detection -Ddir=$dir -Dpattern=$channel_pattern_beads \
        -Dtimepoint=$timelapse_timepoint -Dangles=$angles \
        -Dsubpixel_localization=$subpixel_localization -Dxy_resolution=$xy_resolution \
        -Dz_scaling=$z_scaling -Dtransformation_model=$transformation_model -Dimglib_container=$imglib_container \
        -Dradius1=$radius1 -Dradius2=$radius2 -Dthreshold=$threshold \
            -Dinitial_sigma=$initial_sigma -Dthreshold_gaussian=$threshold_gaussian \
            -Dreferencetp=$referencetp -- --no-splash $timelapse_registration" >> "$job"
    chmod a+x "$job"
For the time-lapse.bsh script comment out the same parts that you commented out for the registration.bsh script.
import ij.IJ;
import java.lang.Runtime;

runtime = Runtime.getRuntime();
System.out.println(runtime.availableProcessors() + " cores available for multi-threading");

type_of_registration = System.getProperty( "type_of_registration" );
type_of_detection = System.getProperty( "type_of_detection" );

dir = System.getProperty( "dir" );
pattern = System.getProperty( "pattern" );
timepoint = System.getProperty( "timepoint" );
angles = System.getProperty( "angles" );

subpixel_localization = System.getProperty( "subpixel_localization" );
int xy_resolution = Integer.parseInt( System.getProperty( "xy_resolution" ) );
float z_scaling =Float.parseFloat( System.getProperty( "z_scaling" ) );
transformation_model = System.getProperty( "transformation_model" );
imglib_container = System.getProperty( "imglib_container" );

//Parameters for difference of mean !!Comment out for Difference of Gaussian!!
int radius1 = Integer.parseInt( System.getProperty( "radius1" ) );
int radius2 = Integer.parseInt( System.getProperty( "radius2" ) );
float threshold = Float.parseFloat( System.getProperty( "threshold" ) );

//Parameters for difference of gaussian !!Comment out for Differnence of Mean!!
//float initial_sigma = Float.parseFloat( System.getProperty( "initial_sigma" ) );
//float threshold_gaussian = Float.parseFloat( System.getProperty( "threshold_gaussian" ) );

referencetp = Integer.parseInt( System.getProperty( "referencetp" ) );

System.out.println( "type_of_registration=" + type_of_registration );
System.out.println( "type_of_detection=" + type_of_detection );
System.out.println( "dir=" + dir );
System.out.println( "pattern_of_spim=" + pattern );
System.out.println( "timepoint=" + timepoint );
System.out.println( "angles=" + angles );
System.out.println( "xy_resolution=" + xy_resolution );
System.out.println( "z_resolution=" + z_scaling );
System.out.println( "transformation_model=" + transformation_model );
System.out.println( "imglib_container=" + imglib_container );
System.out.println( "radius1=" + radius1 );
System.out.println( "radius2=" + radius2 );
System.out.println( "threshold=" + threshold );
System.out.println( "initial_sigma=" + initial_sigma );
System.out.println( "threshold_gaussian=" + threshold_gaussian );
System.out.println( "referencetp=" + referencetp );


IJ.run("Bead-based registration", "select_type_of_registration=" + type_of_registration + " " +
    "select_type_of_detection=[" + type_of_detection + "]" + " " +
    "spim_data_directory=" + dir + " " +
        "pattern_of_spim=" + pattern  + " " +
        "timepoints_to_process=" + timepoint + " " +
        "angles_to_process=" + angles + " " +
        "load_segmented_beads" + " " +
    "subpixel_localization=[" + subpixel_localization + "]" + " " +
    "specify_calibration_manually xy_resolution=" + xy_resolution + " z_resolution=" + z_scaling + " " +
    "transformation_model=" + transformation_model  + " " +
//  "imglib_container=[" + imglib_container + "] + " " +
    "channel_0_radius_1=" + radius1 + " " +  //Comment out for Difference of Gaussian
    "channel_0_radius_2=" + radius2 + " " + //Comment out for Difference of Gaussian
    "channel_0_threshold=" + threshold + " " + //Comment out for Difference of Gaussian
//  "channel_0_initial_sigma=" + initial_sigma + " " + //Comment out for Difference of Mean
//  "channel_0_threshold=" + threshold_gaussian + " " + //Comment out for Difference of Mean
    "re-use_per_timepoint_registration" + " " +
    "timelapse_registration" + " " +
    "select_reference=[Manually (specify)]" + " " +
    "reference_timepoint=" + referencetp + " "
    );

/* shutdown */
runtime.exit(0);
Submit the register-timelapse.job to the cluster using the submit-jobs script:
#!/bin/bash

bsub -q short -n 12 -W 00:10 -R rusage[mem=10000] -R span[hosts=1] -o "out.%J" -e "err.%J" ./register-timelapse.job
Content based multi-view fusion
The relevant part in the master file:
For single-channel data use select_channel="Single-channel". For using the timelapse registration select registration_fusion="\"Time-point registration (reference=1) of channel 0\"" and specifify the correct reference timepoint in (reference=1). If you want to use the registration of the individual timepoints for the fusion select registration_fusion="\"Individual registration of channel 0\" instead.
Specify how much you want to downsample the fusion. However always use the cropping parameters for the full resolution when defining the cropping area.
###---------- Multi-view content based fusion ----------
##Change between Single-Channel or Mulit-channel fusion
##If single channel then comment out 2nd fusion command in fusion.bsh script
select_channel="Single-channel"
#select_channel="Multi-channel"

##Use timelapse registration or Individual registration
##For timelapse registration specify reference timepoint:
registration_fusion="\"Time-point registration (reference=1) of channel 0\""
##Individual registration:
#registration_fusion="\"Individual registration of channel 0\""
downsample_output="2"

##Cropping parameters of full resolution
x="100"
y="226"
z="355"
w="1731"
h="820"
d="755"
Execute the create_fusion_jobs script for writing the fusion jobs:
#!/bin/bash
source /projects/tomancak_lightsheet/Christopher/pipeline/master

mkdir -p $jobs_fusion

for i in $timepoint

do
    job="$jobs_fusion/fusion-$i.job"
    echo $job
    echo "#!/bin/bash" > "$job"
    echo "$XVFB_RUN -a $Fiji -Xms100g -Xmx100g -Dselect_channel=$select_channel \
        -Dregistration_fusion=$registration_fusion -Ddir=$dir \
        -Dpattern_of_spim=$pattern_of_spim -Dtimepoint=$i -Dangles=$angles \
        -Dfusion_method=$fusion_method -Dprocess_views_in_paralell=$process_views_in_paralell \
        -Dblending=$blending -Dweights=$weights -Ddownsample_output=$downsample_output \
        -Dx=$x -Dy=$y -Dz=$z -Dw=$w -Dh=$h -Dd=$d -Dfused_image_output=$fused_image_output\
        -- --no-splash $fusion" >> "$job"
    chmod a+x "$job"
done
The fusion.bsh script, for single channel comment out the additional "registration=[" + registration_fusion + "]" + " " + line:
import ij.IJ;
import java.lang.Runtime;

runtime = Runtime.getRuntime();
System.out.println(runtime.availableProcessors() + " cores available for multi-threading");

select_channel = System.getProperty( "select_channel" );
dir = System.getProperty( "dir" );
pattern_of_spim = System.getProperty( "pattern_of_spim" );
timepoint = System.getProperty( "timepoint" );
angles = System.getProperty( "angles" );

fusion_method = System.getProperty( "fusion_method" );
process_views_in_paralell = System.getProperty( "process_views_in_paralell" );
blending = System.getProperty( "blending" );
weights = System.getProperty( "weights" );
downsample_output = Integer.parseInt( System.getProperty( "downsample_output" ) );
registration_fusion = System.getProperty( "registration_fusion" );

x = System.getProperty( "x" );
y = System.getProperty( "y" );
z = System.getProperty( "z" );
w = System.getProperty( "w" );
h = System.getProperty( "h" );
d = System.getProperty( "d" );

fused_image_output = System.getProperty( "fused_image_output" );

System.out.println( "Channel=" + select_channel );
System.out.println( "Registration=" + registration_fusion );
System.out.println( "dir=" + dir );
System.out.println( "Pattern=" + pattern_of_spim );
System.out.println( "timepoint=" + timepoint );
System.out.println( "angles=" + angles );

System.out.println( "fusion_method=" + fusion_method );
System.out.println( "process_views_in_paralell=" + process_views_in_paralell );
System.out.println( blending );
System.out.println( weights );
System.out.println( "Downsample=" + downsample_output );
System.out.println( "cropping=" + x + " " + y + " " + z + " " + w + " " + h + " " + d );
System.out.println( "fused_image_output=" + fused_image_output );

IJ.run("Multi-view fusion", "select_channel=" + select_channel + " " +
    "registration=[" + registration_fusion + "]" + " " +
//  "registration=[" + registration_fusion + "]" + " " +        //Comment out for Single-Channel fusion
    "spim_data_directory=" + dir + " " +
    "pattern_of_spim=" + pattern_of_spim + " " +
    "timepoints_to_process=" + timepoint + " " +
    "angles=" + angles + " " +
    "fusion_method=[" + fusion_method + "]" + " " +
    "process_views_in_paralell=" + process_views_in_paralell + " " +
    " + blending + " + " " +
    " + weights + " + " " +
    "downsample_output=" + downsample_output + " " +
    "crop_output_image_offset_x=" + x + " " +
    "crop_output_image_offset_y=" + y + " " +
    "crop_output_image_offset_z=" + z + " " +
    "crop_output_image_size_x=" + w + " " +
    "crop_output_image_size_y=" + h + " " +
    "crop_output_image_size_z=" + d + " " +
    "fused_image_output=[" + fused_image_output + "]");

/* shutdown */
runtime.exit(0);
For submitting the fusion jobs execute the submit-jobs script:
#!/bin/bash

for file in `ls ${1} | grep ".job$"`
do
    bsub -q short -n 12 -W 00:20 -R rusage[mem=30000] -R span[hosts=1] -o "out.%J" -e "err.%J" ${1}/$file
done
Multi-view deconvolution
Before performing multi-view deconvolution we need to apply the external transformation onto the registration files for downsampling the deconvolution. Make a copy of the registration files as backup before applying the external transformation.
External transformation
For the external transformation in the master file specify the pattern of the spim files, the timepoints that need to be transformed and for downsampling twice use 0.5:
###---------- External transformation for multi-view deconvolution ----------
##Caution: Before applying the exteranl transformation make a copy of the registration files!
##Only single channel, use external transformation for each individual channel
pattern_extrans="spim_TL{tt}_Angle{a}.tif"
#pattern_extrans="spim_TL{tt}_Angle{a}_Channel1.tif"

##timepoints:
external_transformation_timepoint="1-3"

##For downsampling 2x use 0.5:
m00="0.5"
m11="0.5"
m22="0.5"
The create_external_transformation script:
#!/bin/bash
source /projects/tomancak_lightsheet/Christopher/pipeline/master

mkdir -p $jobs_external_transformation

    job="$jobs_external_transformation/external_transformation.job"
    echo $job
    echo "#!/bin/bash" > "$job"
    echo "$XVFB_RUN -a $Fiji -Xms40g -Xmx40g -Ddir=$dir -Dpattern_of_spim=$pattern_extrans \
        -Dtimepoint=$external_transformation_timepoint -Dangles=$angles -Dreferencetp=$referencetp \
        -Dm00=$m00 -Dm11=$m11 -Dm22=$m22 -- --no-splash $external_transformation" >> "$job"
    chmod a+x "$job"
The external_transformation.bsh script:
import ij.IJ;
import java.lang.Runtime;

runtime = Runtime.getRuntime();
System.out.println(runtime.availableProcessors() + " cores available for multi-threading");

dir = System.getProperty( "dir" );
pattern_of_spim = System.getProperty( "pattern_of_spim" );
timepoint = System.getProperty( "timepoint" );
angles = System.getProperty( "angles" );
referencetp = System.getProperty( "referencetp" );
how_to_provide_affine_matrix = System.getProperty( "how_to_provide_affine_matrix" );
float m00 = Float.parseFloat( System.getProperty( "m00" ) );
float m11 = Float.parseFloat( System.getProperty( "m11" ) );
float m22 = Float.parseFloat( System.getProperty( "m22" ) );

System.out.println( "dir=" + dir );
System.out.println( "pattern_of_spim=" + pattern_of_spim );
System.out.println( "timepoint=" + timepoint );
System.out.println( "angles=" + angles );
System.out.println( "reference timepoint=" +referencetp );
System.out.println( "transformation m00=" + m00 + " " + "m11=" + m11 + " " + "m22=" + m22 );


IJ.run("Apply external transformation",
        "spim_data_directory=" + dir + " " +
        "pattern_of_spim=" + pattern_of_spim + " " +
        "timepoints_to_process=" + timepoint + " " +
        "angles=" + angles + " " +
        "how_to_provide_affine_matrix=[As individual entries]" +  " " +
//  "m00=0.5 m01=0 m02=0 m03=0 m10=0 m11=0.5 m12=0 m13=0 m20=0 m21=0 m22=0.5 m23=0" +  " " +
    "m00=" + m00 + " " + "m01=0 m02=0 m03=0 m10=0 m11=" + m11 + " " + "m12=0 m13=0 m20=0 m21=0 m22=" + m22 + " " + "m23=0" +  " " +
        "apply_to=[Time-point registration (reference=" + referencetp + ")]");

IJ.run("Apply external transformation",
        "spim_data_directory=" + dir + " " +
        "pattern_of_spim=" + pattern_of_spim + " " +
        "timepoints_to_process=" + referencetp + " " +
        "angles=" + angles + " " +
        "how_to_provide_affine_matrix=[As individual entries]" +  " " +
//      "m00=0.5 m01=0 m02=0 m03=0 m10=0 m11=0.5 m12=0 m13=0 m20=0 m21=0 m22=0.5 m23=0" +  " " +
    "m00=" + m00 + " " + "m01=0 m02=0 m03=0 m10=0 m11=" + m11 + " " + "m12=0 m13=0 m20=0 m21=0 m22=" + m22 + " " + "m23=0" +  " " +
    "apply_to=[Individual registration]");

/* shutdown */
runtime.exit(0);
Submit the external transformation job to the cluster with the submit-jobs script:
#!/bin/bash

for file in `ls ${1} | grep ".job$"`
do
    bsub -q short -n 12 -W 00:05 -R rusage[mem=10000] -R span[hosts=1] -o "out.%J" -e "err.%J" ${1}/$file
done
Deconvolution
For deconvolution specify again the spim pattern, the number of iterations and the cropping parameters. The cropping area is defined on the downsampled data. Therefore divide the full resolution cropping area by the factor you downsampled the registration files.
###---------- Multi-view deconvolution ----------
##Only for single channel, use deconvolution for each individual channel
pattern_deconvo="spim_TL{tt}_Angle{a}.tif"
#pattern_deconvo="spim_TL{tt}_Angle{a}_Channel1.tif"
iter="1"

##Cropping parameters: if downsampled divid fusion cropping parameters by this factor
decox="50"
decoy="113"
decoz="177"
decow="865"
decoh="410"
decod="377"
The create_deconvolution_jobs script:
#!/bin/bash
source /projects/tomancak_lightsheet/Christopher/pipeline/master

mkdir -p $jobs_deconvolution

for i in $timepoint
do
    job="$jobs_deconvolution/deconvolution-$i.job"
    echo $job
    echo "#!/bin/bash" > "$job"
    echo "$XVFB_RUN -a $Fiji -Xms110g -Xmx110g -Ddir=$dir -Dpattern_of_spim=$pattern_deconvo \
    -Dtimepoint=$i -Dangles=$angles -Dreferencetp=$referencetp \
    -Dx=$decox -Dy=$decoy -Dz=$decoz -Dw=$decow -Dh=$decoh -Dd=$decod \
    -Dtype_of_iteration=$type_of_iteration -Dosem_acceleration=$osem_acceleration \
    -Duse_tikhonov_regularization=$use_tikhonov_regularization -DTikhonov_parameter=$Tikhonov_parameter \
    -Dcompute=$compute -Dcompute_on=$compute_on -Dpsf_estimation=$psf_estimation \
    -Dpsf_display=$psf_display -Dload_input_images_sequentially=$load_input_images_sequentially \
    -Dfused_image_output=$fused_image_output -Diter=$iter \
    -- --no-splash $deconvolution" >> "$job"
    chmod a+x "$job"
done
The deconvolution.bsh script:
import ij.IJ;
import java.lang.Runtime;

fiji.plugin.Multi_View_Deconvolution.psfSize = 31;
fiji.plugin.Multi_View_Deconvolution.isotropic = true;

runtime = Runtime.getRuntime();
System.out.println(runtime.availableProcessors() + " cores available for multi-threading");

dir = System.getProperty( "dir" );
pattern_of_spim = System.getProperty( "pattern_of_spim" );
timepoint = System.getProperty( "timepoint" );
angles = System.getProperty( "angles" );
referencetp = System.getProperty( "referencetp" );

x = System.getProperty( "x" );
y = System.getProperty( "y" );
z = System.getProperty( "z" );
w = System.getProperty( "w" );
h = System.getProperty( "h" );
d = System.getProperty( "d" );

type_of_iteration = System.getProperty( "type_of_iteration" );
osem_acceleration = System.getProperty( "osem_acceleration" );
use_tikhonov_regularization = System.getProperty( "use_tikhonov_regularization" );
float Tikhonov_parameter = Float.parseFloat( System.getProperty( "Tikhonov_parameter" ) );
compute = System.getProperty( "compute" );
compute_on = System.getProperty( "compute_on" );
psf_estimation = System.getProperty( "psf_estimation" );
psf_display = System.getProperty( "psf_display" );
load_input_images_sequentially = System.getProperty( "load_input_images_sequentially" );
fused_image_output = System.getProperty( "fused_image_output" );

iter = System.getProperty( "iter" );

System.out.println( "dir=" + dir );
System.out.println( "pattern_of_spim=" + pattern_of_spim );
System.out.println( "timepoint=" + timepoint );
System.out.println( "angles=" + angles );
System.out.println( "reference timepoint=" +referencetp );
System.out.println( "cropping parameters=" + x + " " + y + " " + z + " " + w + " " + h + " " + d );
System.out.println( "type_of_iteration=" + type_of_iteration );
System.out.println( "osem_acceleration=" + osem_acceleration );
System.out.println( use_tikhonov_regularization );
System.out.println( "Tikhonov_parameter=" + Tikhonov_parameter );
System.out.println( "compute=" + compute );
System.out.println( "compute_on=" + compute_on );
System.out.println( "psf_estimation=" + psf_estimation );
System.out.println( "psf_display=" + psf_display );
System.out.println( load_input_images_sequentially );
System.out.println( "fused_image_output=" + fused_image_output );

IJ.run("Multi-view deconvolution", "spim_data_directory=" + dir + " " +
    "pattern_of_spim=" + pattern_of_spim + " " +
    "timepoints_to_process=" + timepoint + " " +
    "angles=" + angles + " " +
    "registration=[Time-point registration (reference=" + referencetp + ") of channel 0]" + " " +
    "crop_output_image_offset_x=" + x + " " +
    "crop_output_image_offset_y=" + y + " " +
    "crop_output_image_offset_z=" + z + " " +
    "crop_output_image_size_x=" + w + " " +
    "crop_output_image_size_y=" + h + " " +
    "crop_output_image_size_z=" + d + " " +
    "type_of_iteration=[" + type_of_iteration + "]" + " " +
    "osem_acceleration=[" + osem_acceleration + "]" + " " +
    "number_of_iterations=" + iter + " " +
    " + use_tikhonov_regularization + " + " " +
    "tikhonov_parameter=" + Tikhonov_parameter + " " +
//  "compute=[in 512x512x512 blocks]" + " " +
    "compute=[" + compute + "]" + " " +
    "compute_on=[" + compute_on + "]" + " " +
    "psf_estimation=[" + psf_estimation + "]" + " " +
//  "psf_display=[" + psf_display + "]" + " " +
    "psf_display=[Do not show PSF's]" + " " +
    " + load_input_images_sequentially + " + " " +
    "fused_image_output=[" + fused_image_output + "]"
    );

/* shutdown */
runtime.exit(0);
Submit the deconvolution jobs using the submit-jobs script:
#!/bin/bash

for file in `ls ${1} | grep ".job$"`
do
    bsub -q short -n 12 -R rusage[mem=117000] -R span[hosts=1] -o "out.%J" -e "err.%J" ${1}/$file
done
3d Rendering
In the master file specify the working directory and script for rendering single-channel data. Under source_rendering give the directory where to find the fusion or deconvolution output. Under target_directory give the name of a directory where to save the data within the data directory. A directory will be made for you. Specify the number of frames and the min max values for setting the brightness and contrast for the rendering.
At the moment it is not possible to put in the orientation or the rotation parameters from the master file. We will work on this part. Thus you need to modify the render-mov1.bsh accordingly.
###---------- Rendering ----------
##Working directory
jobs_rendering="/projects/pilot_spim/Christopher/pipeline/jobs_master_beta_2.0/3d_rendering_cpu"

##Two different sets of scripts, one for single channel and one for multi-channel; choose:
##Working script
#rendering="/projects/pilot_spim/Christopher/pipeline/jobs_master_beta_2.0/3d_rendering_cpu/single-render-mov.bsh"
rendering="/projects/pilot_spim/Christopher/pipeline/jobs_master_beta_2.0/3d_rendering_cpu/multi-render-mov.bsh"

##source
source_rendering="/output_fusion"

##target directory
target_rendering="/rendering"

#for rotation
nframes="6"

##Min Max single channel
minimum_rendering="0.6"
maximum_rendering="0.005"

##Min Max multi channel
#min_ch0=0.9
#max_ch0=0.01

#min_ch1=0.9
#max_ch1=0.01

##For multi-channel rendering:
#zSlices="369"

##Orientation or rotation
#still needs to be put into the script directly
#under construction
The create_render_jobs script:
#!/bin/bash

source /projects/pilot_spim/Christopher/pipeline/master

source_rendering=${dir}${source_rendering}
target_rendering=${dir}${target_rendering}

mkdir -p $jobs_rendering
mkdir -p $target_rendering

for i in $timepoint

do
    job="$jobs_rendering/render-$i.job"
    echo $job
    echo "#!/bin/bash" > "$job"
    echo "$XVFB_RUN -as\"-screen 0 1280x1024x24\" \
        $Fiji_rendering -Xms20g -Xmx20g -Ddir=$source_rendering \
        -Dtimepoint=$i -Dnframes=$nframes -Dtarget_rendering=$target_rendering\
        -Dminimum_rendering=$minimum_rendering -Dmaximum_rendering=$maximum_rendering \
        -Dmin_ch0=$min_ch0 -Dmax_ch0=$max_ch0 -Dmin_ch1=$min_ch1 -Dmax_ch1=$max_ch1 \
        -DzSlices=$zSlices -- --no-splash $rendering" >> "$job"
    chmod a+x "$job"
done
In the single-render-mov.bsh script for getting a fixed orientation modify the transformation matrics and comment out the rotation function (Line 99-103) as well as the rotation command (Line 116: transform) in the rendering part of the script. For rotation comment out the transformation matrics (Line 93-94) and the orientation command (Line 115: orientation) in the rendering part of the script.
import java.lang.Runtime;
import ij.ImagePlus;
import ij.ImageStack;
import ij.process.ImageProcessor;
import ij.IJ;
import ij.measure.Calibration;
import mpicbg.ij.stack.InverseTransformMapping;
import mpicbg.models.TranslationModel3D;
import mpicbg.models.AffineModel3D;
import mpicbg.models.InverseCoordinateTransformList;
import ij.process.ImageStatistics;
import ij.process.StackStatistics;

runtime = Runtime.getRuntime();

dir = System.getProperty( "dir" );
timepoint = Integer.parseInt( System.getProperty( "timepoint" ) );
int nFrames = Integer.parseInt( System.getProperty( "nframes" ) );
target_rendering = System.getProperty( "target_rendering" );
float minimum_rendering = Float.parseFloat( System.getProperty( "minimum_rendering" ));
float maximum_rendering = Float.parseFloat( System.getProperty( "maximum_rendering" ));

System.out.println( "Opening" );
System.out.println( "dir=" + dir );
System.out.println( "timepoint=" + timepoint);
System.out.println( "Number of frames=" + nFrames );
System.out.println( "target_directory=" + target_rendering );
System.out.println( "MinMax=" + minimum_rendering + " " + maximum_rendering );

IJ.run("Image Sequence...", "open=" + dir + "/" + timepoint + " " +
        "number=1000 starting=1 increment=1 scale=100" + " " +
        "file=.tif" + " " +
        "or=[] sort");

imp = IJ.getImage();

/*
 * Get min and max using stack histogram.
 * @param sat_lov
 *           how many pixels are allowed to be below min.
 * @param sat_high
 *           how many pixels are allowed to be above max.
 * @param stats
 *           stack histogram.
 * @return double[2] {min,max}
 */
double[] getMinAndMax( double sat_low, double sat_high, ImageStatistics stats ) {
    int hmin, hmax;
    int[] histogram = stats.histogram;
    int hsize = histogram.length;
    int t_low = (int)(stats.pixelCount*sat_low);
    int t_high = (int)(stats.pixelCount*sat_high);

    int i = -1;
    boolean found = false;
    int count = 0;
    int maxindex = hsize-1;
    do {
        i++;
        count += histogram[i];
        found = count>t_low;
    } while (!found && i<maxindex);
    hmin = i;

    i = hsize;
    count = 0;
    do {
        i--;
        count += histogram[i];
        found = count>t_high;
    } while (!found && i>0);
    hmax = i;

    double scale = (double)hsize / (stats.histMax - stats.histMin);
    double[] a = new double[2];
    a[0]= (double)hmin / scale + stats.histMin;
    a[1]= ((double)hmax + 1.0) / scale + stats.histMin;
    return a;
}

System.out.println("Analyzing histogram");

/*
 * compute max, min and convert to 8 bit
 */
stats = new StackStatistics( imp, 10000, 0.0, 0.0 );
double[] minmax = getMinAndMax( minimum_rendering, maximum_rendering , stats );
IJ.setMinAndMax( imp, minmax[0], minmax[1] );

System.out.println("Orienting");

/* orientation comment out for rotation */
/*orientation = new net.imglib2.realtransform.AffineTransform3D();
 *orientation.set(1.0, 0.0, 0.0, 0.0, 0.0, -0.978154, -0.20791358, 0.0, 0.0, 0.20791358, -0.978154, 0.0);
 */


/* rotation Comment out for orientation */
theta = ( double )timepoint / 180.0 * Math.PI;
orientation = new net.imglib2.realtransform.AffineTransform3D();
orientation.rotate( 0, theta );
transform = new net.imglib2.realtransform.AffineTransform3D();
transform.preConcatenate(orientation);

System.out.println("Rendering");

//Comment out orientation or transformation accordingly:

omp = net.imglib2.render.volume.Renderer.runGray(
    imp,                                      //impSource 3d image, will be converted to singel channel float even if it is ARGB-color
    imp.getWidth(),                       //@param width width of the target canvas
    imp.getHeight(),                       //@param height height of the target canvas
    0,                                        //@param min minimum intensity
    minmax[ 1 ] * 2,                          //@param max maximum intensity
    //orientation,              //orientation from transformation matrix comment out for rotation
    transform,                  //orientation initial  transformation assuming that the 3d volume is centered (e.g. export of Interactive Stack Rotation) Comment out if orientation is used!
    //( double )timepoint / ( double )nFrames,//animation a value between 0 and 1 that specifies the camera position along a predefined path
    0,
    1,                                        //stepSize z-stepping for the volume renderer higher is faster but less beautiful
    0,                    //bg background intensity
    1,                    //interpolationMethod 0 NN, 1 NL
    1.0 / ( minmax[ 1 ] ),                    //alphaScale scale factor for linear intensity to alpha transfer
//  - (minmax[0] + (minmax[0]*0.2)));
    -( minmax[ 1 ] - minmax[ 0 ] ) * 0.5);      //alphaOffset offset for linear intensity to alpha transfer

omp.show();
IJ.save( omp, target_rendering + "/render_tp" + IJ.pad(timepoint, 4) + ".tif" );

System.out.println("All done");

/* shutdown */
runtime.exit(0);
Submit the rendering jobs by using the submit-jobs script:
#!/bin/bash

for file in `ls ${1} | grep ".job$"`
do
    bsub -q short -n 1 -R span[hosts=1] -o "out.%J" -e "err.%J" ${1}/$file
done
Hdf5 export
The part in the master file covering the hdf5 export:
###---------- hdf5 export ----------
##Target directory
target_hdf5="/hdf5/"

##Number of jobs
num_export_job="`seq 0 3`"

#Path directory
#path="\"/projects/pilot_spim/Christopher/Test_scripts/single-channel\""
path="\"/projects/pilot_spim/Christopher/Test_scripts/multi-channel/channel_split\""

#Xml filename
exportXmlFilename="\"/hdf5/Test_single.xml\""

##Spim pattern
##For single channel:spim_TL{tt}_Angle{a}.tif
##For 2 channel: spim_TL{tt}_Angle{a}_Channel{c}.tif
#inputFilePattern="\"spim_TL{tt}_Angle{a}.tif\""
inputFilePattern="\"spim_TL{tt}_Angle{a}_Channel{c}.tif\""

##Channels: change for 2 channel data
channels_export="\"0\""
#channels_export="\"0,1\""

angles_export="\"1,2,3,4,5\""
timepoint_export="\"1-3\""
referencetp_export="\"1\""

filepath="\"/output_fusion/\""
filepattern="\"%1\\\$d/img_tl%1\\\$d_ch%2\\\$d_z%3\\\$03d.tif\""

export_numSlices="369"
sliceValueMin="0"
sliceValueMax="60000"

cropOffsetX="100"
cropOffsetY="226"
cropOffsetZ="355"
scale="2"
The first step is to determine the number of necessary jobs. Execute the run_numjobs script. This job runs throught the export.bsh script and calculates the number of necessary jobs.
#!/bin/bash

source /projects/pilot_spim/Christopher/pipeline/master

job="$jobs_export/getnumjobs"
        echo $job
        echo "#!/bin/bash" > "$job"
        echo "$XVFB_RUN -a $Fiji_export -Xmx10g -Dprintnumjobs=true \
                -Dpath=$path -DexportXmlFilename=$exportXmlFilename -Dspimresolutions=$spimresolutions \
                -Dspimsubdivisions=$spimsubdivisions -DinputFilePattern=$inputFilePattern \
                -Dchannels=$channels_export -Dangles=$angles_export -Dtimepoints=$timepoint_export \
                -DreferenceTimePoint=$referencetp_export -DoverrideImageZStretching=$overrideImageZStretching \
                -DzStretching=$z_scaling -Dfusionresolutions=$fusionresolutions \
                -Dfusionsubdivisions=$fusionsubdivisions -Dfilepath=$filepath -Dfilepattern=$filepattern \
                -DnumSlices=$export_numSlices -DsliceValueMin=$sliceValueMin -DsliceValueMax=$sliceValueMax \
                -DcropOffsetX=$cropOffsetX -DcropOffsetY=$cropOffsetY -DcropOffsetZ=$cropOffsetZ -Dscale=$scale \
                -- --no-splash $export" >> "$job"

chmod a+x "$job"

bsub -q short -n 1 -R span[hosts=1] -o "numjobsout" -e "output/err.%J" "$job"
This script will write a job file getnumjobs which will be send directly to the cluster.
#!/bin/bash
/sw/bin/xvfb-run -a /sw/users/pietzsch/packages/Fiji.app/ImageJ-linux64 -Xmx10g -Dprintnumjobs=true
-Dpath="/projects/pilot_spim/Christopher/Test_scripts/single-channel"
-DexportXmlFilename="/hdf5/Test_single.xml" -Dspimresolutions=
-Dspimsubdivisions= -DinputFilePattern="spim_TL{tt}_Angle{a}.tif"
-Dchannels="0" -Dangles="1,2,3" -Dtimepoints="1-3"
-DreferenceTimePoint="1" -DoverrideImageZStretching=
-DzStretching=3.2643520832 -Dfusionresolutions=
-Dfusionsubdivisions= -Dfilepath="/output_fusion/"
-Dfilepattern="%1\$d/img_tl%1\$d_ch%2\$d_z%3\$03d.tif" -DnumSlices=376
-DsliceValueMin=0 -DsliceValueMax=60000 -DcropOffsetX=100 -DcropOffsetY=226
-DcropOffsetZ=226 -Dscale=355
-- --no-splash /projects/pilot_spim/Christopher/pipeline/jobs_master_beta_2.0/hdf5/export.bsh
The output of this job will be the numjobsout file:
cat numjobsout

your job looked like:

------------------------------------------------------------
# LSBATCH: User input
/projects/pilot_spim/Christopher/pipeline/jobs_master_beta_2.0/hdf5//getnumjobs
------------------------------------------------------------

Successfully completed.

Resource usage summary:

    CPU time   :      3.39 sec.
    Max Memory :         3 MB
    Max Swap   :        33 MB

    Max Processes  :         1
    Max Threads    :         1

The output (if any) follows:

path=/projects/pilot_spim/Christopher/Test_scripts/single-channel
Xml Filename=/projects/pilot_spim/Christopher/Test_scripts/single-channel/hdf5/Test_single.xml
inputFilePattern=spim_TL{tt}_Angle{a}.tif
channels=0
angles=1,2,3
timepoints=1-3
referenceTimePoint=1
overrideImageZStretching=true
zStretching=3.481975
filepath=/projects/pilot_spim/Christopher/Test_scripts/single-channel/output_fusion/
filepattern=%1$d/img_tl%1$d_ch%2$d_z%3$03d.tif
sliceValueMin=0
sliceValueMax=60000
cropOffsetX=100
cropOffsetY=226
cropOffsetZ=355
scale=2
ChannelPattern: 0
Channels: (0)
ChannelsToRegister: 0
ChannelsRegister: (0)
ChannelsToFuse: 0
ChannelsFuse: (0)
(Thu Mar 13 09:44:10 CET 2014): Loading timepoint 1
Using model: mpicbg.models.AffineModel3D
(Thu Mar 13 09:44:10 CET 2014): Loading timepoint 2
Using model: mpicbg.models.AffineModel3D
(Thu Mar 13 09:44:10 CET 2014): Loading timepoint 3
Using model: mpicbg.models.AffineModel3D
Using model: mpicbg.models.AffineModel3D
Using model: mpicbg.models.AffineModel3D
Using model: mpicbg.models.AffineModel3D
Using model: mpicbg.models.AffineModel3D
Dimension of final output image:
From : (-4.3802876, -48.357666, -589.2959) to (1932.7172, 1272.5442, 761.48395)
Size: (1937.0974, 1320.9019, 1350.7798) needs 13185 MB of RAM
Scaled size(2): (969, 660, 675) needs 1648 MB of RAM
tx = 96.0 ty = 178.0 tz = -234.0 scale = 2
number of jobs: 3


PS: The stderr output (if any) follows:


PS:

Fail to open stderr file output/err.861957: No such file or directory.
The stderr output is included in this report.
You can check if all parameters are correct. The important line is the last number of jobs: 3. This means we need to adjust the master file accordingly:
##Number of jobs
num_export_job="`seq 0 3`"
There must always be a “0” job. This job generates the .xml file. The other jobs will write .h5 files that contain the actual data. The rest works analogous to the other parts of the pipline. Create the jobs with the create_export_jobs script. This script will also create a new directory within the spim data directory.
#!/bin/bash

source /projects/pilot_spim/Christopher/pipeline/master

target_hdf5=${dir}${target_hdf5}

echo $target_hdf5

mkdir -p $target_hdf5

for i in $num_export_job
do
    job="$jobs_export/export-$i.job"
        echo $job
        echo "#!/bin/bash" > "$job"
        #echo "source $config" >> "$job"
        echo "$XVFB_RUN -a $Fiji_export -Xmx10g -Dpartition=$i \
        -Dpath=$path -DexportXmlFilename=$exportXmlFilename -Dspimresolutions=$spimresolutions \
        -Dspimsubdivisions=$spimsubdivisions -DinputFilePattern=$inputFilePattern \
        -Dchannels=$channels_export -Dangles=$angles_export -Dtimepoints=$timepoint_export \
        -DreferenceTimePoint=$referencetp_export -DoverrideImageZStretching=$overrideImageZStretching \
        -DzStretching=$z_scaling -Dfusionresolutions=$fusionresolutions \
        -Dfusionsubdivisions=$fusionsubdivisions -Dfilepath=$filepath -Dfilepattern=$filepattern \
        -DnumSlices=$export_numSlices -DsliceValueMin=$sliceValueMin -DsliceValueMax=$sliceValueMax \
        -DcropOffsetX=$cropOffsetX -DcropOffsetY=$cropOffsetY -DcropOffsetZ=$cropOffsetZ -Dscale=$scale \
        -- --no-splash $export" >> "$job"
        chmod a+x "$job"
done
Each job will use the export.bsh script:
import creator.Scripting;
import creator.Scripting.PartitionedSequenceWriter;
import creator.SetupAggregator;
import creator.spim.imgloader.StackImageLoader;
import mpicbg.spim.data.SequenceDescription;
import mpicbg.spim.data.ViewRegistration;
import mpicbg.spim.data.ViewRegistrations;
import mpicbg.spim.data.ViewSetup;
import net.imglib2.realtransform.AffineTransform3D;
import viewer.hdf5.Partition;

String path = System.getProperty( "path" );
String exportXmlFilename = System.getProperty( "exportXmlFilename" );

//int[][] spimresolutions = System.getProperty( "spimresolutions" );
//int[][] spimsubdivisions = System.getProperty( "spimsubdivisions" );

inputFilePattern = System.getProperty( "inputFilePattern" );
channels = System.getProperty( "channels" );
angles = System.getProperty( "angles" );
timepoints = System.getProperty( "timepoints" );
int referenceTimePoint = Integer.parseInt( System.getProperty( "referenceTimePoint" ) );
//overrideImageZStretching = System.getProperty( "overrideImageZStretching" );
float zStretching = Float.parseFloat( System.getProperty( "zStretching" ) );

//int[][] fusionresolutions = System.getProperty( "fusionresolutions" );
//int[][] fusionsubdivisions = System.getProperty( "fusionsubdivisions" );

String filepath = System.getProperty( "filepath" );
String filepattern = System.getProperty( "filepattern" );
int numSlices = Integer.parseInt( System.getProperty( "numSlices" ) );
int sliceValueMin = Integer.parseInt( System.getProperty( "sliceValueMin" ) );
int sliceValueMax = Integer.parseInt( System.getProperty( "sliceValueMax" ) );

int cropOffsetX = Integer.parseInt( System.getProperty( "cropOffsetX" ) );
int cropOffsetY = Integer.parseInt( System.getProperty( "cropOffsetY" ) );
int cropOffsetZ = Integer.parseInt( System.getProperty( "cropOffsetZ" ) );
int scale = Integer.parseInt( System.getProperty( "scale" ) );


String exportXmlFilename = path + exportXmlFilename;
inputDirectory = path + "/";
overrideImageZStretching = true;
String filepath = path + filepath;

// ==============================================================================

int[][] spimresolutions = { { 1, 1, 1 }, { 2, 2, 1 }, { 4, 4, 2 }, { 8, 8, 4 } };
int[][] spimsubdivisions = { { 32, 32, 4 }, { 16, 16, 8 }, { 8, 8, 8 }, { 8, 8, 8 } };
// int[][] spimresolutions = { { 1, 1, 1 }, { 2, 2, 1 }, { 4, 4, 2 } };
// int[][] spimsubdivisions = { { 32, 32, 4 }, { 16, 16, 8 }, { 8, 8, 8 } };

int[][] fusionresolutions = { { 1, 1, 1 }, { 2, 2, 2 }, { 4, 4, 4 }, { 8, 8, 8 } };
int[][] fusionsubdivisions = { { 16, 16, 16 }, { 16, 16, 16 }, { 8, 8, 8 }, { 8, 8, 8 } };

// =============================================================================

System.out.println( "path=" + path );
System.out.println( "Xml Filename=" + exportXmlFilename );
System.out.println( "inputFilePattern=" + inputFilePattern );
System.out.println( "channels=" + channels );
System.out.println( "angles=" + angles );
System.out.println( "timepoints=" + timepoints );
System.out.println( "referenceTimePoint=" + referenceTimePoint);
System.out.println( "overrideImageZStretching=" + overrideImageZStretching );
System.out.println( "zStretching=" + zStretching );
System.out.println( "filepath=" + filepath );
System.out.println( "filepattern=" + filepattern );
System.out.println( "sliceValueMin=" + sliceValueMin );
System.out.println( "sliceValueMax=" + sliceValueMax );
System.out.println( "cropOffsetX=" + cropOffsetX );
System.out.println( "cropOffsetY=" + cropOffsetY );
System.out.println( "cropOffsetZ=" + cropOffsetZ );
System.out.println( "scale=" + scale );

// =============================================================================

spimseq = Scripting.createSpimRegistrationSequence( inputDirectory, inputFilePattern, channels, angles, timepoints, referenceTimePoint, overrideImageZStretching, zStretching );
fusionTransforms = Scripting.getFusionTransforms( spimseq, scale, cropOffsetX, cropOffsetY, cropOffsetZ );
fusion = Scripting.createFusionResult( spimseq, filepath, filepattern, numSlices, sliceValueMin, sliceValueMax, fusionTransforms );


SetupAggregator aggregator = new SetupAggregator();
aggregator.addSetups( spimseq, spimresolutions, spimsubdivisions );
aggregator.addSetups( fusion, fusionresolutions, fusionsubdivisions );


// splitting ...
int timepointsPerPartition = 2;
int setupsPerPartition = 0;
ArrayList partitions = Scripting.split( aggregator, timepointsPerPartition, setupsPerPartition, exportXmlFilename );

PartitionedSequenceWriter writer = new PartitionedSequenceWriter( aggregator, exportXmlFilename, partitions );
printnumjobs = Boolean.parseBoolean( System.getProperty( "printnumjobs" ) );
if ( printnumjobs )
{
    print( "number of jobs: " + ( writer.numPartitions() + 1 ) );
}
else
{
    jobid = Integer.parseInt( System.getProperty( "partition" ) );
    if ( jobid == 0 )
    {
        writer.writeXmlAndLinks();
    }
    else
    {
        writer.writePartition( jobid - 1 );
    }
}

/* shutdown */
System.exit(0);
Send the jobs to the cluster using the submit-jobs script:
#!/bin/bash

for file in `ls ${1} | grep ".job$"`
do
    bsub -q short -n 8 -W 01:00 -R rusage[mem=10000] -R span[hosts=1] -o "out.%J" -e "err.%J" ${1}/$file
done
Multi-channel Processing
The master file has all the necessary information to easily switch between single-channel and multi-channel data. You just need to make the correct settings in the master file and use 2 additional scripts for the current pipeline to process multi-channel datasets. In this chapter I will point out the necessary changes specifically.
First steps
Since we already did set up the master file and the scripts properly the only things we need to manipulate this time are the processing parameters (see First time using the master file)
Change the data directory dir=. The example dataset has 3 timepoints and 5 angles. For multi-channel processing select the option for multi-channel data: pattern_of_spim="spim_TL{tt}_Angle{a}_Channel{c}.tif". Also change the reference timepoint and the calibration settings.
####--------------------------------- General Parameters ---------------------------------
###Data directory
dir="/projects/tomancak_lightsheet/Christopher/Test_scripts/multi-channel/"

###Dataset core parameters
timepoint="`seq 1 3`"
angles="1,2,3,4,5"
num_angles="5"

###pattern of spim data:
#pattern_of_spim="spim_TL{tt}_Angle{a}.tif"
pattern_of_spim="spim_TL{tt}_Angle{a}_Channel{c}.tif"
##change pattern for single-channel: (e.g. spim_TL{tt}_Angle{a}.tif)
##or multi-channel processing: (e.g. spim_TL{tt}_Angle{a}_Channel{c}.tif)
##for padded zeros use tt as place holder

###Timelapse registration
referencetp="1"

###Manual calibration
xy_resolution="1"
z_scaling="3.481975"
The dataset is in the specified directory:
cd /projects/tomancak_lightsheet/Christopher/Test_scripts/multi-channel/
ls
2014-02-14_Stock19_Stock17.czi
2014-02-14_Stock19_Stock17(1).czi
2014-02-14_Stock19_Stock17(2).czi
2014-02-14_Stock19_Stock17(3).czi
2014-02-14_Stock19_Stock17(4).czi
2014-02-14_Stock19_Stock17(5).czi
2014-02-14_Stock19_Stock17(6).czi
2014-02-14_Stock19_Stock17(7).czi
2014-02-14_Stock19_Stock17(8).czi
2014-02-14_Stock19_Stock17(9).czi
2014-02-14_Stock19_Stock17(10).czi
2014-02-14_Stock19_Stock17(11).czi
2014-02-14_Stock19_Stock17(12).czi
2014-02-14_Stock19_Stock17(13).czi
2014-02-14_Stock19_Stock17(14).czi
Add the (0) index to the first .czi file:
mv 2014-02-14_Stock19_Stock17.czi 2014-02-14_Stock19_Stock17(0).czi
ls
2014-02-14_Stock19_Stock17(0).czi
2014-02-14_Stock19_Stock17(1).czi
2014-02-14_Stock19_Stock17(2).czi
2014-02-14_Stock19_Stock17(3).czi
2014-02-14_Stock19_Stock17(4).czi
2014-02-14_Stock19_Stock17(5).czi
2014-02-14_Stock19_Stock17(6).czi
2014-02-14_Stock19_Stock17(7).czi
2014-02-14_Stock19_Stock17(8).czi
2014-02-14_Stock19_Stock17(9).czi
2014-02-14_Stock19_Stock17(10).czi
2014-02-14_Stock19_Stock17(11).czi
2014-02-14_Stock19_Stock17(12).czi
2014-02-14_Stock19_Stock17(13).czi
2014-02-14_Stock19_Stock17(14).czi
Rename .czi files
The renaming in the multi-channel data follows the exact same principle as in the single-channel data. Just modify the master file accordingly and then execute the rename-zeiss-files.sh script.
###---------- Renaming .czi files ----------
first_index="0"
last_index="14"
first_timepoint="1"
angles_renaming=(1 2 3 4 5)

##For padded zero 2 = 01; 3 = 001
pad_rename_czi="2"

##Change directory and pattern
source_pattern=/2014-02-14_Stock19_Stock17\(\{index\}\).czi
target_pattern=/spim_TL\{timepoint\}_Angle\{angle\}.czi
The .czi files should now be renamed:
cd /projects/tomancak_lightsheet/Christopher/Test_scripts/multi-channel/
ls
spim_TL01_Angle1.czi
spim_TL01_Angle2.czi
spim_TL01_Angle3.czi
spim_TL01_Angle4.czi
spim_TL01_Angle5.czi
spim_TL02_Angle1.czi
spim_TL02_Angle2.czi
spim_TL02_Angle3.czi
spim_TL02_Angle4.czi
spim_TL02_Angle5.czi
spim_TL03_Angle1.czi
spim_TL03_Angle2.czi
spim_TL03_Angle3.czi
spim_TL03_Angle4.czi
spim_TL03_Angle5.czi
Resave .czi files
The resaving also relies on the same scripts as for the single-channel data. Specify the correct angles and the correct parameter for the padded zero:
###---------- Resaving .czi or ome.tiff as .tif ----------
##use ometiff_resave for ome.tiff and czi_resave for .czi
angle_resaving="1 2 3 4 5"

##For padded zero 2 = 01; 3 = 001
pad_resave="2"
Create the jobs by executing the create-resaving-jobs script and submit them by using the submit-jobs script.
cd /projects/tomancak_lightsheet/Christopher/Test_scripts/multi-channel/
ls
spim_TL01_Angle1.czi
spim_TL01_Angle1.tif
spim_TL01_Angle2.czi
spim_TL01_Angle2.tif
spim_TL01_Angle3.czi
spim_TL01_Angle3.tif
spim_TL01_Angle4.czi
spim_TL01_Angle4.tif
spim_TL01_Angle5.czi
spim_TL01_Angle5.tif
spim_TL02_Angle1.czi
spim_TL02_Angle1.tif
spim_TL02_Angle2.czi
spim_TL02_Angle2.tif
spim_TL02_Angle3.czi
spim_TL02_Angle3.tif
spim_TL02_Angle4.czi
spim_TL02_Angle4.tif
spim_TL02_Angle5.czi
spim_TL02_Angle5.tif
spim_TL03_Angle1.czi
spim_TL03_Angle1.tif
spim_TL03_Angle2.czi
spim_TL03_Angle2.tif
spim_TL03_Angle3.czi
spim_TL03_Angle3.tif
spim_TL03_Angle4.czi
spim_TL03_Angle4.tif
spim_TL03_Angle5.czi
spim_TL03_Angle5.tif
Split channels
The channels are then split into separated files. The algorithm will output the files with the following naming patterns:
spim_TL{tt}_Angle{a}_Channel0
spim_TL{tt}_Angle{a}_Channel1
etc...
In the master file Specify the number of angles and give a name for a new directory within the data directory where you want to save the resulting files. This directory will be created for you:
###---------- Split Channels (Only for multi-channel data) ----------
##Outputs channls as spim_TL{tt}_Angle{a}_Channel0,spim_TL{tt}_Angle{a}_Channel1 ...
angles_split="1 2 3 4 5"

##Target directory
target_split="/channel_split/"
The create-split-jobs script:
#!/bin/bash

source /projects/tomancak_lightsheet/Christopher/pipeline/master

target_split=${dir}${target_split}

mkdir -p ${jobs_split}
mkdir -p ${target_split}

for i in $timepoint
#for i in 1

do

for a in $angles_split

do
            job="$jobs_split/split-$i-$a.job"
                echo $job
                echo "#!/bin/bash" > "$job"
                echo "$XVFB_RUN -a $Fiji -Ddir=$dir -Dtimepoint=$i -Dangle=$a \
        -Dpad=$pad_resave -Dtarget_split=$target_split -- --no-splash $split" >> "$job"
                chmod a+x "$job"
        done
done
The split.bsh script:
import ij.IJ;
import ij.ImagePlus;
import ij.ImageStack;
import java.lang.Runtime;
import java.io.File;
import java.io.FilenameFilter;


runtime = Runtime.getRuntime();

dir = System.getProperty( "dir" );
int timepoint = Integer.parseInt( System.getProperty( "timepoint" ) );
angle = System.getProperty( "angle" );
target_split = System.getProperty( "target_split" );
int pad = Integer.parseInt( System.getProperty( "pad" ) );

System.out.println( "timpoint=" + timepoint );
System.out.println( "angles=" + angles );
System.out.println( "target_split=" + target_split );
System.out.println( "pad=" + pad );

//open image

System.out.println( dir );
imp = new ImagePlus( dir + "spim_TL" + IJ.pad( timepoint , pad ) + "_Angle" + angle + ".tif" );
System.out.println( imp.getTitle() );

/* split channels */
stack = imp.getStack();
for ( c = 0; c < imp.getNChannels(); ++c )
{
    channelStack = new ImageStack( imp.getWidth(), imp.getHeight() );
    for ( z = 0; z < imp.getNSlices(); ++z )
        channelStack.addSlice(
            "",
            stack.getProcessor(
                imp.getStackIndex( c + 1, z + 1, 1 ) ) );
    impc = new ImagePlus( imp.getTitle() + " #" + ( c + 1 ), channelStack );
    IJ.save( impc, target_split + imp.getTitle().replaceFirst( ".tif$", "_Channel" + ( c ) + ".tif" ) );
}

/* shutdown */
runtime.exit(0);
Submit the jobs using the submit-jobs script:
#!/bin/bash

for file in `ls ${1} | grep ".job$"`
do
    bsub -q short -n 1  -R span[hosts=1] -o "out.%J" -e "err.%J" ${1}/$file
done
The split files will be now saved in a new directory:
cd /projects/tomancak_lightsheet/Christopher/Test_scripts/multi-channel/channel_split
ls
spim_TL01_Angle1_Channel0.tif
spim_TL01_Angle1_Channel1.tif
spim_TL01_Angle2_Channel0.tif
spim_TL01_Angle2_Channel1.tif
spim_TL01_Angle3_Channel0.tif
spim_TL01_Angle3_Channel1.tif
spim_TL01_Angle4_Channel0.tif
spim_TL01_Angle4_Channel1.tif
spim_TL01_Angle5_Channel0.tif
spim_TL01_Angle5_Channel1.tif
spim_TL02_Angle1_Channel0.tif
spim_TL02_Angle1_Channel1.tif
spim_TL02_Angle2_Channel0.tif
spim_TL02_Angle2_Channel1.tif
spim_TL02_Angle3_Channel0.tif
spim_TL02_Angle3_Channel1.tif
spim_TL02_Angle4_Channel0.tif
spim_TL02_Angle4_Channel1.tif
spim_TL02_Angle5_Channel0.tif
spim_TL02_Angle5_Channel1.tif
spim_TL03_Angle1_Channel0.tif
spim_TL03_Angle1_Channel1.tif
spim_TL03_Angle2_Channel0.tif
spim_TL03_Angle2_Channel1.tif
spim_TL03_Angle3_Channel0.tif
spim_TL03_Angle3_Channel1.tif
spim_TL03_Angle4_Channel0.tif
spim_TL03_Angle4_Channel1.tif
spim_TL03_Angle5_Channel0.tif
spim_TL03_Angle5_Channel1.tif
We will proceed to work with the files were the channels are split. Since the data directory in these files is now different we need to use a different directory in the master file. From then on, all the output will be saved into this directory:
####--------------------------------- General Parameters ---------------------------------
###Data directory
#dir="/projects/tomancak_lightsheet/Christopher/Test_scripts/single-channel/"
dir="/projects/tomancak_lightsheet/Christopher/Test_scripts/single-channel/channel-split"
Multi-view registration
In the example dataset the beads were only visible in Channel1. We will perform a single-channel bead registration only on this channel. We therefore need to specify the spim data pattern accordingly:
channel_pattern_beads="spim_TL{tt}_Angle{a}_Channel1.tif"
Change the detection parameters for the chosen detection method.
###---------- Multi-view registration (Difference of mean or Difference of Gaussian) ----------
##Specify the Pattern for Detection of the beads single channel: spim_TL{t}_Angle{a}.tif
##multi-channel: spim_TL{t}_Angle{a}_Channel1.tif were 1 is the Channel that contains the beads
#channel_pattern_beads="spim_TL{tt}_Angle{a}.tif"
channel_pattern_beads="spim_TL{tt}_Angle{a}_Channel1.tif"

##Difference of mean (Comment out Difference of Gaussian parts in registration.bsh script)
type_of_detection="\"Difference-of-Mean (Integral image based)\""
radius1="2"
radius2="3"
threshold="0.009"

##Difference of Gaussian (Comment out Differnce of Mean parts in registration.bsh script)
#type_of_detection="\"Difference-of-Gaussian\""
#initial_sigma="1.8000"
#threshold_gaussian="0.0080"
Execute the create-registration-jobs script to create the jobs for registration and send them to the cluster by executing the submit-jobs script.
Timelapse registration
The time-lapse registration uses the already defined multi-view registration. Specify the timepoints you want to use for timelapse registration.
###---------- Timelapse registration ----------
timelapse_timepoint="1-3"
Create the register-timelapse.job by executing the create-timelapse-jobs and then submit them to the cluster.
Dublicate registration files
For further processing we need registration files for both channels. Therefore we dublicate the existing registration files and rename them to the missing channel. We advise to make a backup of the registration files at this point.
In the master file specify which channel was registered (channel_source) and which channel still needs registration files (channel_target).
###---------- Dublicate Registration files (Only for multi-channel data) ----------
#Channel that contain the beads
channel_source="1"
channel_target="0"
For dublicating the registration files just execute the dublicate_rename_registration.sh script.
#!/bin/bash

source /projects/tomancak_lightsheet/Christopher/pipeline/master

reftp=${referencetp}
ref=registration.to_"${reftp}"
#echo "${ref}"

channel_source=${channel_source}
channel_target=${channel_target}


for i in $timepoint
do
    i=`printf "%0${pad_resave}d" "$i"`

    for a in $angles_split
        do

            for end in "beads.txt" "dim" "registration" "$ref"
                do

        #echo $dir/registration/spim_TL"$i"_Angle"$a"_Channel"${channel_source}".tif."$end" $dir/registration/spim_TL"$i"_Angle"$a"_Channel"${channel_target}".tif."$end"
        cp $dir/registration/spim_TL"$i"_Angle"$a"_Channel1.tif."$end" $dir/registration/spim_TL"$i"_Angle"$a"_Channel0.tif."$end"

    done

  done

done

echo Dublication complete! Have a nice day!
exit 0

chmod a+x dublicate_rename_registration.sh
./dublicate_rename_registration.sh
Content based multi-view fusion
For the content based multi-view fusion use select_channel="Multi-channel". Specify the registration, the downsampling and the cropping accordingly:
###---------- Multi-view content based fusion ----------
##Change between Single-Channel or Mulit-channel fusion
##If single channel then comment out 2nd fusion command in fusion.bsh script
#select_channel="Single-channel"
select_channel="Multi-channel"

##Use timelapse registration or Individual registration
##For timelapse registration specify reference timepoint:
registration_fusion="\"Time-point registration (reference=1) of channel 0\""
##Individual registration:
#"\"Individual registration of channel 0\""
downsample_output="2"

##Cropping parameters of full resolution
x="0"
y="314"
z="320"
w="1858"
h="758"
d="740"
In the fusion.bsh script comment in the additional registration "registration=[" + registration_fusion + "]" + " " + line (Line 46).
import ij.IJ;
import java.lang.Runtime;

runtime = Runtime.getRuntime();
System.out.println(runtime.availableProcessors() + " cores available for multi-threading");

select_channel = System.getProperty( "select_channel" );
dir = System.getProperty( "dir" );
pattern_of_spim = System.getProperty( "pattern_of_spim" );
timepoint = System.getProperty( "timepoint" );
angles = System.getProperty( "angles" );

fusion_method = System.getProperty( "fusion_method" );
process_views_in_paralell = System.getProperty( "process_views_in_paralell" );
blending = System.getProperty( "blending" );
weights = System.getProperty( "weights" );
downsample_output = Integer.parseInt( System.getProperty( "downsample_output" ) );
registration_fusion = System.getProperty( "registration_fusion" );

x = System.getProperty( "x" );
y = System.getProperty( "y" );
z = System.getProperty( "z" );
w = System.getProperty( "w" );
h = System.getProperty( "h" );
d = System.getProperty( "d" );

fused_image_output = System.getProperty( "fused_image_output" );

System.out.println( "Channel=" + select_channel );
System.out.println( "Registration=" + registration_fusion );
System.out.println( "dir=" + dir );
System.out.println( "Pattern=" + pattern_of_spim );
System.out.println( "timepoint=" + timepoint );
System.out.println( "angles=" + angles );

System.out.println( "fusion_method=" + fusion_method );
System.out.println( "process_views_in_paralell=" + process_views_in_paralell );
System.out.println( blending );
System.out.println( weights );
System.out.println( "Downsample=" + downsample_output );
System.out.println( "cropping=" + x + " " + y + " " + z + " " + w + " " + h + " " + d );
System.out.println( "fused_image_output=" + fused_image_output );

IJ.run("Multi-view fusion", "select_channel=" + select_channel + " " +
    "registration=[" + registration_fusion + "]" + " " +
    "registration=[" + registration_fusion + "]" + " " +        //Comment out for Single-Channel fusion
    "spim_data_directory=" + dir + " " +
    "pattern_of_spim=" + pattern_of_spim + " " +
    "timepoints_to_process=" + timepoint + " " +
    "angles=" + angles + " " +
    "fusion_method=[" + fusion_method + "]" + " " +
    "process_views_in_paralell=" + process_views_in_paralell + " " +
    " + blending + " + " " +
    " + weights + " + " " +
    "downsample_output=" + downsample_output + " " +
    "crop_output_image_offset_x=" + x + " " +
    "crop_output_image_offset_y=" + y + " " +
    "crop_output_image_offset_z=" + z + " " +
    "crop_output_image_size_x=" + w + " " +
    "crop_output_image_size_y=" + h + " " +
    "crop_output_image_size_z=" + d + " " +
    "fused_image_output=[" + fused_image_output + "]");

/* shutdown */
runtime.exit(0);
Create the fusion jobs by executing the create_fusion_jobs and submit them to the cluster.
3D-rendering for 2 channels
The relevant part in the master file:
###---------- Rendering ----------
##Two different sets of scripts, one for single channel and one for multi-channel; choose:
##Working directory
jobs_rendering="/projects/pilot_spim/Christopher/pipeline/jobs_master_beta_2.0/3d_rendering_cpu"

##Working script
#rendering="/projects/pilot_spim/Christopher/pipeline/jobs_master_beta_2.0/3d_rendering_cpu/single-render-mov.bsh"
rendering="/projects/pilot_spim/Christopher/pipeline/jobs_master_beta_2.0/3d_rendering_cpu/multi-render-mov.bsh"

##source
source_rendering="/output_fusion"

##target directory
target_rendering="/rendering"

nframes="6"

##Min Max single channel
#minimum_rendering="0.6"
#maximum_rendering="0.005"

##Min Max multi channel
min_ch0=0.9
max_ch0=0.01

min_ch1=0.9
max_ch1=0.01

##For multi-channel rendering:
zSlices="369"

##Orientation or rotation
#still needs to be put into the script directly
#under construction
First specify the directory of the jobs. The 2 channel rendering uses the multi-render-mov.bsh script, you need to select this script for rendering. Specify which output you want to process and where you want to save the results of the rendering within in the original directory. Finally give the number of frames, the min and max values and the number of slices of the output.
The create-render-jobs script:
#!/bin/bash
source /projects/pilot_spim/Christopher/pipeline/master

source_rendering=${dir}${source_rendering}
target_rendering=${dir}${target_rendering}

mkdir -p $jobs_rendering
mkdir -p $target_rendering

for i in $timepoint

do
    job="$jobs_rendering/render-$i.job"
    echo $job
    echo "#!/bin/bash" > "$job"
    echo "$XVFB_RUN -as\"-screen 0 1280x1024x24\" \
        $Fiji_rendering -Xms20g -Xmx20g -Ddir=$source_rendering \
        -Dtimepoint=$i -Dnframes=$nframes -Dtarget_rendering=$target_rendering\
        -Dminimum_rendering=$minimum_rendering -Dmaximum_rendering=$maximum_rendering \
        -Dmin_ch0=$min_ch0 -Dmax_ch0=$max_ch0 -Dmin_ch1=$min_ch1 -Dmax_ch1=$max_ch1 \
        -DzSlices=$zSlices -- --no-splash $rendering" >> "$job"
    chmod a+x "$job"
done
The jobs will use the multi-render-mov.bsh script for rendering. The postion can be set by changing the transformation matrix (line 141-143). For rotation comment in Line 147-149.
/*
 * two channels composite form two independent files
 */
import java.lang.Runtime;
import ij.CompositeImage;
import ij.ImagePlus;
import ij.ImageStack;
import ij.process.ImageProcessor;
import ij.IJ;
import ij.measure.Calibration;
import mpicbg.ij.stack.InverseTransformMapping;
import mpicbg.models.TranslationModel3D;
import mpicbg.models.AffineModel3D;
import mpicbg.models.InverseCoordinateTransformList;
import ij.process.ImageStatistics;
import ij.process.StackStatistics;
import ij.plugin.filter.GaussianBlur;
import net.imglib2.type.numeric.ARGBDoubleType;
import net.imglib2.type.numeric.ARGBType;
import net.imglib2.type.numeric.AbstractARGBDoubleType;
import net.imglib2.type.numeric.NativeARGBDoubleType;
runtime = Runtime.getRuntime();

/* read parameters from command line */
dir2 = System.getProperty( "target_rendering" );
dir = System.getProperty( "dir" );

int timepoint = Integer.parseInt( System.getProperty( "timepoint" ) );
int nFrames = Integer.parseInt( System.getProperty( "nframes" ) );
int n = Integer.parseInt( System.getProperty( "zSlices" ) );

float min_ch0 = Float.parseFloat( System.getProperty( "min_ch0" ) );
float max_ch0 = Float.parseFloat( System.getProperty( "max_ch0" ) );
float min_ch1 = Float.parseFloat( System.getProperty( "min_ch1" ) );
float max_ch1 = Float.parseFloat( System.getProperty( "max_ch1" ) );

System.out.println("Opening");

System.out.println(dir);
System.out.println(dir2);
System.out.println(timepoint);
System.out.println(nFrames);
System.out.println(n);
System.out.println( "MinMax channel0 =" + min_ch0 + ";" + max_ch0 );
System.out.println( "MinMax channel1 =" + min_ch1 + ";" + max_ch1 );


// Open channel 0
IJ.run("Image Sequence...", "open=" + dir +  "/" + timepoint + "/img_tl" + timepoint + "_ch0_z000.tif number=" + n + " starting=1 increment=1 scale=100 file=ch0 sort");
imp1 = IJ.getImage();

// Open channel 1
IJ.run("Image Sequence...", "open=" + dir + "/" + timepoint + "/img_tl" + timepoint + "_ch1_z000.tif number=" + n + " starting=1 increment=1 scale=100 file=ch1 sort");
imp2 = IJ.getImage();

int n = imp1.getNSlices();

/*
 * Get min and max using stack histogram.
 * @param sat_lov
 *           how many pixels are allowed to be below min.
 * @param sat_high
 *           how many pixels are allowed to be above max.
 * @param stats
 *           stack histogram.
 * @return double[2] {min,max}
 */
double[] getMinAndMax( double sat_low, double sat_high, ImageStatistics stats ) {
    int hmin, hmax;
    int[] histogram = stats.histogram;
    int hsize = histogram.length;
    int t_low = (int)(stats.pixelCount*sat_low);
    int t_high = (int)(stats.pixelCount*sat_high);

    int i = -1;
    boolean found = false;
    int count = 0;
    int maxindex = hsize-1;
    do {
        i++;
        count += histogram[i];
        found = count>t_low;
    } while (!found && i<maxindex);
    hmin = i;

    i = hsize;
    count = 0;
    do {
        i--;
        count += histogram[i];
        found = count>t_high;
    } while (!found && i>0);
    hmax = i;

    double scale = (double)hsize / (stats.histMax - stats.histMin);
    double[] a = new double[2];
    a[0]= (double)hmin / scale + stats.histMin;
    a[1]= ((double)hmax + 1.0) / scale + stats.histMin;
    return a;
}

System.out.println("Analyzing histogram");

/*
 * compute max, min
 */
stats = new StackStatistics( imp1, 10000, 0.0, 0.0 );
double[] minmax1 = getMinAndMax( min_ch0, max_ch0, stats );
IJ.setMinAndMax( imp1, minmax1[0], minmax1[1] );

stats = new StackStatistics( imp2, 10000, 0.0, 0.0 );
double[] minmax2 = getMinAndMax( min_ch1, max_ch1, stats );
IJ.setMinAndMax( imp2, minmax2[0], minmax2[1] );

stack = new ImageStack( imp1.getWidth(), imp1.getHeight() );
for ( int i = 0; i < n; ++i ) {
    stack.addSlice( "", imp1.getStack().getProcessor( i + 1 ).duplicate() );
    stack.addSlice( "", imp2.getStack().getProcessor( i + 1 ).duplicate() );
}

imp = new ImagePlus("", stack );
imp.setDimensions(2, n, 1);
imp.setOpenAsHyperStack(true);
imp = new CompositeImage(imp,CompositeImage.COMPOSITE);

imp.show();

imp1.changes = false;
imp2.changes = false;
imp1.close();
imp2.close();

System.out.println( "Transformation" );

/* transformation */
affine = new net.imglib2.realtransform.AffineTransform3D();

/* constant orientation */
orientation = new net.imglib2.realtransform.AffineTransform3D();
orientation.set(
        0.9902683, -0.09312532, 0.10342625, 0.0,
        -0.13917312, -0.66262114, 0.735916, 0.0,
        0.0, -0.74314815, -0.669133, 0.0);

affine.preConcatenate( orientation );

/* rotation */
//theta = ( double )timepoint / 180.0 * Math.PI;
//affine.rotate( 0, theta );

/* color conversion */
/* background */
bgARGB = new ARGBDoubleType( 1, 0, 0, 0 );

/* intensity offsets an preprocessing */
/* gfp */
for ( int i = 0; i < n; ++i ) {
    ip = imp.getStack().getProcessor(imp.getStackIndex(1,i + 1,1));
    ip.subtract(minmax1[0]);
    ip.multiply(1.0 / (minmax1[1]-minmax1[0]));
}


/* ruby */
offset = ( minmax2[ 1 ] - minmax2[ 0 ] ) * 0.35;
for ( int i = 0; i < n; ++i ) {
    ip = imp.getStack().getProcessor(imp.getStackIndex(2,i + 1,1));
//  new GaussianBlur().blurGaussian(ip, 1.5, 1.5, 0.001);
    ip.subtract(minmax2[0]);
    ip.multiply(1.0 / (minmax2[1] - minmax2[0]));
}

s1 = 1.0;
s2 = 1.0;
a1 = 1.0;
a2 = 1.0;

composite2ARGBDouble =
    new net.imglib2.render.volume.RealCompositeARGBDoubleConverter( 2 );

    composite2ARGBDouble.setARGB( new ARGBDoubleType( a1, 0, s1, 0 ), 0 );
    composite2ARGBDouble.setARGB( new ARGBDoubleType( a2, s2, 0, s2 ), 1 );

omp = net.imglib2.render.volume.Renderer.runARGB(
    imp,
    imp.getWidth(),
    imp.getHeight(),
    affine,
    0,
    1,
    bgARGB,
    1,
    composite2ARGBDouble );

//omp = net.imglib2.render.volume.Renderer.runARGB(
//  imp,
//  imp.getWidth(),
//  imp.getHeight(),
//  affine,
//  1.0,
//  1.0,
//  new Translation3D(),
//  1,
//  bgARGB,
//  net.imglib2.render.volume.Renderer.Interpolation.NN,
//  composite2ARGBDouble );

System.out.println("Saving=" + dir2 );

omp.show();

IJ.save( omp, dir2 + "/render_tp" + IJ.pad(timepoint, 4) + ".tif" );

System.out.println("All done");

/* shutdown */
runtime.exit(0);
Execute the create-render-jobs script and submit the jobs to the cluster with the submit-jobs script.
Hdf5 export
Change the necessary parameters in the master file:
###---------- hdf5 export ----------
##Target directory
target_hdf5="/hdf5/"

##Number of jobs
num_export_job="`seq 0 3`"

#Path directory
#path="\"/projects/pilot_spim/Christopher/Test_scripts/single-channel\""
path="\"/projects/pilot_spim/Christopher/Test_scripts/multi-channel/channel_split\""

#Xml filename
exportXmlFilename="\"/hdf5/Test_single.xml\""

##Spim pattern
##For single channel:spim_TL{tt}_Angle{a}.tif
##For 2 channel: spim_TL{tt}_Angle{a}_Channel{c}.tif
#inputFilePattern="\"spim_TL{tt}_Angle{a}.tif\""
inputFilePattern="\"spim_TL{tt}_Angle{a}_Channel{c}.tif\""

##Channels: change for 2 channel data
#channels_export="\"0\""
channels_export="\"0,1\""

angles_export="\"1,2,3,4,5\""
timepoint_export="\"1-3\""
referencetp_export="\"1\""

filepath="\"/output_fusion/\""
filepattern="\"%1\\\$d/img_tl%1\\\$d_ch%2\\\$d_z%3\\\$03d.tif\""

export_numSlices="369"
sliceValueMin="0"
sliceValueMax="60000"

cropOffsetX="0"
cropOffsetY="314"
cropOffsetZ="355"
scale="2"
The getnumjobs file:
#!/bin/bash
/sw/bin/xvfb-run -a /sw/users/pietzsch/packages/Fiji.app/ImageJ-linux64
-Xmx10g -Dprintnumjobs=true
-Dpath="/projects/pilot_spim/Christopher/Test_scripts/multi-channel/channel_split"
-DexportXmlFilename="/hdf5/Test_single.xml" -Dspimresolutions=
-Dspimsubdivisions= -DinputFilePattern="spim_TL{tt}_Angle{a}_Channel{c}.tif"
-Dchannels="0,1" -Dangles="1,2,3,4,5" -Dtimepoints="1-3"
-DreferenceTimePoint="1" -DoverrideImageZStretching=
-DzStretching=3.481975 -Dfusionresolutions= -Dfusionsubdivisions=
-Dfilepath="/output_fusion/" -Dfilepattern="%1\$d/img_tl%1\$d_ch%2\$d_z%3\$03d.tif"
-DnumSlices=369 -DsliceValueMin=0 -DsliceValueMax=60000
-DcropOffsetX=0 -DcropOffsetY=314 -DcropOffsetZ=320 -Dscale=2
-- --no-splash /projects/pilot_spim/Christopher/pipeline/jobs_master_beta_2.0/hdf5/export.bsh
The output of the getnumjobs:
cat numjobsout

Your job looked like:

------------------------------------------------------------
# LSBATCH: User input
/projects/pilot_spim/Christopher/pipeline/jobs_master_beta_2.0/hdf5//getnumjobs
------------------------------------------------------------

Successfully completed.

Resource usage summary:

    CPU time   :      3.86 sec.
    Max Memory :         3 MB
    Max Swap   :        33 MB

    Max Processes  :         1
    Max Threads    :         1

The output (if any) follows:

path=/projects/pilot_spim/Christopher/Test_scripts/multi-channel/channel_split
Xml Filename=/projects/pilot_spim/Christopher/Test_scripts/multi-channel/channel_split/hdf5/Test_single.xml
inputFilePattern=spim_TL{tt}_Angle{a}_Channel{c}.tif
channels=0,1
angles=1,2,3,4,5
timepoints=1-3
referenceTimePoint=1
overrideImageZStretching=true
zStretching=3.481975
filepath=/projects/pilot_spim/Christopher/Test_scripts/multi-channel/channel_split/output_fusion/
filepattern=%1$d/img_tl%1$d_ch%2$d_z%3$03d.tif
sliceValueMin=0
sliceValueMax=60000
cropOffsetX=0
cropOffsetY=314
cropOffsetZ=320
scale=2
ChannelPattern: 0,1
Channels: (0, 1)
ChannelsToRegister: 0,1
ChannelsRegister: (0, 1)
ChannelsToFuse: 0,1
ChannelsFuse: (0, 1)
(Thu Mar 13 09:01:08 CET 2014): Loading timepoint 1
Using model: mpicbg.models.AffineModel3D
(Thu Mar 13 09:01:08 CET 2014): Loading timepoint 2
Using model: mpicbg.models.AffineModel3D
(Thu Mar 13 09:01:08 CET 2014): Loading timepoint 3
Using model: mpicbg.models.AffineModel3D
Using model: mpicbg.models.AffineModel3D
Using model: mpicbg.models.AffineModel3D
Using model: mpicbg.models.AffineModel3D
Using model: mpicbg.models.AffineModel3D
Dimension of final output image:
From : (-4.7491517, -72.81616, -577.69653) to (1935.009, 1301.533, 950.0663)
Size: (1939.7582, 1374.3491, 1527.7628) needs 15537 MB of RAM
Scaled size(2): (970, 687, 764) needs 1942 MB of RAM
tx = -4.0 ty = 242.0 tz = -257.0 scale = 2
number of jobs: 3


PS: The stderr output (if any) follows:
Modify the master file accordingly. Create the jobs using the create_export_jobs script and submit them to the cluster.
New Multiview Reconstruction pipeline
The key change in the Multiview Reconstruction (MVR) pipeline is that all results are written into an XML. This poses new problems for cluster processing, because several concurrently running jobs need to update the same file.
Stephan Preibisch solved that problem by allowing to write one XML file per job (usually a timepoint) and then merging the job specific XMLs into one XML for the entire dataset.
In practice it means the following steps need to be executed:
- Define XML dataset - creates one XML for the entire timelapse
- Re-save data as HDF5 - converts data into HDF5 container optimised for fast access in BigDataViewer
- Run per time-point registrations - creates as many XMLs as there are timepoints
- Merge XMLs - consolidates the per-timepoint XMLs back into a single XML
Some new parameters are introduced and some old parameters change names. Therefore, use the master file described in this chapter to process with the MVR pipeline.
Define XML
First step in Multiview Reconstruction is to define an XML file that describes the imaged dataset. This is very flexible and can be adapted to datasets with several angles, channels, illumination sides and timepoints. The relevant portion of the master file looks like this:
type_of_dataset="\"Image Stacks (ImageJ Opener)\""                      # raw fileformat
xml_filename="\"dataset.xml\""                                          # filename
multiple_timepoints="\"YES (one file per time-point)\""                 # or NO (one time-point)
multiple_channels="\"NO (one channel)\""                                # or YES (one file per channel)
multiple_illumination_directions="\"NO (one illumination direction)\""  # or YES (one file per illumination direction)
multiple_angles="\"YES (one file per angle)\""                          # or NO (one angle)"
. .
#--------------------------------------------------------------------------------
# XML definition and manipulation
#--------------------------------------------------------------------------------
jobs_xml=${job_directory}"/define_xml/"                         # directory
define_xml=${job_directory}"define_xml/define_xml.bsh"          # script
merge_xml=${job_directory}"merge_xml.bsh"                       # script
and describes a multi timepoint time-lapse with single channel, one illumination direction and multiple angles. (Note that the timepoints and angles are defined elsewhere in the general part of the master file).
The parameters in the master file are sourced by a create-dataset-jobs bash script
#!/bin/bash
source /projects/tomancak_lightsheet/Valia/Valia/new_pipeline/master

mkdir -p $jobs_xml

job="$jobs_xml/create-dataset.job"
echo $job
echo "#!/bin/bash" > "$job"
echo "$XVFB_RUN -a $Fiji \
    -Ddir=$dir \
    -Dpattern=$channel_pattern_beads \
    -Dtimepoint=$timelapse_timepoint \
    -Dangles=$angles \
    -Dxy_resolution=$xy_resolution \
    -Dz_scaling=$z_scaling \
    -Dimglib_container=$imglib_container \
    -Dtype_of_dataset=$type_of_dataset \
    -Dxml_filename=$xml_filename \
    -Dmultiple_timepoints=$multiple_timepoints \
    -Dmultiple_channels=$multiple_channels \
    -Dmultiple_illumination_directions=$multiple_illumination_directions \
    -Dmultiple_angles=$multiple_angles \
        -- --no-splash $define_xml" >> "$job"
chmod a+x "$job"
which creates a create-dataset.job bash script that passes the parameters to Fiji by executing define_xml.bsh beanshell script
import ij.IJ;
import ij.ImagePlus;
import java.lang.Runtime;
import java.io.File;
import java.io.FilenameFilter;

runtime = Runtime.getRuntime();
System.out.println(runtime.availableProcessors() + " cores available for multi-threading");

type_of_dataset = System.getProperty( "type_of_dataset" );
xml_filename = System.getProperty( "xml_filename" );
multiple_timepoints = System.getProperty( "multiple_timepoints" );
multiple_channels = System.getProperty( "multiple_channels" );
multiple_illumination_directions = System.getProperty( "multiple_illumination_directions" );
multiple_angles = System.getProperty( "multiple_angles" );

dir = System.getProperty( "dir" );
pattern = System.getProperty( "pattern" );
timepoint = System.getProperty( "timepoint" );
angles = System.getProperty( "angles" );

int xy_resolution = Integer.parseInt(System.getProperty( "xy_resolution" ));
float z_scaling = Float.parseFloat( System.getProperty( "z_scaling" ) );
imglib_container = System.getProperty( "imglib_container" );

System.out.println( "type of dataset=" + type_of_dataset );
System.out.println( "xml filename=" + xml_filename );
System.out.println( "multiple_timepoints=" + multiple_timepoints );
System.out.println( "multiple_channels=" + multiple_channels );
System.out.println( "multiple_illumination_directions=" + multiple_illumination_directions );
System.out.println( "multiple_angles=" + multiple_angles );
System.out.println( "dir=" + dir );
System.out.println( "pattern_of_spim=" + pattern );
System.out.println( "timepoint=" + timepoint );
System.out.println( "angles=" + angles );
System.out.println( "xy_resolution=" + xy_resolution );
System.out.println( "z_resolution=" + z_scaling );
System.out.println( "imglib_container=" + imglib_container );

IJ.run("Define Multi-View Dataset",
    "type_of_dataset=[" + type_of_dataset + "] " +
    "xml_filename=[" + xml_filename + "] " +
    "multiple_timepoints=[" + multiple_timepoints + "] " +
    "multiple_channels=[" + multiple_channels + "] " +
    "_____multiple_illumination_directions=[" + multiple_illumination_directions + "] " +
    "multiple_angles=[" + multiple_angles + "] " +
    "image_file_directory=" + dir + " " +
    "image_file_pattern=" + pattern + " " +
    "timepoints_=" + timepoint + " " +
    "acquisition_angles_=" + angles + " " +
    "calibration_type=[Same voxel-size for all views] calibration_definition=[User define voxel-size(s)]" + " " +
    "imglib2_data_container=[" + imglib_container + "] " +
    "pixel_distance_x=" + xy_resolution + " " +
    "pixel_distance_y=" + xy_resolution + " " +
    "pixel_distance_z=" + z_scaling + " " +
    "pixel_unit=um"
    );

/* shutdown */
runtime.exit(0);
Since in this case it makes no sense to parallelise, it is best to launch the create-dataset.job in interactive mode on one of the nodes of the cluster (ideally not the headnode). On our cluster this will look like this:
[tomancak@madmax define_xml]$ ./create-dataset-jobs
/projects/tomancak_lightsheet/Valia/Valia/new_pipeline/jobs_master_beta_2.0/define_xml//create- dataset.job
[tomancak@madmax define_xml]$ bsub -q interactive -Is bash
Job <484001> is submitted to queue <interactive>.
<<Waiting for dispatch ...>>
<<Starting on n42>>
[tomancak@n42 define_xml]$ ./create-dataset.job
12 cores available for multi-threading
type of dataset=Image Stacks (ImageJ Opener)
xml filename=dataset.xml
multiple_timepoints=YES (one file per time-point)
multiple_channels=NO (one channel)
multiple_illumination_directions=NO (one illumination direction)
multiple_angles=YES (one file per angle)
dir=/projects/tomancak_lightsheet/Valia/Valia/raw/
pattern_of_spim=spim_TL{t}_Angle{a}.tif
timepoint=1-715
angles=1,2,3,4,5,6
xy_resolution=1
z_resolution=3.497273
imglib_container=ArrayImg (faster)
1
Minimal resolution in all dimensions over all views is: 1.0
(The smallest resolution in any dimension; the distance between two pixels in the output image will be  that wide)
Saved xml '/projects/tomancak_lightsheet/Valia/Valia/raw/dataset.xml'.
End result should be a dataset.xml created in the directory where the raw data reside.
Tips and tricks:
-
In order to change the definition of the dataset define it locally with gui and macro recorder turned on and copy/paste the relevant macro parameters to the master file.
-
Macro commands that consist of strings are usually surrounded by square brackets
[]. Do NOT put the brackets into the master file, they are provided by the BeanShell script.
Re-save as HDF5
This step is optional at this point. Re-saving to HDF5 can be done also after registration or not at all.
The purpose of this step is to convert the raw light sheet data (either .czi or .tif) into the HDF5 container that is optimised for fast viewing through the BigDataViewer Fiji plugin.
Relevant portion of the master file looks like this:
#-------------------------------------------------------------------------------
# hdf5 export
#-------------------------------------------------------------------------------
Fiji_export="/sw/people/tomancak/packages/fiji_tobi_for_testing/Fiji.app/ImageJ-linux64" # Fiji_tobias
jobs_export=${job_directory}"/hdf5/"                            # directory
resave_angle="\"All angles\""
resave_channel="\"All channels\""
resave_illumination="\"All illuminations\""
resave_timepoint="\"All Timepoints\""
subsampling_factors="\"{ {1,1,1}, {2,2,1}, {4,4,1}, {8,8,1} }\""
hdf5_chunk_sizes="\"{ {32,32,4}, {32,32,4}, {16,16,16}, {16,16,16} }\""
timepoints_per_partition="1"
setups_per_partition="0"
As usual, we create cluster jobs per timepoint by sourcing the master file parameters with create_export_jobs
 #!/bin/bash

source /projects/tomancak_lightsheet/Valia/Valia/new_pipeline/master

job="$jobs_export/hdf5-0.job"
echo $job
echo "#!/bin/bash" > "$job"
echo "$XVFB_RUN -a $Fiji_export -Xmx10g \
        -Ddir=$dir \
        -Dxml_filename=$xml_filename \
        -Dresave_angle=$resave_angle \
        -Dresave_channel=$resave_channel \
        -Dresave_illumination=$resave_illumination \
        -Dresave_timepoint=$resave_timepoint \
        -Dsubsampling_factors=$subsampling_factors \
        -Dhdf5_chunk_sizes=$hdf5_chunk_sizes \
        -Dtimepoints_per_partition=$timepoints_per_partition \
        -Dsetups_per_partition=$setups_per_partition \
        -Drun_only_job_number=0 \
                 -- --no-splash $export" >> "$job"
chmod a+x "$job"

for i in $timepoint
do
    job="$jobs_export/hdf5-$i.job"
    echo $job
    echo "#!/bin/bash" > "$job"
    echo "$XVFB_RUN -a $Fiji_export -Xmx10g \
        -Ddir=$dir \
        -Dxml_filename=$xml_filename \
        -Dresave_angle=$resave_angle \
        -Dresave_channel=$resave_channel \
        -Dresave_illumination=$resave_illumination \
        -Dresave_timepoint=$resave_timepoint \
        -Dsubsampling_factors=$subsampling_factors \
        -Dhdf5_chunk_sizes=$hdf5_chunk_sizes \
        -Dtimepoints_per_partition=$timepoints_per_partition \
        -Dsetups_per_partition=$setups_per_partition \
        -Drun_only_job_number=$i \
            -- --no-splash $export" >> "$job"
    chmod a+x "$job"
done
Note that we first run a job with parameter run_only_job_number set to 0. This creates the master dataset.h5 file.
The rest of the hdf5-<number>.job bash scripts execute export.bsh BeanShell using Fiji
import ij.IJ;
import ij.ImagePlus;
import java.lang.Runtime;
import java.io.File;
import java.io.FilenameFilter;


dir = System.getProperty( "dir" );
xml_filename = System.getProperty( "xml_filename" );
resave_angle = System.getProperty( "resave_angle" );
resave_channel = System.getProperty( "resave_channel" );
resave_illumination = System.getProperty( "resave_illumination" );
resave_timepoint = System.getProperty( "resave_timepoint" );
subsampling_factors = System.getProperty( "subsampling_factors" );
hdf5_chunk_sizes = System.getProperty( "hdf5_chunk_sizes" );
timepoints_per_partition = System.getProperty( "timepoints_per_partition" );
setups_per_partition = System.getProperty( "setups_per_partition" );
run_only_job_number = System.getProperty( "run_only_job_number" );

System.out.println( "dir=" + dir );
System.out.println( "xml_filename=" + xml_filename);
System.out.println( "resave_angle=" + resave_angle );
System.out.println( "resave_channel=" + resave_channel );
System.out.println( "resave_illumination=" + resave_illumination );
System.out.println( "resave_timepoint=" + resave_timepoint);
System.out.println( "subsampling_factors=" + subsampling_factors);
System.out.println( "hdf5_chunk_sizes=" + hdf5_chunk_sizes );
System.out.println( "timepoints_per_partition=" + timepoints_per_partition );
System.out.println( "setups_per_partition=" + setups_per_partition );
System.out.println( "run_only_job_number=" + run_only_job_number );

//activate cluster processing

IJ.run("Toggle Cluster Processing", "display_cluster");

IJ.run("As HDF5",
    "select_xml=" + dir + xml_filename + " " +
    "resave_angle=[" + resave_angle + "] " +
    "resave_channel=[" + resave_channel + "] " +
    "resave_illumination=[" + resave_illumination + "] " +
    "resave_timepoint=[" + resave_timepoint + "] " +
    "subsampling_factors=[" + subsampling_factors + "] " +
    "hdf5_chunk_sizes=[" + hdf5_chunk_sizes + "] " +
    "split_hdf5 " +
    "timepoints_per_partition=" + timepoints_per_partition + " " +
    "setups_per_partition=" + setups_per_partition + " " +
    "run_only_job_number=" + run_only_job_number + " " +
    "use_deflate_compression " +
    "export_path=" + dir + "hdf5_" + xml_filename);

/* shutdown */
System.exit(0);
The hdf5-<number>.job bash scripts will be submitted to the cluster with the following submit-jobs script
#!/bin/bash

for file in `ls ${1} | grep ".job$"`
do
    bsub -q short -n 1 -R rusage[mem=10000] -R span[hosts=1] -o "out.%J" -e "err.%J" ${1}/$file
done
and generate in the raw data directory a series of .h5 files. Each file contains the raw data for one time-point. At this point without any registration.
hdf5_dataset.h5
hdf5_dataset-00-00.h5
hdf5_dataset-01-00.h5
hdf5_dataset-02-00.h5
hdf5_dataset-03-00.h5
hdf5_dataset-04-00.h5
hdf5_dataset-05-00.h5
hdf5_dataset-06-00.h5
hdf5_dataset-07-00.h5
hdf5_dataset-08-00.h5
hdf5_dataset-09-00.h5
and new hdf5_dataset.xml.
From now on, the data are in the HDF5 container (unregistered) and can be viewed in BigDataViewer. In the next step we register the data by running the registration pipeline and updating the XML.
Multiview registration
We now have to .xml files. dataset.xml created during the define xml step and hdf5_dataset.xml created after re-saving to HDF5. Lets first make a copy of the dataset.xml
cp dataset.xml original_dataset.xmland copy the hdf5_dataset.xml into dataset.xml
cp hdf5_dataset.xml dataset.xmlLike this we have a back-up of the two intermediate state XMLs and a dataset.xml to use as input for registration.
The parts of master file relevant for multiview registration look as follow:
#-------------------------------------------------------------------------------
#                          Multi-view registration
#
# Specify the method for Detection of beads:
#     Difference of mean: Comment out Difference of Gaussian in registration.bsh
#     Difference of Gaussian: Comment out Differnce of Mean in registration.bsh
#-------------------------------------------------------------------------------

process_timepoint="\"Single Timepoint (Select from List)\""             # or
process_channel="\"All channels\""                                      # or
process_illumination="\"All illuminations\""            # or
process_angle="\"All angles\""                                          # or

type_of_detection="\"Difference-of-Mean (Integral image based)\"" # Difference
radius1="2"                                                       # of Mean
radius2="3"
threshold="0.005"

# type_of_detection="\"Difference-of-Gaussian\""                  # Difference
# initial_sigma="1.8000"                                          # of Gaussian
# threshold_gaussian="0.0080"
and
#-------------------------------------------------------------------------------
# Multi-view Registration
#-------------------------------------------------------------------------------

jobs_registration=${job_directory}"/registration/"              # directory
registration=${jobs_registration}"/registration.bsh"            # script
channel_pattern_beads=${pattern_switch}                         # Pattern
type_of_registration="Single-channel"                   # registration parameters
label_interest_points="beads"
subpixel_localization="\"3-dimensional quadratic fit\""
transformation_model="Affine"
imglib_container="\"Array container (images smaller ~2048x2048x450 px)\""
registration_algorithm="\"Fast 3d geometric hashing (rotation invariant)\""
type_of_registration="\"Register timepoints individually\""
interest_points_channel_0="beads"
fix_tiles="\"Do not fix tiles\""
map_back_tiles="\"Map back to first tile using rigid model\""
transformation="Affine"
model_to_regularize_with="Rigid"
lambda="0.10"
allowed_error_for_ransac="5"
The parameters are read from master through the create-registration-jobs
#!/bin/bash
source /projects/tomancak_lightsheet/Valia/Valia/new_pipeline/master

mkdir -p $jobs_registration

for i in $timepoint

do
    job="$jobs_registration/register-$i.job"
    echo $job
    echo "#!/bin/bash" > "$job"
    echo "$XVFB_RUN -a $Fiji -Dxml_path=$dir \
    -Dxml_filename=$xml_filename \
    -Dprocess_timepoint=$process_timepoint \
    -Dprocess_illumination=$process_illumination \
    -Dprocess_angle=$process_angle \
    -Dlabel_interest_points=$label_interest_points \
    -Dtype_of_registration=$type_of_registration \
        -Dtype_of_detection=$type_of_detection \
    -Ddir=$dir \
    -Dpattern=$channel_pattern_beads \
        -Dtimepoint=$i \
    -Dangles=$angles \
        -Dsubpixel_localization=$subpixel_localization \
    -Dxy_resolution=$xy_resolution \
        -Dz_scaling=$z_scaling \
    -Dtransformation=$transformation \
        -Dimglib_container=$imglib_container \
    -Dradius1=$radius1 -Dradius2=$radius2 \
        -Dthreshold=$threshold \
    -Dinitial_sigma=$initial_sigma \
        -Dthreshold_gaussian=$threshold_gaussian \
    -Dregistration_algorithm=$registration_algorithm \
    -Dtype_of_registration=$type_of_registration \
    -Dinterest_points_channel_0=$interest_points_channel_0 \
    -Dfix_tiles=$fix_tiles \
    -Dmap_back_tiles=$map_back_tiles \
    -Dmodel_to_regularize_with=$model_to_regularize_with \
    -Dlambda=$lambda \
    -Dallowed_error_for_ransac=$allowed_error_for_ransac \
            -- --no-splash $registration" >> "$job"
    chmod a+x "$job"
done
which generates registration_<number>.job bash scripts that launches registration.bsh in Fiji on the cluster
import ij.IJ;
import ij.ImagePlus;
import java.lang.Runtime;
import java.io.File;
import java.io.FilenameFilter;

runtime = Runtime.getRuntime();
System.out.println(runtime.availableProcessors() + " cores available for multi-threading");

//select xml
xml_path = System.getProperty( "xml_path" );
xml_filename = System.getProperty( "xml_filename" );
timepoint = System.getProperty( "timepoint" );

//parameters concerning what to process
process_timepoint = System.getProperty( "process_timepoint" );
//process_channel = System.getProperty( "process_channel" );
process_illumination = System.getProperty( "process_illumination" );
process_angle = System.getProperty( "process_angle" );

type_of_registration = System.getProperty( "type_of_registration" );
type_of_detection = System.getProperty( "type_of_detection" );
label_interest_points= System.getProperty( "label_interest_points" );

dir = System.getProperty( "dir" );
pattern = System.getProperty( "pattern" );
angles = System.getProperty( "angles" );

bead_brightness = System.getProperty( "bead_brightness" );
subpixel_localization = System.getProperty( "subpixel_localization" );

int xy_resolution = Integer.parseInt(System.getProperty( "xy_resolution" ));
float z_scaling = Float.parseFloat( System.getProperty( "z_scaling" ) );
transformation_model = System.getProperty( "transformation_model" );
imglib_container = System.getProperty( "imglib_container" );

//Parameters for difference of mean !!Comment out for Difference of Gaussian!!
int radius1 = Integer.parseInt( System.getProperty( "radius1" ) );
int radius2 = Integer.parseInt( System.getProperty( "radius2" ) );
float threshold = Float.parseFloat( System.getProperty( "threshold" ) );

//Parameters for difference of gaussian !!Comment out for Differnence of Mean!!
//float initial_sigma = Float.parseFloat( System.getProperty( "initial_sigma" ) );
//float threshold_gaussian = Float.parseFloat( System.getProperty( "threshold_gaussian" ) );
//registration parameters
registration_algorithm = System.getProperty( "registration_algorithm" );
type_of_registration = System.getProperty( "type_of_registration" );
interest_points_channel_0 = System.getProperty( "interest_points_channel_0" );
fix_tiles = System.getProperty( "fix_tiles" );
map_back_tiles = System.getProperty( "map_back_tiles" );
transformation = System.getProperty( "transformation" );
model_to_regularize_with = System.getProperty( "model_to_regularize_with" );
float lambda = Float.parseFloat( System.getProperty( "lambda" ) );
int allowed_error_for_ransac = Integer.parseInt( System.getProperty( "allowed_error_for_ransac" ) );

System.out.println( "xml=" + current_xml );
System.out.println( "label=" + label_interest_points );
System.out.println( "timepoints=" + process_timepoint );
System.out.println( "illuminations=" + process_illumination );
System.out.println( "angles=" + process_angle );
System.out.println( "type_of_registration=" + type_of_registration );
System.out.println( "type_of_detection=" + type_of_detection );
System.out.println( "dir=" + dir );
System.out.println( "pattern_of_spim=" + pattern );
System.out.println( "timepoint=" + timepoint );
System.out.println( "angles=" + angles );
System.out.println( "bead_brightness=" + bead_brightness );
System.out.println( "subpixel_localization=" + subpixel_localization );
System.out.println( "xy_resolution=" + xy_resolution );
System.out.println( "z_resolution=" + z_scaling );
System.out.println( "imglib_container=" + imglib_container );
System.out.println( "radius1=" + radius1 );
System.out.println( "radius2=" + radius2 );
System.out.println( "threshold=" + threshold );
System.out.println( "initial_sigma=" + initial_sigma );
System.out.println( "threshold_gaussian=" + threshold_gaussian );
System.out.println( "registration_algorithm=" + registration_algorithm );
System.out.println( "type_of_registration=" + type_of_registration );
System.out.println( "interest_points_channel_0=" + interest_points_channel_0 );
System.out.println( "fix_tiles=" + fix_tiles );
System.out.println( "map_back_tiles=" + map_back_tiles );
System.out.println( "transformation=" + transformation );
System.out.println( "model_to_regularize_with=" + model_to_regularize_with );
System.out.println( "lambda=" + lambda );
System.out.println( "allowed_error_for_ransac=" + allowed_error_for_ransac );

//activate cluster processing
IJ.run("Toggle Cluster Processing", "display_cluster");

//interest point detection
IJ.run("Detect Interest Points for Registration",
    "select_xml=" + xml_path + xml_filename + " " +
    "unique_id=" + timepoint + " " +
    "process_angle=[" + process_angle + "] " +
    "process_illumination=[" + process_illumination + "] " +
    "process_timepoint=[" + process_timepoint + "] " +
    "xml_output=[Save every XML with user-provided unique id]" + " " +
    "processing_timepoint=[Timepoint " + timepoint + "] " +
    "type_of_interest_point_detection=[" + type_of_detection + "] " +
    "label_interest_points=" + label_interest_points + " " +
    "subpixel_localization=[" + subpixel_localization + "] " +
    "interest_point_specification_(channel_0)=[Advanced ...] " +
    "radius_1=" + radius1 + " " +
    "radius_2=" + radius2 + " " +
    "threshold=" + threshold + " " +
    "find_maxima");

//registration based on interest point detection
IJ.run("Register Dataset based on Interest Points",
    "select_xml=" + xml_path + "dataset.job_" + timepoint + ".xml " +
        "process_angle=[" + process_angle + "] " +
        "process_illumination=[" + process_illumination + "] " +
        "process_timepoint=[" + process_timepoint + "] " +
    "xml_output=[Do not process on cluster] " +
    "processing_timepoint=[Timepoint " + timepoint + "] " +
        "registration_algorithm=[" + registration_algorithm + "] " +
        "type_of_registration=[" + type_of_registration + "] " +
        "interest_points_channel_0=" + interest_points_channel_0 + "  " +
        "fix_tiles=[" + fix_tiles + "] " +
        "map_back_tiles=[" + map_back_tiles + "] " +
        "transformation=" + transformation + " " +
        "regularize_model " +
        "model_to_regularize_with=" + model_to_regularize_with + " " +
        "lamba=" + lambda + " " +
        "allowed_error_for_ransac=" + allowed_error_for_ransac);

/* shutdown */
runtime.exit(0);
Note that the registration bash executes 3 macro commands.
- Toggle Cluster Processing - activates cluster processing which makes cluster specific parameters of registration available
- Detect Interest Points for Registration - detects beads or sample features used for registration
- Register Dataset based on Interest Points - does the actual registration using the detected interest points
The registration_<number>.job scripts are submitted to the cluster with submit_jobs bash
#!/bin/bash

for file in `ls ${1} | grep ".job$"`
do
    bsub -q short -n 1 -W 00:15 -R rusage[mem=50000] -R span[hosts=1] -o "out.%J" -e "err.%J" ${1}/$file
done
The result of the registration are 10 XML files, one for each timepoint, in the raw data directory:
dataset.job_1.xml
dataset.job_10.xml
dataset.job_2.xml
dataset.job_3.xml
dataset.job_4.xml
dataset.job_5.xml
dataset.job_6.xml
dataset.job_7.xml
dataset.job_8.xml
dataset.job_9.xml
Merge XMLs
The per timepoint XMLs need to be merged into a single output XML. This can be done at any point of the cluster run, i.e. not all XMLs need to exist to perform the merge and the merge can be performed multiple times. It however makes sense to wait until all per-timepoint XMLs are created.
The merge step has a single specific parameter in the master’
merge_xml=${job_directory}"define_xml/merge_xml.bsh" # scriptcreate-merge-jobs bash script
#!/bin/bash
source /projects/tomancak_lightsheet/Valia/Valia/new_pipeline/master

job="$jobs_xml/merge.job"
echo $job
echo "#!/bin/bash" > "$job"
echo "$XVFB_RUN -a $Fiji \
    -Dxml_path=$dir \
    -Dxml_filename=$xml_filename \
        -- --no-splash $merge_xml" >> "$job"
chmod a+x "$job"
creates merge.job that will execute merge_xml.bsh on the cluster node using Fiji
import ij.IJ;
import ij.ImagePlus;
import java.lang.Runtime;
import java.io.File;
import java.io.FilenameFilter;

runtime = Runtime.getRuntime();
System.out.println(runtime.availableProcessors() + " cores available for multi-threading");

xml_path = System.getProperty( "xml_path" );
xml_filename = System.getProperty( "xml_filename" );

System.out.println( "directory=" + xml_path );

IJ.run("Merge Cluster Jobs",
    "directory=" + xml_path + " " +
    "filename_contains=job_ " +
    "filename_also_contains=.xml " +
    "display " +
//  "delete_xml's " +
    "merged_xml=registered_" + xml_filename);

/* shutdown */
runtime.exit(0);
merge.job should be executed on the cluster in interactive mode (see here).
The result of the merge is registration_dataset.xml. This is the final product of the registration pipeline. The results of registration can be viewed using BigDataViewer
Tips and tricks
- the per-timepoint XML files can be deleted after the merge.
- regardless of whether or not the per-timepoint files are deleted, new per-timepoint XMLs can be added by re-running the merge.job
Registration