This page documents a way to register whole slide images in Fiji and analyze their result in QuPath. This workflow allows to register slides with transformations which are more complex than affine transform, by using the ImgLib2 library, elastix, and BigWarp. Reasonably, if the sample is not too deformed or damaged, registration at the sub-cellular level can be achieved on the whole slide - provided you are not working on serial sections where the cells are not identical between successive sections.
If you are registering serial sections, you can modify the registration parameters in order to have a match at the tissue level instead of at a cellular/subcellular level.
Videos tutorials
Installation
Option 1 - Automated procedure with bash scripts
This is an experimental install procedure which is performing all the steps detailed in the Complete procedure below, but with bash scripts. It is the one explained in the video tutorial:
- If you use windows, install Git 4 Windows with the default parameters
- Go to https://github.com/BIOP/biop-bash-scripts
- Download the repository as Zip: Green ‘Code’ button › Download as Zip
- Unzip it
- On windows:
- Double click the script
install_warpy.sh - Enter the path
C:/(recommended)
- Double click the script
- On mac:
- Go to the directory of the zip file
- Unzip it
- Go to the directory of the unzipped file
- Right-click
install_warpy.commandand select Open. By doing this right-click, you can force the execution of the scripts. Do not double-click the.shfiles since it will open a text editor. Your admin password will be asked. Take care! No*character is displayed when you type it. - Enter the path (
/Applications/recommended)
On Mac, your previous QuPath install may be erased, so rename your previous QuPath if you want to keep it
On Mac, If you get an error message, please grant the terminal application with full disk access
Installation - Option 2 - Manual procedure
ImageJ / Fiji
PTBIOP update site
Enable the PTBIOP update site, then restart Fiji.
Elastix - To enable automated registrations capabilities
- Download the release 5.0.1 of elastix for your OS. This documentation has been tested for elastix 5.0.1.
- Unzip it somewhere convenient (
Cdrive on windows, inApplicationsfor Mac )
Windows
For windows users, you also need to install Visual C++ redistributable, you’ll most probably need vc_redist.x64.exe
Mac
Fiji will be calling the elastix executables, which are recognized as ‘unknown developers’ by Mac OS. Thus you need to make security exceptions for both elastix and transformix to avoid clicking indefinitely on the OS warning messages.
Linux (not tested)
Nothing particular should be required for linux system. If it works, please contact the BIOP and let us know!
Indicate elastix and transformix executable location in Fiji
- Execute Plugins › BIOP › Set and Check Wrappers then indicate the proper location of the executable files
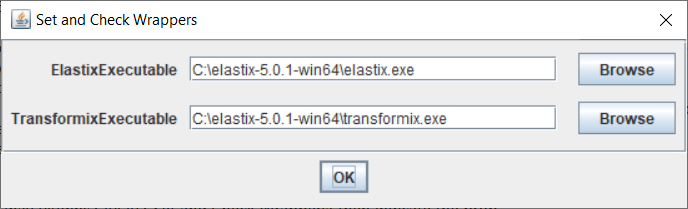
- This message should show up in the ImageJ console :
[INFO] Transformix -> set :-) Elastix -> set :-). You may have an error message for Cellpose, which can be ignored.
Once elastix is installed, you can run the following script in Fiji to test elastix functionality. Save the file with a .groovy extension, open it Fiji, and run it.
QuPath
- Install the latest QuPath version (0.4+)
- Install the QuPath Warpy extension by following its readme.
Step by step registration procedure
To follow the WSI registration procedure, a demo dataset, consisting of a fluorescent image which can be registered to a RGB H-DAB image, can be downloaded from Zenodo. Only the files with the .ome.tiff extensions are necessary.
Create your QuPath project
Create first a QuPath project containing all the images that you want to register.
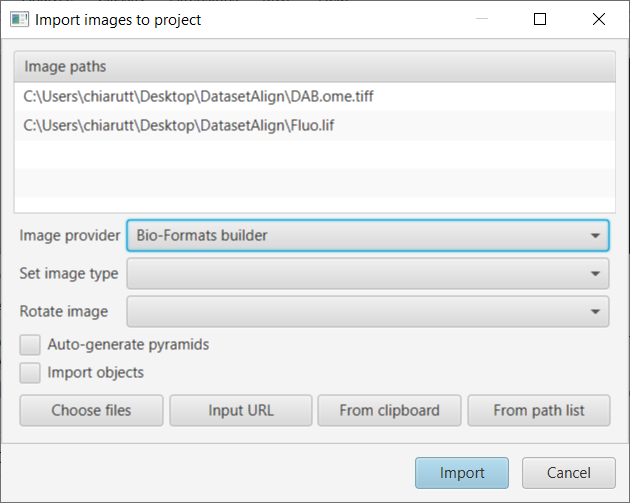
Only the Bio-Formats image builder is supported on the Fiji side. Make sure to select Bio-Formats builder when importing your slides.
If your image can’t be loaded in QuPath using the Bio-Formats builder, you can convert your slides in ome.tiff format. Several options are available, for instance by using Kheops (preferred for a better computation of low resolution levels), or the glencoe ngff converter.
All files need to be properly calibrated (microns, millimeters, etc, but not pixels!). Check on the image tab of QuPath that you have a proper physical unit specified, and not pixels!
If the pixel size is wrong, you need to override it in QuPath and re-save the project before resuming the workflow.
![]()
Save your project, and you are done for now on the QuPath side.
You can let QuPath open while performing the registration on Fiji.
Registration in Fiji
Open your QuPath project
In Fiji, open your QuPath project using
Plugins › BigDataViewer-Playground › BDVDataset › Create BDV Dataset [QuPath]. You can also directly type QuPath in Fiji’s search bar to avoid struggling in Fiji’s menu hierarchy.
- Select your QuPath project file (usually named
project.qpproj). - Let the default options but make sure to select MILLIMETER in the
physical units of the datasetfield
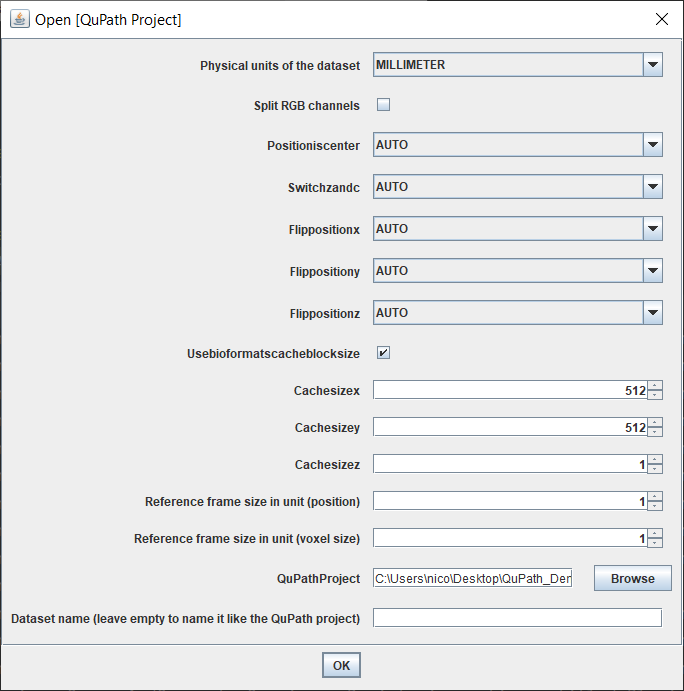
the physical units of the dataset field actually indicates how you want to import your dataset. Bio-Formats takes care of converting the unit of the acquisition into millimeters. This can be achieved only if the image is correctly calibrated initially: bio-formats knows how to converts from microns to millimeters, or from angstrom to millimeters, but it can’t know how to transform from pixels to millimeters.
this WSI registration workflow hides many registration parameters by making use of the proper calibration in physical units, and by assuming it targets a cellular resolution level (do not expect registration precision at 50 nm resolution, unless you manually correct it with BigWarp).
After you have opened your project, a window called BDV Sources should pop-up. If you double click on the Sources node, you should be able to browse the hierarchy and see the “sources” contained in your QuPath project. Note that the fluorescent channels have been split into separated sources. In the demo file, you get a window like this:
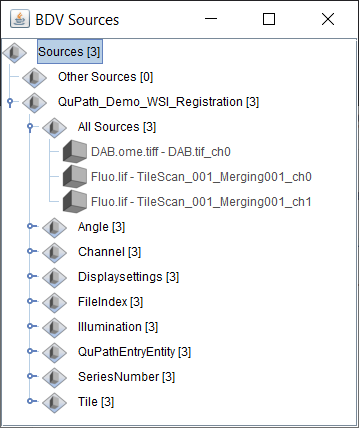
DAB.ome.tiff - DAB.tif-ch0is the RGB DAB imageFluo.ome.tiff - TileScan_001_Merging001-ch0is the DAPI fluorescent channelFluo.ome.tiff - TileScan_001_Merging001-ch1is the EdU fluorescent channel, which staining should be similar to DAB
For the demo dataset registration, the DAB image is used as the fixed image, and the DAPI channel as the moving image.
You can put nicer names to the images in QuPath before opening the project in Fiji.
Navigating within BigDataViewer requires a bit of experience. In 2D, the minimal commands to know are written below:
- hold and drag right-click: Pan;
- mouse wheel (or up / down key): zoom in and out;
shiftmodifier key: zoom in or out faster,ctrlmodifier key: more precise zoom.- You’ll soon notice that holding
left-clickrotates the view. To go back to the default rotation, clickshift+Z
Creating a Warpy Registration
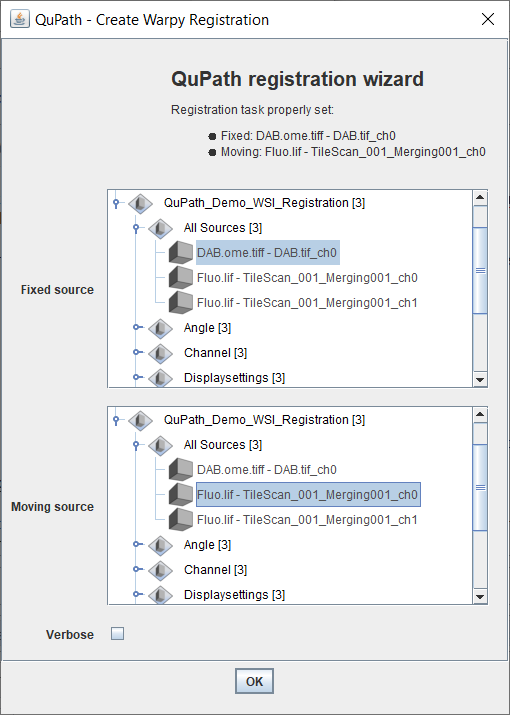
You can start the registration wizard by clicking Plugins › BigDataViewer-Playground › Sources › Register › QuPath - Create Warpy Registration
First, select the DAB source as the fixed source, and the DAPI channel as the moving source that will be used for the registration as indicated in the image below:
Another window shows up:
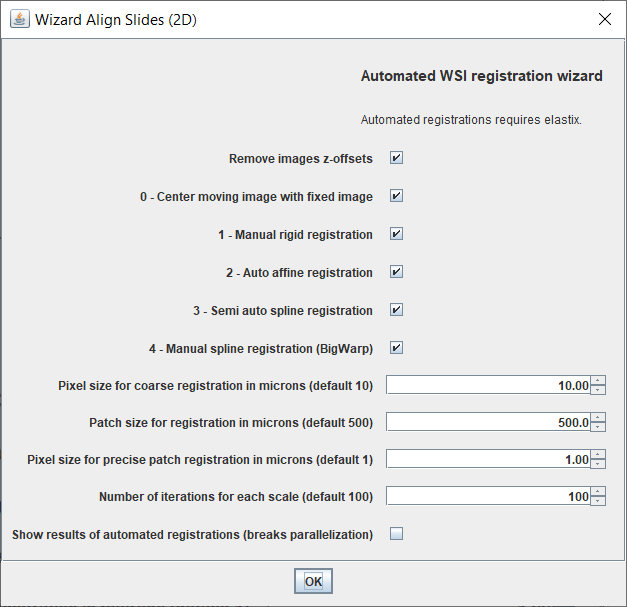
The successive steps (0,1,2,3,4) of registration happens consecutively, all are optional. It is advised to keep the first two boxes checked to remove most of the intitial XYZ offsets which could be stored in the files. The initial offset is usually due to bioformats metadata storing the stage position during acquisition.
If you check Show results of automated registrations, ImageJ1 images will be created to show the different images which are effectively sent to elastix for automated registration. It’s a good way to visualize intermediate registration steps and check what could have gone wrong. However, the processing will be slower because each registration is happening sequentially instead of being parallel.
In the rest of this documentation, we assume all registration steps have been checked. The demo dataset requires all these steps, but a small image may be sufficiently well registered with a single affine transform.
The extra parameters located below the chosen steps will be explained when need in the registration steps.
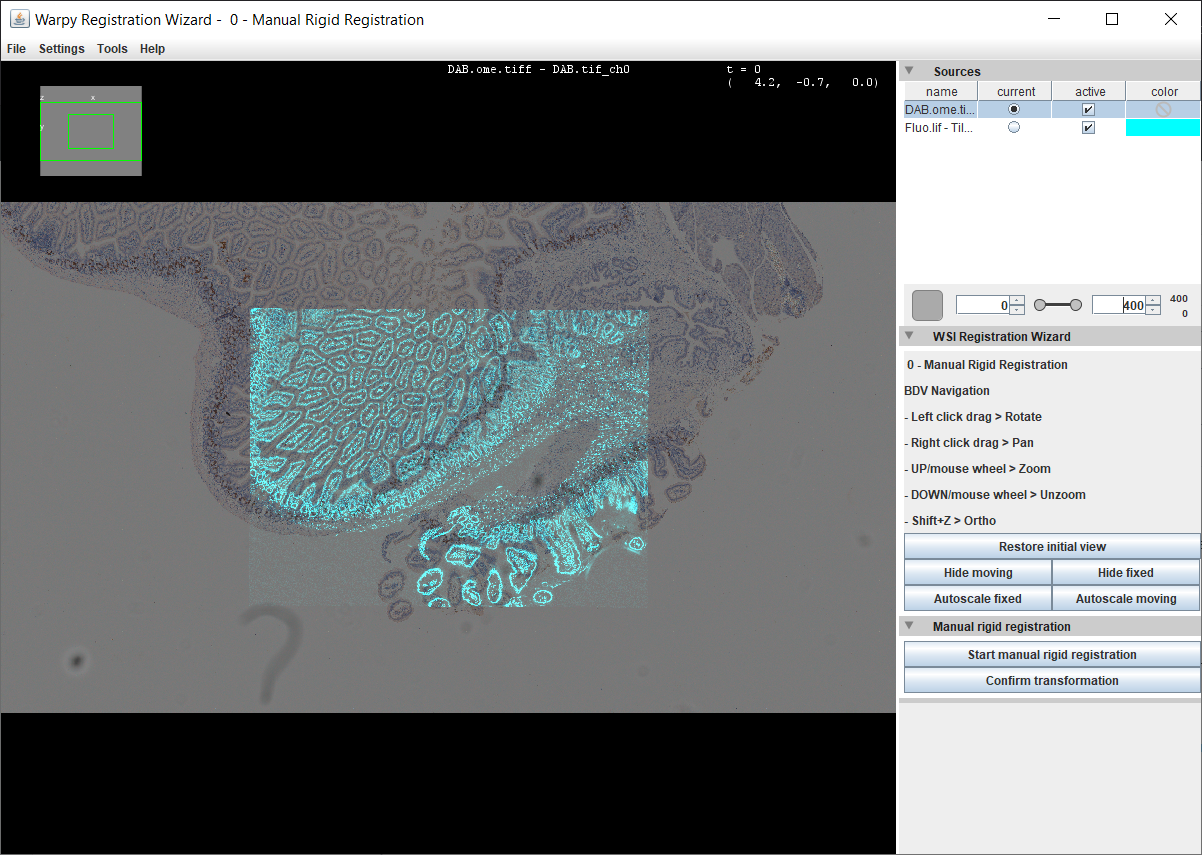
Step 1 - Manual rigid registration
Just after clicking OK, you will get a BigDataViewer window similar to this one:
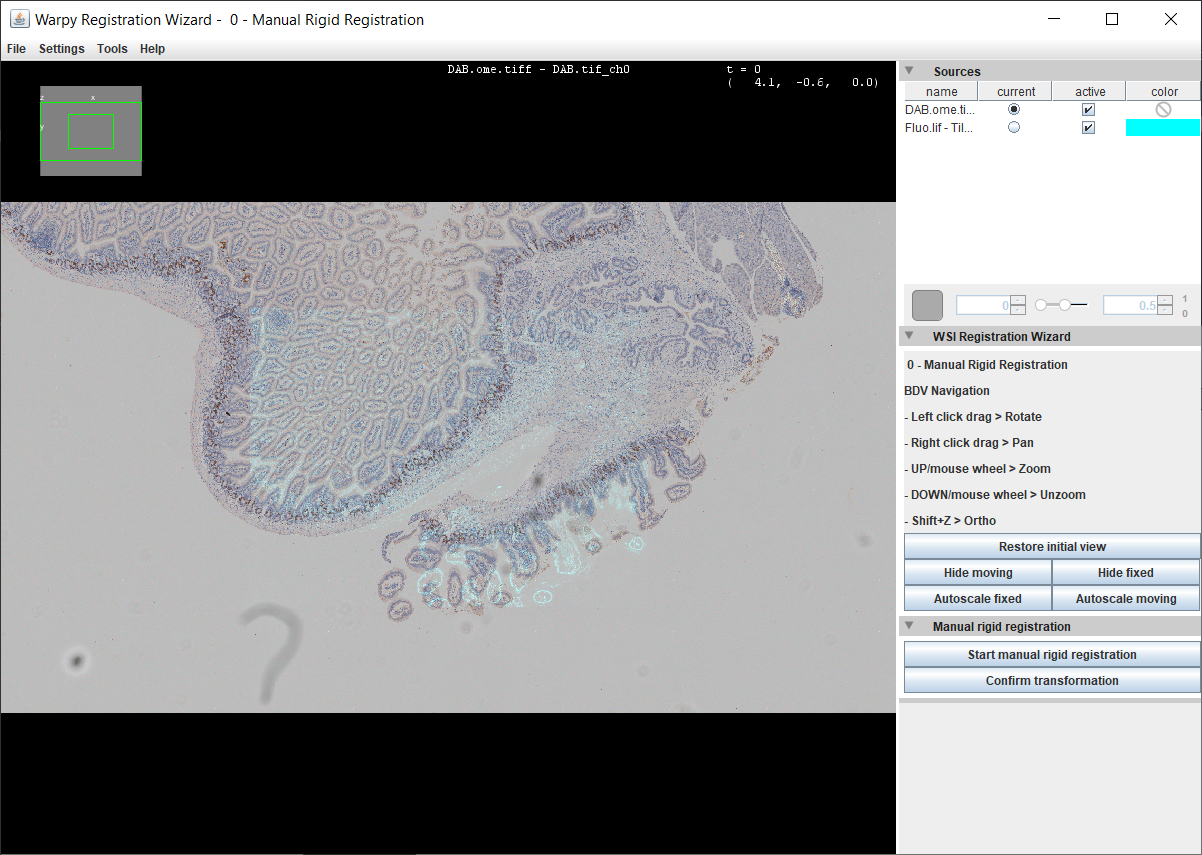
You have three cards on the right part of the window:
1 - Sources : this card can be used to the display settings of the sources (min / max and color for fluorescent images)
After some adjustment, the fluorescence image can be made brighter (max = 50) and the DAB a little bit dimmer (max = 400):
If you register two RGB images, it is important to increase the maximum display values for both images (for instance, from 256 to 512). Otherwise overlayed images will appear fully white.
2 - WSI Registration Wizard : this card displays the registration step we are in, some navigation hints, and some convenience actions : restoring the initial view, performing auto-scale on images, and showing / hiding the fixed or the moving image.
3 - The third card is specific to the current wizard step.
In this step, you will need to modify the location of the fluorescent image in order to approximately put it at its proper location. If you zoom in, you will see an obvious shift which can be corrected with a manual rigid registration:
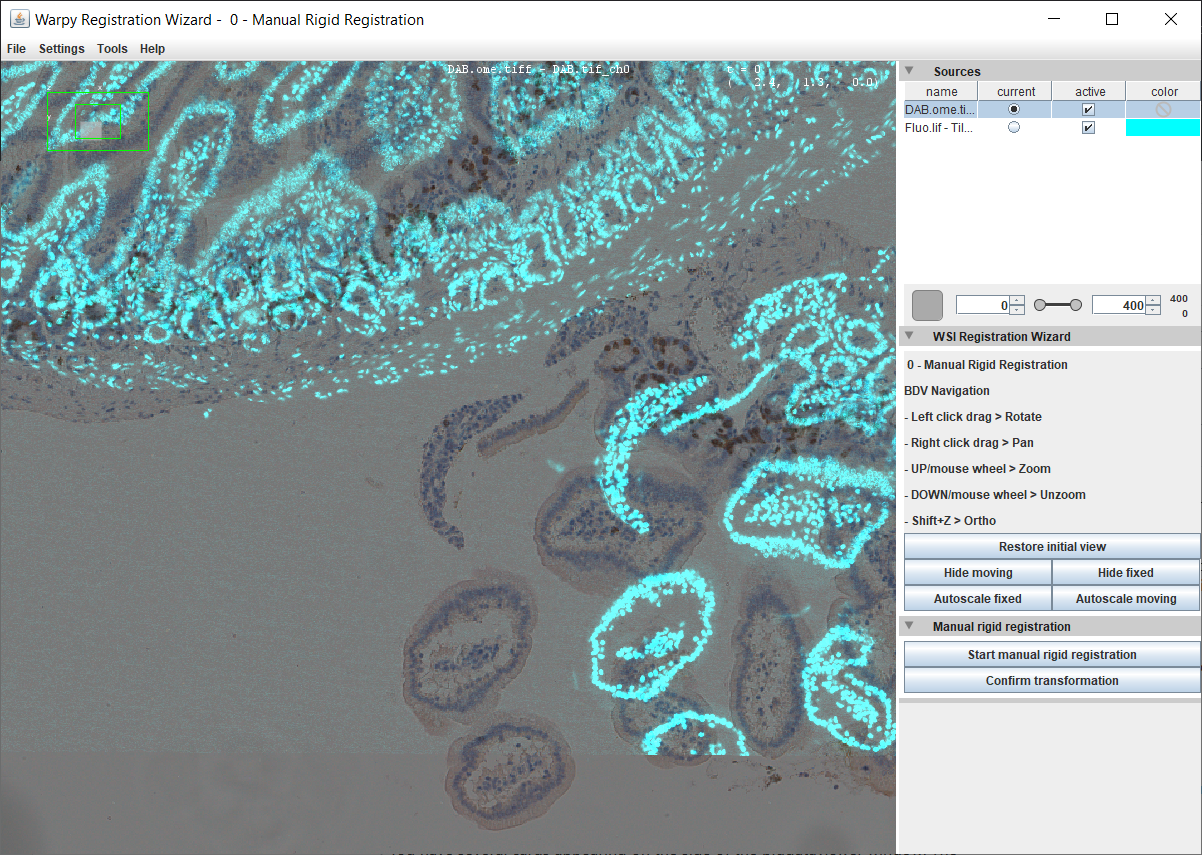
To correct it:
- Click the button
Start manual rigid registrationin the third card. - Pan the view until the two images are approximately aligned (some rotation and zoom adjustment can also be performed, but a translation is enough in the example):
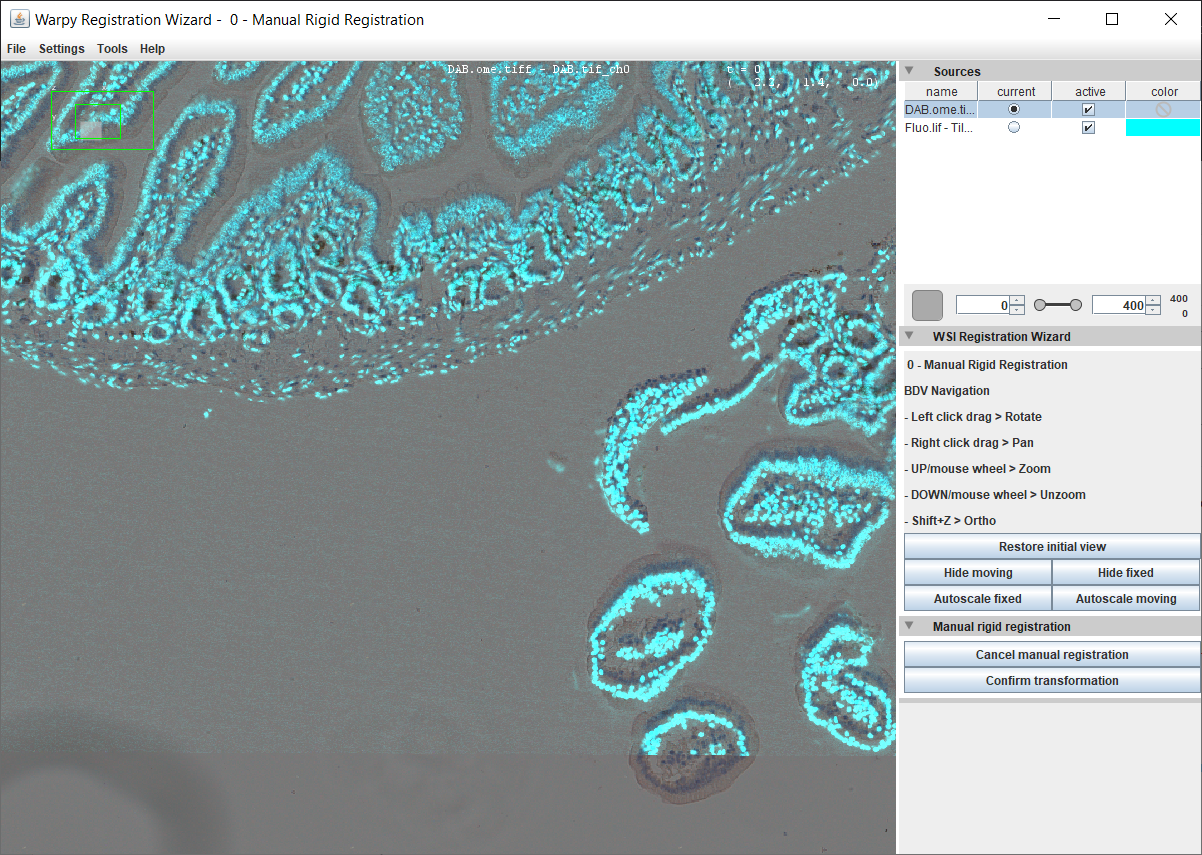
- Finally click
Confirm transformationto go to the next step of the wizard.
If you make a mistake while moving the images in the registration, you can click Cancel manual registration to restore the initial state.
Step 2 - Automated affine registration - Define rectangular ROI
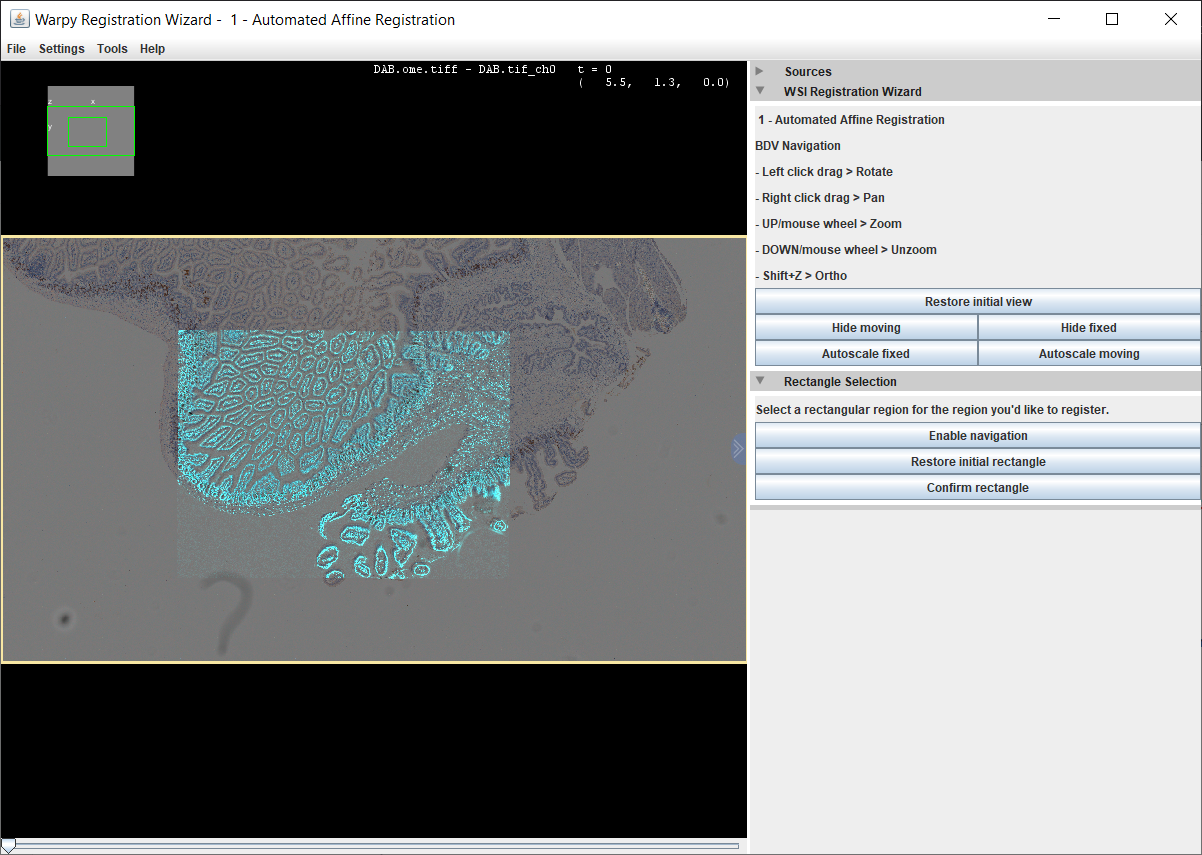
In this step, you need to define the rectangular region that will be used to do a first coarse affine registration. By default a yellow rectangle surrounding the biggest image is set. However, in the demo case, this rectangle is too large : a large portion of the DAB image is not covered by the fluorescent image. To set a better rectangular ROI, you can directly draw a rectangle in the viewer by dragging the mouse while holding the left button:

If you are not satisfied with the rectangle, you can erase the last one by drawing a new rectangle until you are satisfied. Then go to the next step by clicking Confirm rectangle.
You can deactivate the rectangle selection mode and toggle the navigation mode by clicking Enable navigation. You can also restore the initial rectangle with Restore initial rectangle if needed.
For the coarse affine registration with elastix, both the fixed and moving images will be resampled over this rectangular selection. Moreover, the resampling will be performed with a pixel size equals to the value specified in the Pixel size for coarse registration in microns parameter. By default, this value is set to 10 microns.
The coarse affine registration is not performed directly when clicking the Confirm rectangle button. Instead, patches locations for the automated spline registration are set first, before any automated registration is started. This means that, when selecting patches for the spline registration (next step), you should consider the fixed image rather than the moving image, since the moving image will be transformed before each patch is acquired.
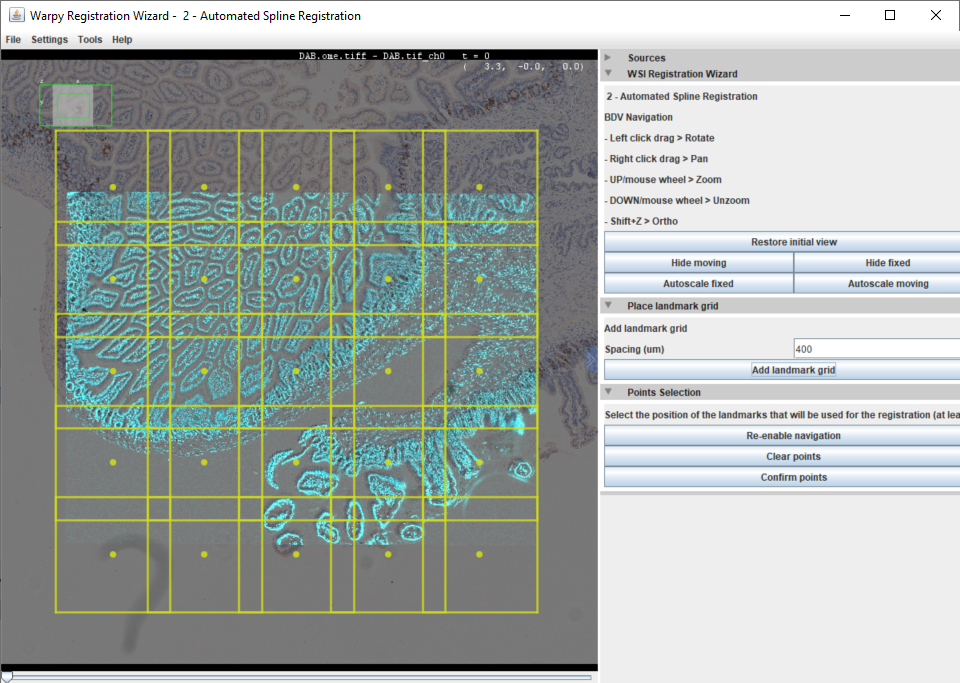
Step 3 - Automated spline registration - Define landmarks
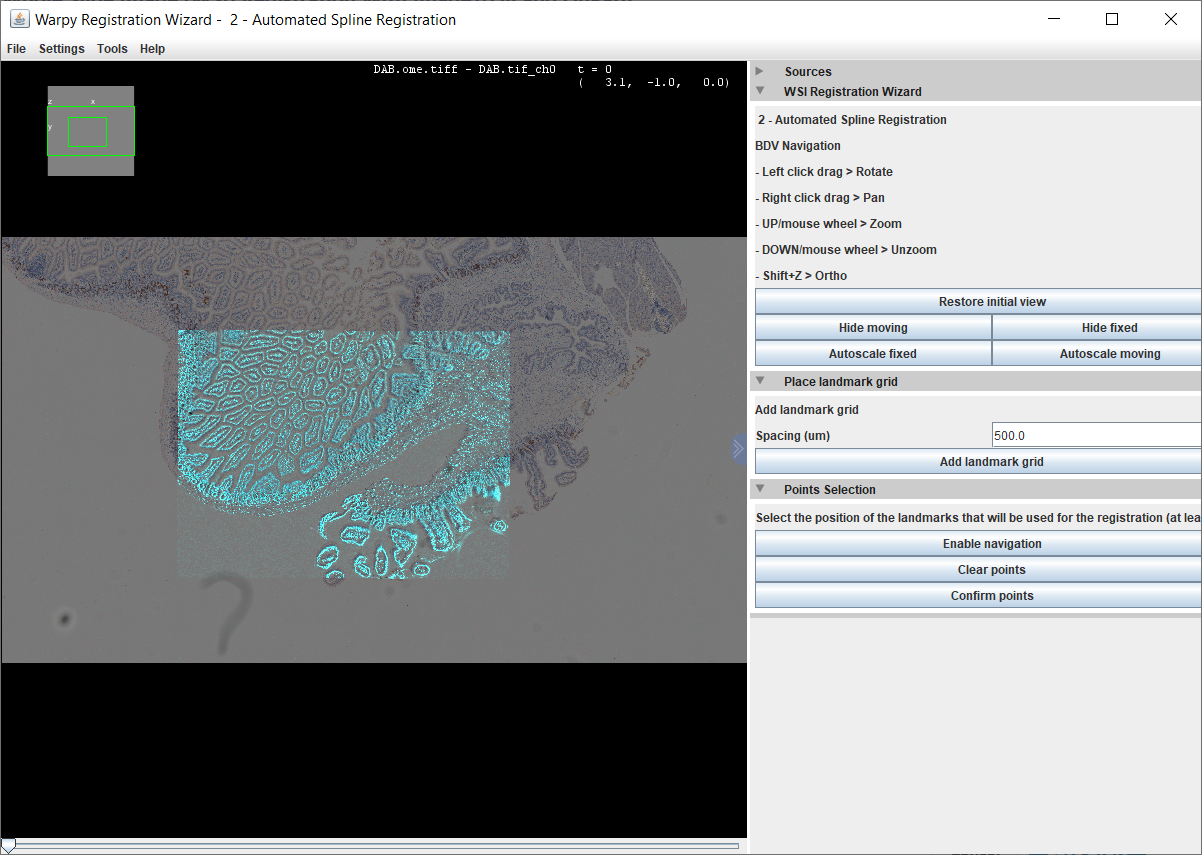
Using the mouse left button, position points that will be used to locally correct the warping of the moving slide. You can concentrate the landmark on the regions you are more interested in. Here’s an example of landmarks positioning:
The number of necessary landmarks is not obvious to know in advance. You need to place them however where common structures are easily identifiable in both the moving and fixed image.
Tips:
- You can move each landmark by dragging its middle point after it has been positioned on the viewer ( the middle point increases in size when it can be dragged )
- You can clear all landmarks and restart positioning landmarks by clicking
Clear points - You can restore the navigation mode (
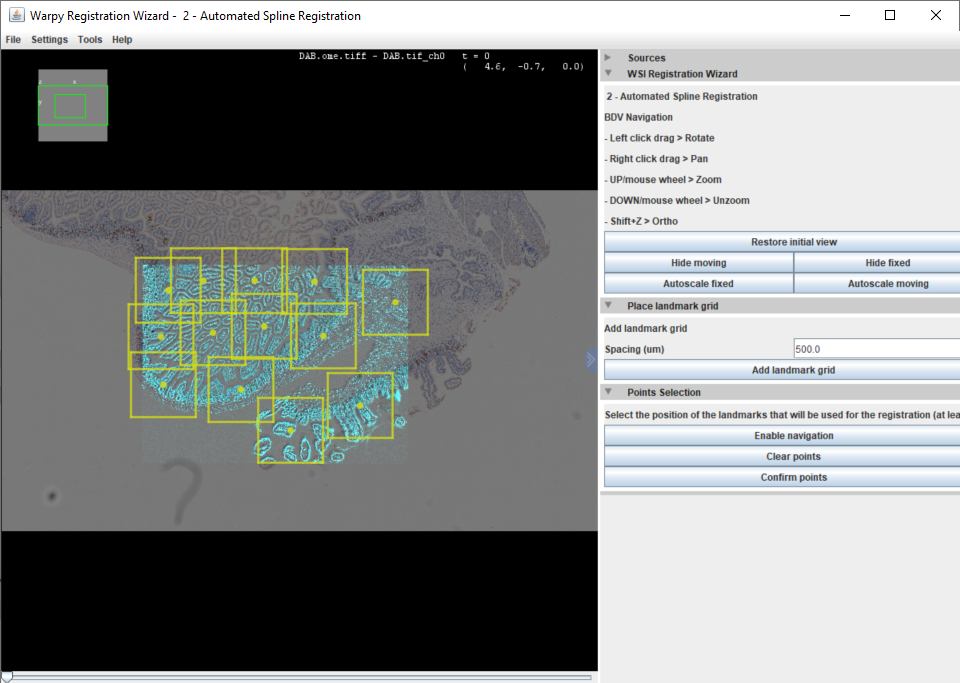
Enable navigation) to zoom on the slide and position better the landmarks. Do not forget to restore the point selection mode (Enable point selection) if you want to drag patches or create new ones (even when adding the grid). - It is possible to place patches automatically on a grid over the rectangular regions defined in the previous step by clicking
Add landmark grid. You can set the spacing between the patches to allow for some overlap or on the contrary to let some space between them:
It is not advised (but possible) to add more than a few hundred landmarks.
Overlapping patches is not issue. In fact, after the patch registration, only the location of the patch central point is kept to interpolate the transformation over the whole slide.
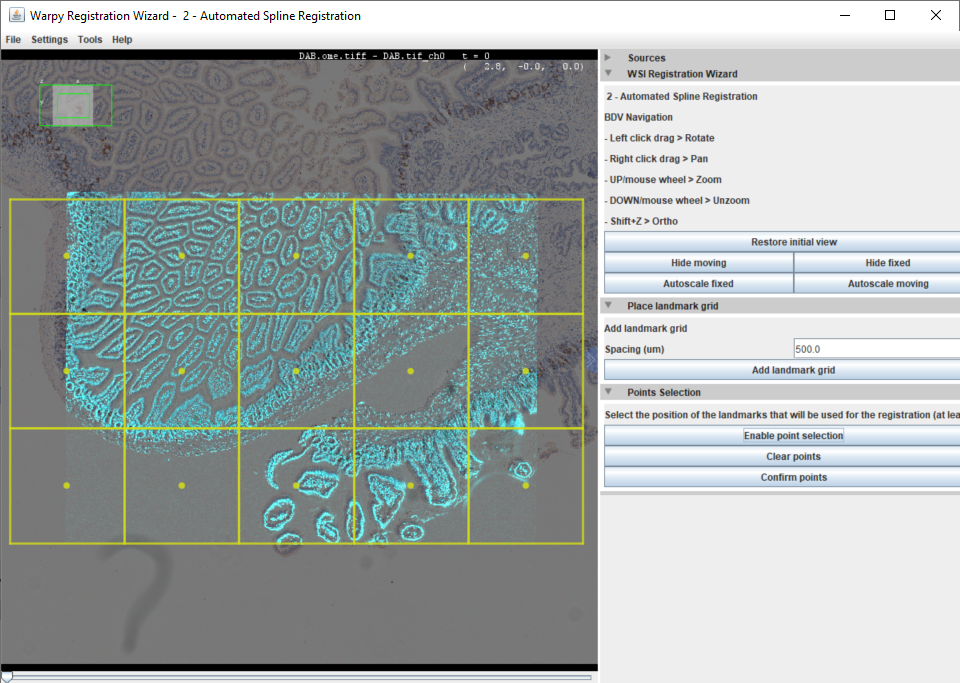
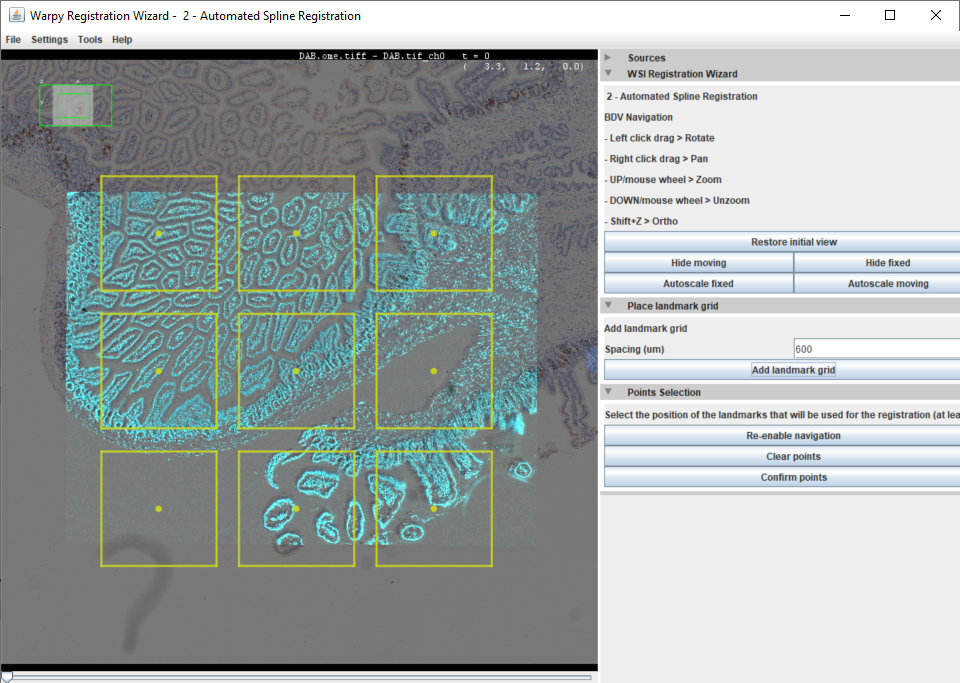
You can change the size of the patches by changing the value Patch size for precision patch registration in the initial step of the wizard. Setting it to 200 microns leads to this automated grid placement (with a spacing of 300 microns between patches:
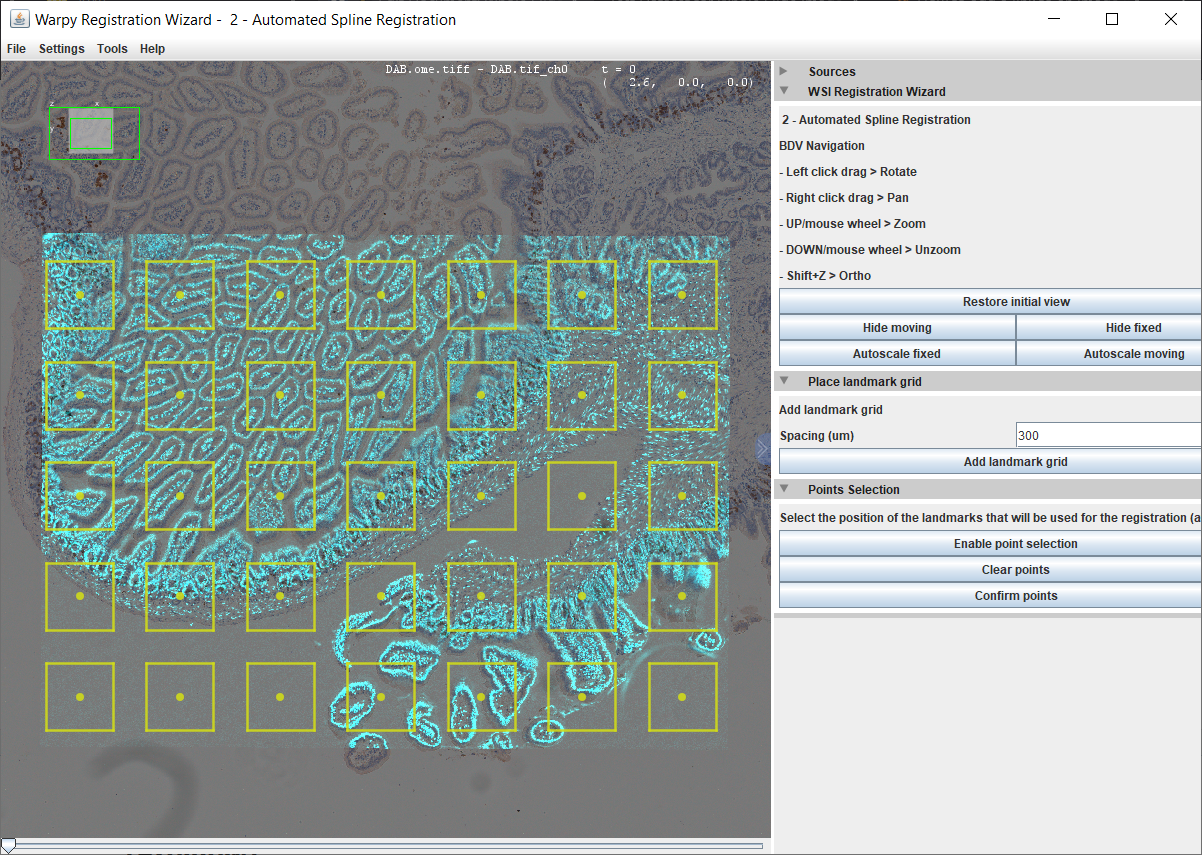
It is advised to shift the landmarks where very little structure is present:

By default, for each patch, the fixed and moving image is resampled with a pixel size of 1 micron. This value can be modified at the beginning of the wizard if necessary (Pixel size for precise patch registration in micron)
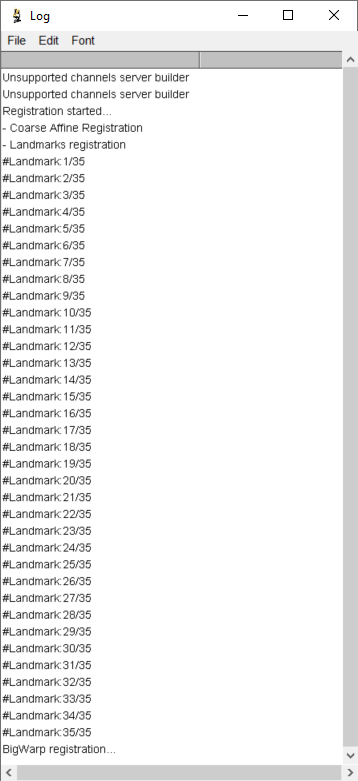
Click confirm points to start the registration. The ImageJ log window shows the progression of the registration:
It typically takes a minute to register the demo dataset.
Step 4 - Manually correct landmarks location with BigWarp
If you have selected 4 - Manual spline registration (BigWarp), you will now be able to manually investigate and correct landmarks that have been automatically registered, and also add new landmarks to the slides, if you want to adjust more precisely a particular region. The interface used is directly the one of BigWarp, so please check the documentation of BigWarp itself in order to edit landmarks.
Here’s a convenient way to perform this step:
- First, ignore the moving image window and increase the size of the BigWarp fixed image.
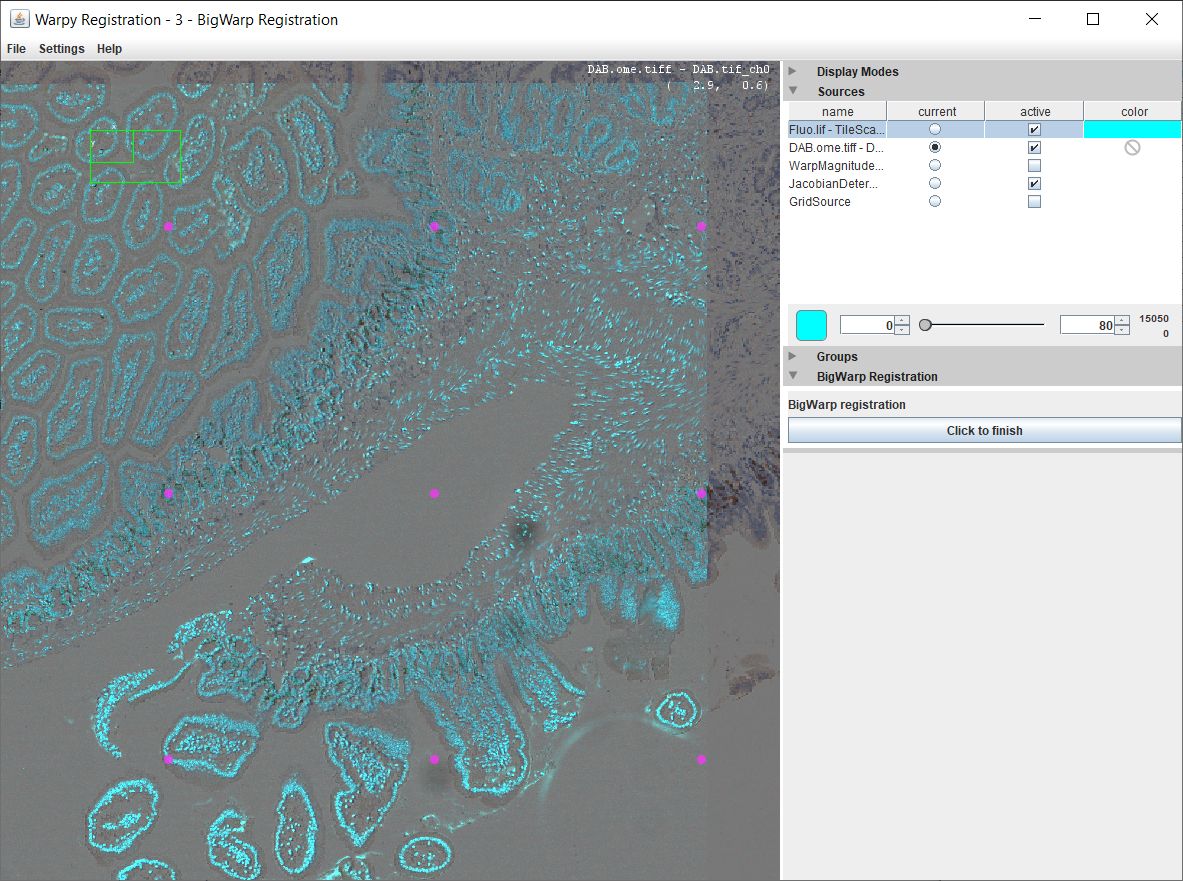
- press
F1for help window - press
Fto toggle ON and OFF the registered moving image (F stands for fused) - zoom (mouse wheel) and pan (drag right mouse button) to investigate the registration quality
- press
ctrl+Dto move to the next landmark
The DAB image has its min max value reset to 0 and 65535. Re-set these values to correct ones by using the Sources card.
To correct a landmark position:
- press
spaceto enter the landmark mode - carefully select and drag a landmark to modify its position. Live visualization of the transformed image helps you positioning it correctly
- press
spaceto exit landmark mode - navigate and repeat for each landmark that needs correction
To add another landmark:
- in landmark mode, press
ctrl + left clickto pin a new landmark on both the moving and fixed image at the current mouse location. It can then be dragged.
You can delete landmarks in the landmark table if necessary:
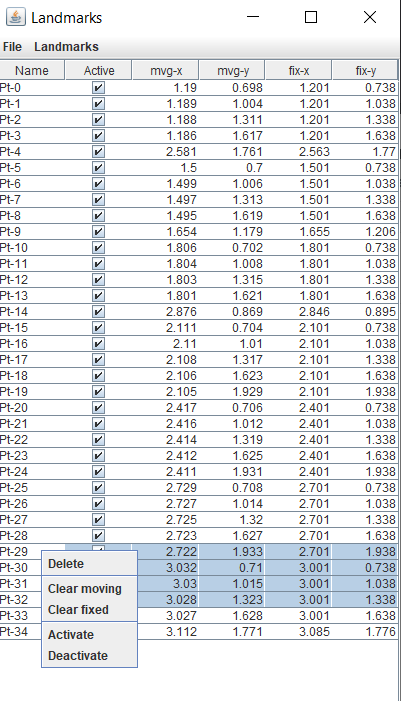
Press Click to finish to end the wizard and save the transformation to QuPath.
Step 5 - Successful registration message
If all went smoothly, you should get this message if the ImageJ log window:
Transformation file successfully written to QuPath project: Path\id_moving\transform_moving_fixed.json
This means that the result of the registration has been stored as a file into your QuPath project. It can then be used from within QuPath to transfer annotations and or detections from one slide to another one, as explained in the next section.
the transformation is stored as a json file in the data entry folder of the fixed moving image. It is named by convention transform_{i}_{j}.json where i and j are the entry ids of the fixed and the the moving image in the QuPath project.
Editing a previous registration
Once the registration has been performed, you may have second thoughts regarding a region which has not been registered well enough. If that’s the case, you can go back to Fiji, re-open your QuPath project, and run the command
QuPath - Edit Warpy Registration:
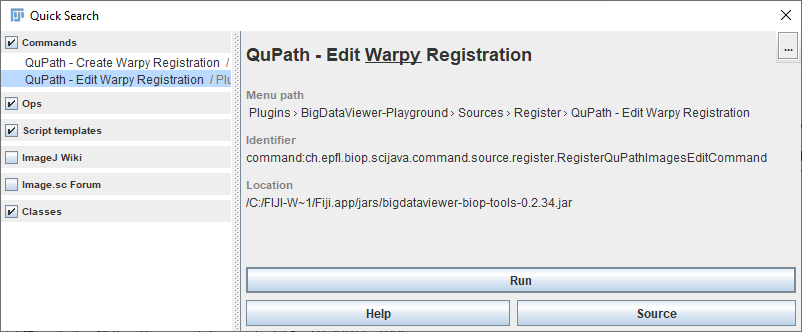
You will need to select the moving and fixed image (a warning message is displayed if no previous registration is found or if you have switched moving and fixed).
Running this command will launch the BigWarp interface, in which you can modify, remove, or add new landmarks. Click the appropriate button in the BigWarp bigdataviewer window in order to save and override your previous registration (which is lost, unless you save the BigWarp landmark file).
Analysis in QuPath
From within QuPath, annotations and or detections can be transferred within registered images, one way or another. Indeed, provided transformations are regular enough, they are invertible.
To transfer annotations or detections from one image to another:
- using the procedure of your choice (cell detection plugin, stardist, manual annotation, etc.), create annotations or detections on the image of your choice (for instance the moving image).
- move to the other registered image (for instance the fixed image).
- you can then execute one of the scripts below Automate › User scripts… › New Script…
The above scripts consists of two parts:
-
Warpy.getCandidateSourceEntrieslooks through all images of the QuPath project if there are transformations files will allow to transfer annotations and detections from one image to the current (target) one, and then performs the transfer. -
transfered annotations/detections does not contain the standard measurements provided by QuPath (fluorescent intensity / DAB value, etc.) In order to add the measurements on the target image, the function
Warpy.addIntensityMeasurementscan be called
Saving the registered image
You have several options, but please be aware that computing the fully transformed image is not as safe as working with transfered ROIs. The image can be modified significantly.
Computing a fully transformed image, created with ImageCombinerWarpy or with the Fiji Warpy exporter, is a transformation over the pixel contents of the original images! The pixel difference between the original and the transformed image depends on the transformation, the used interpolation as well as the downsampling used in the current viewer. This must be taken into account in all analysis steps performed on such transformed images.
With Image Combiner Warpy
This requires using QuPath and the Image Combiner capabilities. For more informations, go to export combined image to OME-TIFF.
With Warpy in Fiji
In Fiji, you can type ‘export warpy’ into Fiji’s search bar and you should get a window like this:
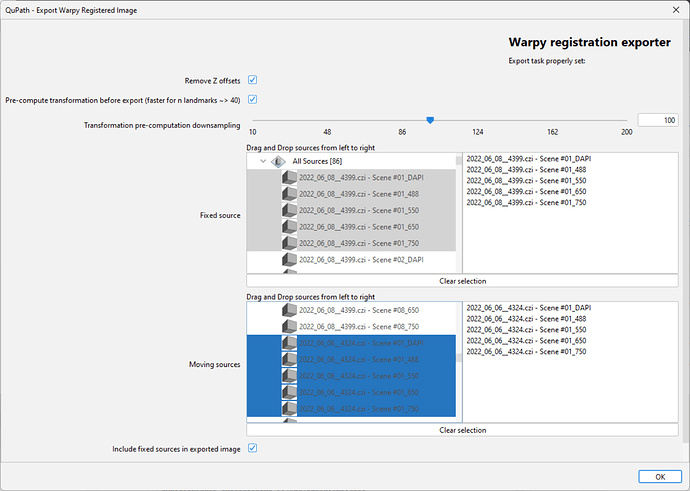
After clicking ok, you’ll get a second window with writing options:
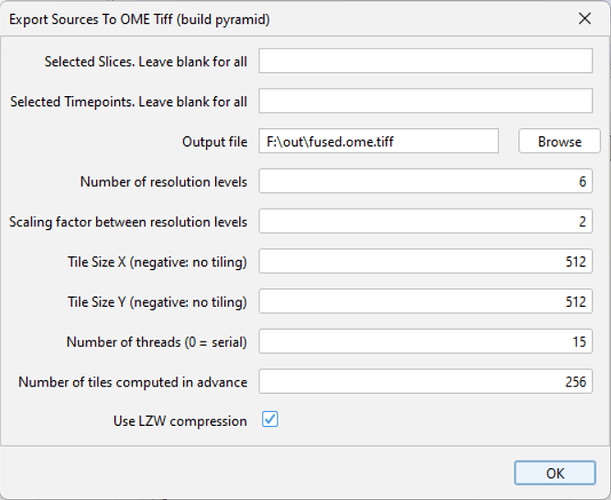
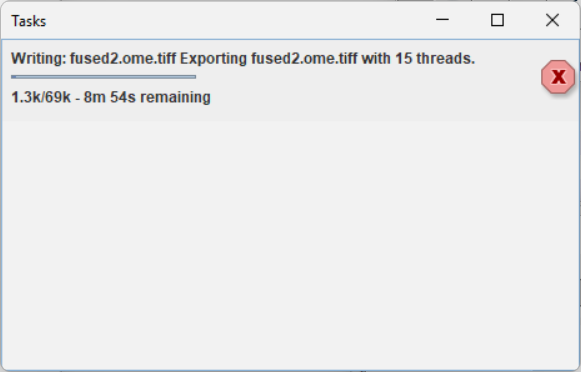
And if everything’s right, you’ll get a progress bar during image writing (click on the bottom right square of Fiji’s main bar):