This tutorial was written in 2010-11, and contains out-of-date or no-longer-accurate information. A potential alternative for using OpenCL in ImageJ is CLIJ.
This tutorial is meant to help you leverage OpenCL from Java for use with ImageJ.
Background
To use OpenCL from Java in ImageJ we rely on JOCL. JOCL is written on top of a low level JNI API to make using OpenCL a bit easier. The OpenCL code you write can also leverage JOCL to accelerate execution of ImageJ plugins from Java. We have created an OpenCL deconvolution example to demonstrate compute acceleration using OpenCL (both locally and remotely as a binary web service).
Setting up the Development Machine
We set up an Ubuntu based development machine for OpenCL development and testing. Mac OS X 10.6, Windows 64/32, and Linux 64/32 pass the tests and are supported by this package. Here are the steps for setting up Ubuntu:
- Obtain an ISO for Ubuntu 10.04
- Install Ubuntu on the target machine.
- Install g++ with:
sudo apt-get install g++ - Install needed development libs with:
sudo apt-get install freeglut3-dev
sudo apt-get install libxi-dev
sudo apt-get install libxmu-dev
Setting up OpenCL
You will need to install OpenCL for your OpenCL enabled hardware if it does not come installed as part of the OS.
Setting up OpenCL for ATI
If you have ATI GPU hardware (AMD), the SDK can be dowloaded on GitHub.
Setting up OpenCL for NVidia
For NVidia hardware, install development drivers, CUDA Toolkit, and GPU Computing SDK code samples by following these installation instructions.
Use the wget tool for downloading the three needed install files from NVidia’s download site.
wget http://developer.download.nvidia.com/compute/cuda/\
3_2_prod/drivers/devdriver_3.2_linux_64_260.19.26.run
wget http://developer.download.nvidia.com/compute/cuda/\
3_2_prod/toolkit/cudatoolkit_3.2.16_linux_64_ubuntu10.04.run
wget http://developer.download.nvidia.com/compute/cuda/\
3_2_prod/sdk/gpucomputingsdk_3.2.16_linux.run
Stop the graphical desktop manager by typing:
sudo gdm stop
from the command line.
Install the required files:
sudo sh devdriver_3.2_linux_64_260.19.26.run
sudo sh cudatoolkit_3.2.16_linux_64_ubuntu10.04.run
sh gpucomputingsdk_3.2.16_linux.run
Per the installation instructions, we setup the environment variables (in .bashrc):
export LD_LIBRARY_PATH="/usr/local/cuda/lib:/usr/local/cuda/lib64"
export PATH="/usr/local/cuda/bin"
Test the installation by compiling and running a few of the NVidia provided OpenCL samples by changing directories to:
/NVIDIA_GPU_COMPUTING_SDK/C

and running:

make

We ran into an error and ended up editing the file

/NVIDIA_GPU_COMPUTING_SDK/C/common.mk

by replacing line 169 with:

NVCCFLAGS  += --compiler-options -fpermissive

and re-running:

make

Change directories to

/NVIDIA_GPU_Computing_SDK/C/bin/linux/release

and run

./bandwidthtest

to check the binary CUDA install.

Build the OpenCL examples by changing directories to

/NVIDIA_GPU_COMPUTING_SDK/OpenCL

and running:

make

Change directories to

/NVIDIA_GPU_Computing_SDK/OpenCL/bin/linux/release

to run the OpenCL Bandwidth sample using:

./oclBandwidthTest
Setting up Eclipse and needed plugins on Ubuntu
To configure the development environment, we started by installing the JRE with:
sudo apt-get install openjdk-6-jdk
and downloading Eclipse for J2EE Developers from:
http://www.eclipse.org/downloads/download.php
and following the Eclipse installation steps.
We added the SVN plugin to Eclipse by clicking on Help › Install New Software and adding the SVN adapter site:
http://subclipse.tigris.org/update_1.6.x
Downloading and running the ImageJ OpenCL examples
The ImageJ OpenCL examples can be imported as an Eclipse project by right clicking in the Package Explorer window and choose Import. Select Git project and add the site:
https://github.com/uw-loci/opencl-decon
Import the branch and assign a general project name like imagej-opencl.
The folder structure of the source consists of the following:
- src - Java and OpenCL source files (extension .cl) Notice the files fht.cl and sobel.cl in the src directory. When executed, the Java code in provided in the examples compile these the OpenCL for execution. Note: Runtime compilation of the OpenCL source files allows execution on any potential OpenCL enabled device.
- sourcedata - (Point Spread Function) PSF and 3D data used as a small sample data set for the FHT3D Example.
- lib - libraries needed for classes using JOCL, ImageJ, and Hessian 4.0.7
We have included the necessary JOCL native libraries for Windows 32/64, Apple, and Linux 32/64 platforms inside this directory. To use OpenCL from Java in ImageJ we leverage JOCL. JOCL uses JNI to make calls into the OpenCL API. The OpenCL code you write can also leverage JOCL to accelerate execution of ImageJ plugins from Java. Since each OS has different native JOCL native libraries, the runtime environment must be configured such that the Java code can load the needed native libraries.
Understanding platform-specific JOCL native libraries
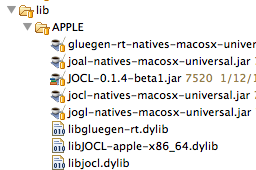
For these samples, three native libraries are needed: gluegen-rt, jocl, and JOCL-‘platform’-‘arch’. If you look in the lib folder, you will find -natives-xyz.jar files containing the respective libraries. You need to unzip each of the three jar files and copy the dynamic files (.so, .dylib, or .dll) into the parent directory if they are not already present. Notice the below example where the libgluegen-rt.dylib, libJOCL-apple-x86_64.dylib, and libjocl.dylib files are in the platform specific directory.

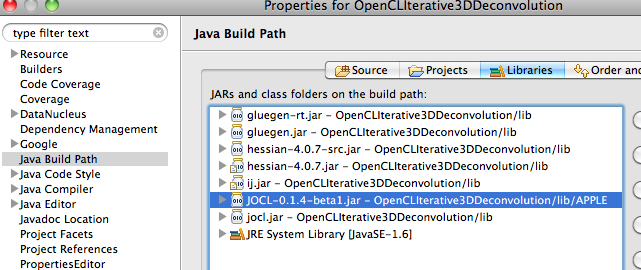
Then ensure that the platform specific jar is exported during the project build. For example notice that the JOCL-0-1.4-beta1.jar file is referenced in the project. (To see this menu right click the project and choose Properties › Java Build Path › Libraries.)

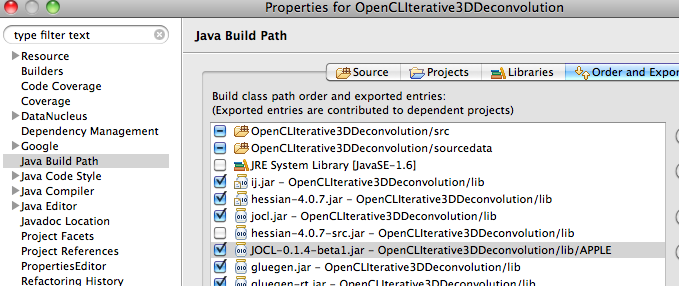
Finally, ensure that the platform specific files are exported:

Start exploring the examples by viewing the developer comments in the file src/publication/SobelFilterExample.java. Notice the Main() method calls run() which use an awt.Image type as an input parameter. Modify and run the Main() method as a Java application and adjust the VM Arguments (E.g. -Xmx1024m) if needed.
SobelFilter example
Without modification, SobelFilterExample.java loads an image from a web server, process it locally using OpenCL, and displays the results. There is nothing novel about this example. It simply allows runtime testing of several system configuration steps to ensure working configuration of JOCL and OpenCL native libraries. Modify this example to suite your needs, but please ensure proper JOCL and OpenCL configuration before proceeding.
Understanding ImageJ + OpenCL
Working within ImageJ: If developing an ImageJ plugin using OpenCL realize that programmatic control is passed to your plugin inside the PlugIn (or PluginFilter) run() method. An example of this can be found in src.demos.OpenCL_SobelFilter.java. For this plugin to run within ImageJ, the JOCL jars and native libraries respective to the target platform will need to be available by the ImageJ class loader. The supporting JOCL native libraries can be copied into the plug-in directory within ImageJ to allow plugin implementations using OpenCL to reference the native libraries provided by the OpenCL installation.
ImageJ OpenCL: An incremental approach to applying OpenCL
Now that you have demonstrated use of OpenCL from Java and within ImageJ, you may wish to see a compute intensive example demonstrating modification of an existing Java implementation that delegates a portion of its implementation to OpenCL. Take a look at the developer comments in the FHT3D_3D_Deconvolution.java example to see what steps are used for brokering data between Java and OpenCL between steps within an algorithm’s implementation.
The approach used to start delegating to OpenCL from an existing Java implementation:
- Assess the performance of the existing implementation to identify the most compute intensive region of code
- Develop a test data set before and after that region
- Write OpenCL code that replaces the compute intensive region
- Test to ensure the new OpenCL code generates the same results using the test data
- Add conditional delegation logic to handle runtime compute capabilities
OpenCL ImageJ plugins following enterprise java patterns
Finally, some users and academic labs are building “GPU Supercomputers” to expose compute resources to a wide range of applications running locally. In this case, you wish to leverage to look at the FHTEJBService and Iterative_Deconvolve_3D_WS classes for an example on how to remotely serve up the your GPU accelerated resources using open source J2EE technologies.
In this example, Hessian Binary Web Services are used to broker data between the Java consumer and the Hessian Servlet. This approach is only recommended for those labs having sufficient throughput between the client application and the OpenCL/GPU servlet host.
Hosting OpenCL-accelerated algorithms using Oracle’s GlassfishV3
To set up OpenCL support on Glassfish for deploying the ImageJ/Fiji Java based EJBs, navigate to the system’s lib directory (for example: /opt/glassfishv3/glassfish/lib) and install the required jars/native libs.
sudo wget http://jogamp.org/deployment/webstart/jocl-natives-linux-amd64.jar
sudo unzip jocl-natives-linux-amd64.jar
sudo rm -rdf META-INF
sudo rm jocl-natives-linux-amd64.jar
sudo wget http://jogamp.org/deployment/webstart/gluegen-rt-natives-linux-amd64.jar
sudo unzip gluegen-rt-natives-linux-amd64.jar
sudo rm -rdf META-INF/
sudo rm gluegen-rt-natives-linux-amd64.jar

sudo wget http://jocl.org/downloads/JOCL-0.1.4-beta1-bin-linux-x86_64.zip
sudo unzip JOCL-0.1.4-beta1-bin-linux-x86_64.zip
sudo mv JOCL-0.1.4-beta1-bin-linux-x86_64/*.so .
sudo mv JOCL-0.1.4-beta1-bin-linux-x86_64/*.jar .
sudo rm -rdf JOCL-0.1.4-beta1-bin-linux-x86_64
sudo rm JOCL-0.1.4-beta1-bin-linux-x86_64.zip

sudo wget http://jogamp.org/deployment/webstart/gluegen-rt.jar
sudo wget http://jogamp.org/deployment/webstart/gluegen.jar
sudo wget http://jogamp.org/deployment/webstart/jocl.jar
The only other thing needed to get glassfish setup to support JOCL is to login to the admin console, under Common Tasks › Configuration › JVM Settings › Path Settings.
Native Library Path Prefix: /opt/glassfishv3/glassfish/lib
GPU Based Processing Techniques and the ImageJ Architecture
The following article describes our first effort at GPU computing with ImageJ using OpenCL, in early 2010. The tutorial above is more recent and more complete; the text below is preserved only for historical reasons.
Introduction
The primary focus of this paper is to provide an introduction to and evaluation of two common GPU technologies (CUDA and OpenCL) as they could be used within ImageJ. The intent is to provide a light introduction to the software libraries used to perform two basic image processing tasks and present performance metrics that may be useful for deciding future efforts in this area.
Many of the algorithms within ImageJ and ImageJ plug-ins can be implemented to take advantage of GPU and multi-core CPU processors. Having the capability to support plugins that leverage ‘many-core hardware processors’ poses important architectural issues for ImageJ. An intent of the ImageJ refactoring effort is to implement support for native code integration in a manner that leverages hardware devices ‘behind-the-scenes’. Performance is not as important as compatibility with external native libraries and ease of use by non-programming scientists.
Note: The use of ‘device’ refers to GPU based hardware devices and ‘host’ refers to GPU based devices.
Background on the use of ImgLib
The future release of ImageJ will adopt the ImgLib generic processing library. A very minor change has been introduced into the ImgLib codebase that allows data to be stored in Java.NIO arrays. The NIO backed arrays are allocated outside of the Java Virtual Machine and allow for a single copy of data to be shared with the native code.
There are several issues that are encountered when developing GPU based code:
- Byte ordering differences need consideration when using NIO Buffers and exchanging data between different hardware devices with different byte ordering.
- The amount of available host memory, device memory, number of GPU processors, and the computational capabilities of devices may vary significantly.
To address these issues, helper methods can be used to dynamically assess a given host’s capabilities at runtime. Working memory for the device and host are important along with the performance characteristics for a device. Profiling performance is also important in assessing a device since a device that is shared between several applications may achieve lower performance than if the device is not shared.
When considering how to access GPU resources from Java, several open-source APIs were considered. For the purposes of this evaluation, Olivier Chafik’s JavaCL was chosen due to its Lesser General Public License.
Introduction to GPU processing pipeline
The processing pipeline when using GPUs as compute device in ImageJ involves several steps:
- Get the data in native arrays with the needed byte ordering from an imglib object
- Choose a device, compile the kernel, and associate the native arrays with the kernel
- Launch the kernel
- Return the results to a compatible Imglib object
Metric/Method
Sobel filter is a common image processing routine that is used for edge detection. It is ideally suited for this evaluation due to implementation simplicity as well as the GPU code’s similarity to the existing open source implementation.
For purposes of timing processing, the 8-bit test image will be loaded into an Imglib NIO backed buffer. The kernel source code is precompiled. The timer is started before the call to execute the kernel and concludes after the results are returned to the Imglib NIO backed buffer. 100 iterations are averaged to determine the recorded value.
Note: It is almost certainly possible to optimize any of the following implementations, however the primary goal of this assessment is not performance.
Implementation
The following code demonstrates a partial implementation of sobel filter within ImageJ:
public byte[] filter(int width, int height, byte[] inputImageArray)
	{
		byte[] pixels = new byte[width*height];
		int p1, p2, p3, p4, p5, p6, p7, p8, p9;
		int offset, sum1, sum2=0, sum=0;
		int rowOffset = width;

		for (int y=1; y 255) sum = 255;

				pixels[offset++] = (byte)sum;
			}
		}
		return pixels;
	}
There are a few properties that make the above partial implementation ideal for GPU computation. Each resultant pixel’s value is independent of those around it. The values consumed in calculating the resultant pixel share a sequential relationship can leverage performance advantages. Several computations are performed for each pixel.
Here is the partial implementation of Sobel filter in OpenCL:
__kernel void sobel( __global char* input, __global char* output, int width, int height)
{
    int x = get_global_id(0);  //find the X id
    int y = get_global_id(1);  //find the Y id
    int p[9];  //allocate a local array used for intermediate values
    int offset = y * width + x;  //determine the offset
if( x < 1 || y < 1 || x > width - 2 || y > height - 2 )  //is this an edge pixel?
{
  output[offset] = 0; //This partial implementation does not calculate edge values
}
else
{
    p[0] = input[offset - width - 1] & 0xff;
    p[1] = input[offset - width] & 0xff;
    p[2] = input[offset - width + 1] & 0xff;
    p[3] = input[offset - 1] & 0xff;
    p[4] = input[offset] & 0xff;
    p[5] = input[offset + 1] & 0xff;
    p[6] = input[offset + width - 1] & 0xff;
    p[7] = input[offset + width] & 0xff;
    p[8] = input[offset + width + 1] & 0xff;

    int sum1 = p[0] + 2*p[1] + p[2] - p[6] - 2*p[7] - p[8];
    int sum2 = p[0] + 2*p[3] + p[6] - p[2] - 2*p[5] - p[8];
    float sum3 = sum1*sum1 + sum2*sum2;

    int sum = sqrt( sum3 );
    if (sum > 255) sum = 255;
    output[offset] = (char) sum;  //write the result to the output array
 }
};
The above OpenCL kernel is almost identical to the Java implementation with the exception that an index is used to identify the per value offset (rather than looping through an array). This allows the computation to be spread over many cores and thus provide the potential for speed up.
The following example demonstrates how an image is loaded using Imglib in preparation for GPU computation:
//Create an array container factory
ArrayContainerFactory arrayContainerFactory = new ArrayContainerFactory();

//Set the backing type to NIO
arrayContainerFactory.setNIOUse(true);

//Create a image backed by an NIO typed array given an input file
Image inImg = LOCI.openLOCIFloatType( file.getPath(), arrayContainerFactory );
ArrayContainerFactory.setNIOUse(true) ensures that NIO backed arrays are used. The reason for using NIO backed arrays rather than Java native arrays is due to optimal data sharing between Java and native code as well as for improved throughput between the host and device. Both CUDA and OpenCL benefit from the use of host arrays that are not paged to disk. This type of memory is referred to as paged-locked memory. Section 5.3.1 of “CUDA Programming Guide Version 3.0” has more specific information on this detail.
Note: OpenCL may use page-locked host memory when the CL_MEM_ALLOC_HOST_PTR flag is set.