Zellige is a software tool allowing the automated extraction of a non-prescribed number of various surfaces from a 3D image acquired by fluorescence microscopy. The program is available through a Fiji plugin.
Publication
Tutorial
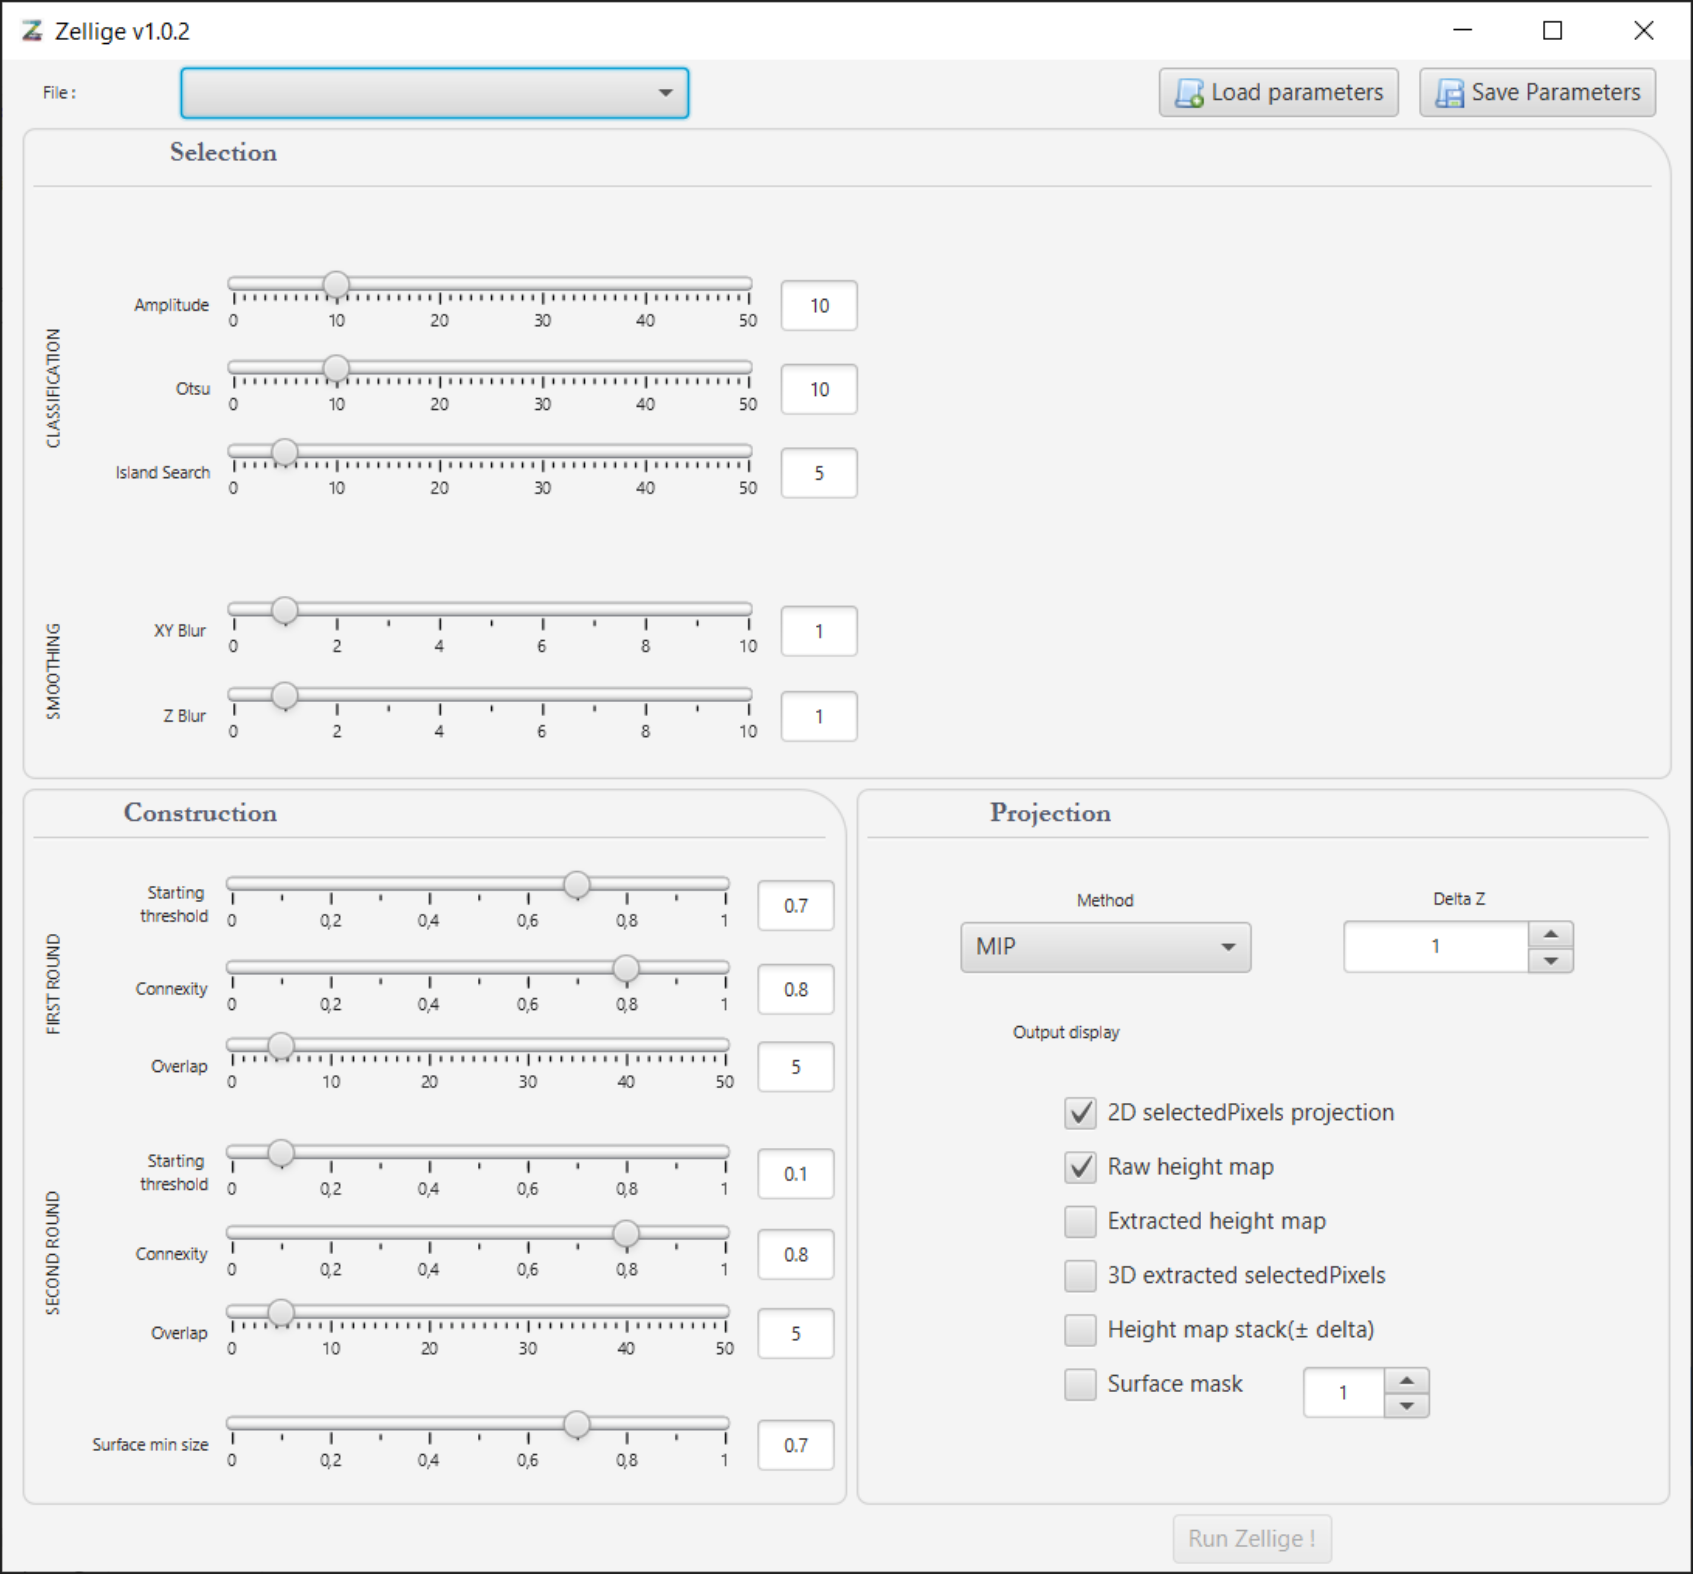
The Zellige plugin consists of a single window divided in 3 main parts for each step: selection, construction and projection.
As an example we use an acquisition of Drosophila pupal wing and abdomen. Open the file in Fiji.
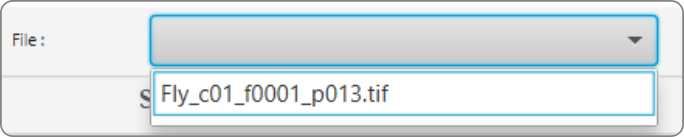
- Choose a file In the top left corner is a selection field that will display when clicked on all opened images in Fiji. You can then select the image that you want to process.
- Load/Save parameters The parameter set used to extract the surfaces can be found [here](http//link/to/file). Download the file on your computer then load the file into Zellige by clicking on the 'Load parameters' button.
- Selection Parameters In addition to Amplitude and Otsu parameters the Island Search parameter permits to eliminate some background or unspecific pixels. Those 3 parameters set the classification part. After the classification, a smoothing step is performed on the xy plan and the z axis and is set by the parameters XY Blur and Z blur.
- Amplitude
The amplitude parameter set the value for a thresholding based on the saliency of a local intensity maximum detected along the z-axis. Pixels which are local maxima along the z axis and which present a saliency above the amplitude parameter value are kept.
- Otsu
The ‘Otsu’ parameter set the value for a thresholding based on local pixel intensity. Pixels that are both locally brightest and with an intensity above the Otsu parameter value are kept.
- Island search
The Island Search parameter set the size for which small isolated clusters or ‘islands’ contained in the classified image should be removed. This parameter is mostly useful when the input image contains a spurious signal due to vesicles for example.
- XY and Z blur
The XY Blur and Z blur parameters set the radius of Gaussian filters respectively for the xy plan and z-axis. The classified image is then subjected to these filters. This step does a smoothing of each surface in each dimension and can partially fill surfaces holes. This smoothing allows the program to handle epithelium with various mesh size and various topology. - Construction parameters
- Starting threshold
The construction blocks can have various lengths depending on the size of the surfaces. Despite the previous classification, some unwanted signal can subsist. Those blocks belonging to the background are small compared with those belonging to a surface; the biggest construction blocks are those that we want to use . The starting threshold is a cut-off that determines, according to the length distribution of the construction blocks, which fraction of the biggest construction blocks can be used as seeds to start a surface construction. The goal of the starting threshold is to prevent the construction of small or false surface (background signal or unwanted signal), the idea is to set this parameter as low as possible. - Overlap
The ‘Overlap’ parameter corresponds to the minimum number of overlapping pixels necessary to test a match between two construction blocks. This parameter should be set as high as possible to prevent any mismatch. - Connexity
The 'connexity' corresponds to the minimum value of the number of connected pixels over the number of overlapping pixels to assemble 2 blocks. This parameter should be set as high enough as possible to prevent any mismatch. - Surface min size
The surface min size is the minimum size relative to the XY input images dimensions that an extracted surface must have to be considered valid. This parameter is the same for both rounds.
In our example, one of the surface is only about 10% of the total image dimension so the surface min size parameter should be set at 0.1. This parameter should be set as high as possible to prevent the construction of small surfaces (small unwanted structures or surfaces constructed in the background)
- Projection parameters
- the raw height maps (the output of the construction step),
- the projection,
- the height map projection (which z value have been use in the specified interval to produce the projection),
- the image sub-volume (the 3D image on the specified interval 2deltaZ + 1),
- the extracted surface in 3D,
- a surface mask in 3D on which you can specify an interval that you can then apply as an ROI on the original image input.
- Run Zellige After all parameters are set, click on the 'run Zellige' button.
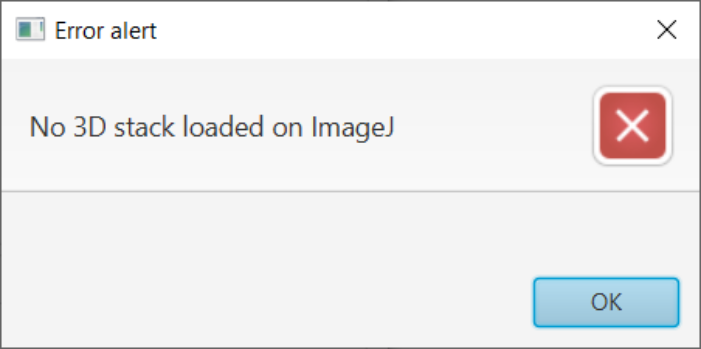
Zellige takes as input a 1-channel 3D image otherwise, a pop-up error message will appear on the screen:
When a suitable file is selected the first step of the pixels' selection starts: the pretreatment of the image (Gaussian filter: 2 x 2 x 1) and the computation of two classifications which will permit the selection of the pixels. Those classifications are configurable in the Selection panel:
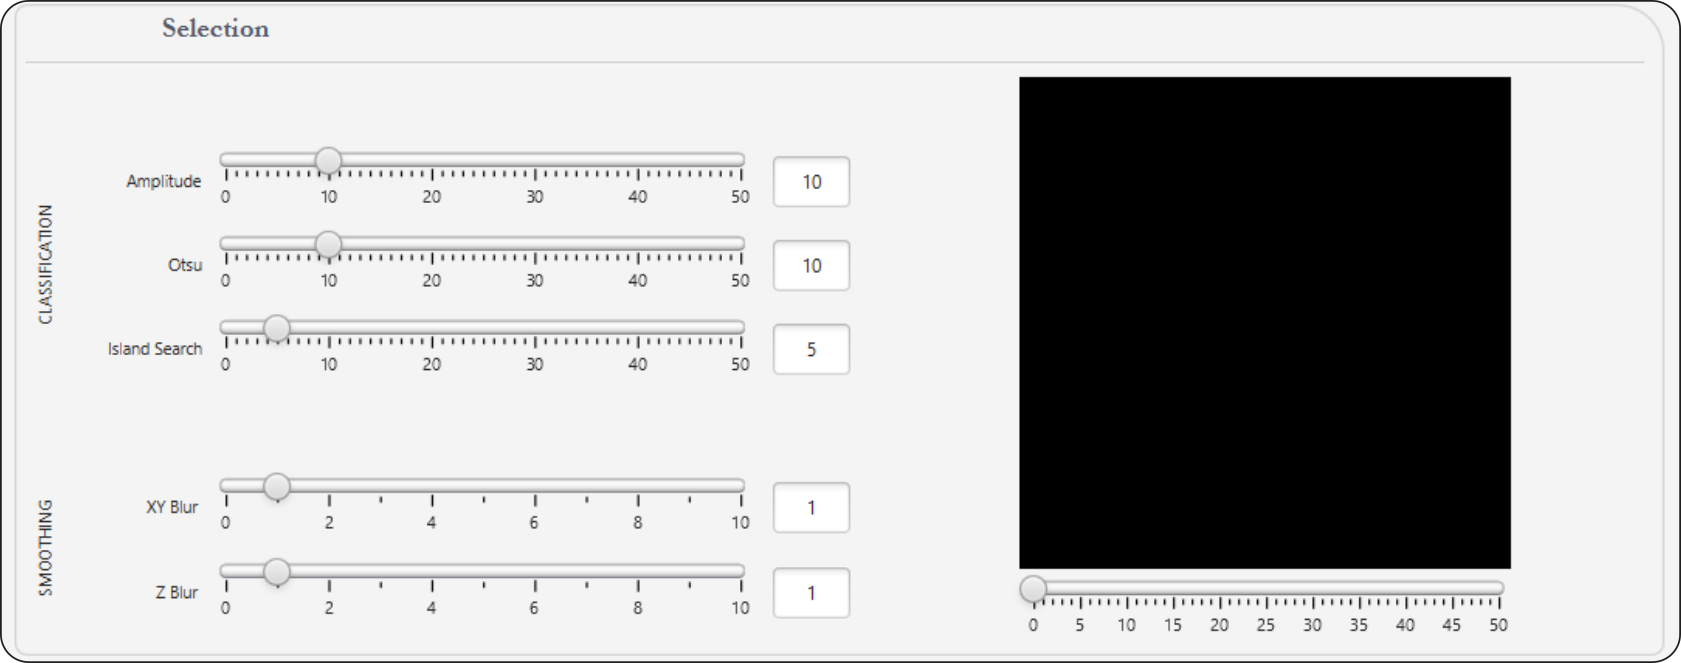
Zellige efficacy is mostly due to this double classification: identify accurately which pixel belongs to a surface and which one belongs to the background allows a faster and better surface reconstruction. For this reason, the output of the double classification is displayed on the right part of the selection panel and allows you to see which pixels will be used for the rest of the algorithm. The scroll bar under the classifications’ display allows you to scroll through the stack along the z-axis. During this computation, the parameters for the double classification (Amplitude and Otsu) are disabled, as the ‘run’ button.
As soon as one of the two parameters is changed, the new output of the double classification is automatically computed and displayed. This implies that for a large image both scroll bars will be disable every time you change the value of the ‘Amplitude’ or ‘Otsu parameter’, and so for a time corresponding to the computation of the thresholding.
When the output of both classifications is display, you can directly click on the ‘run’ button or first, load a parameter file or adjust the different parameters manually.
 At any time, you can save the parameters set on the GUI by clicking on the 'Save Parameters' button.
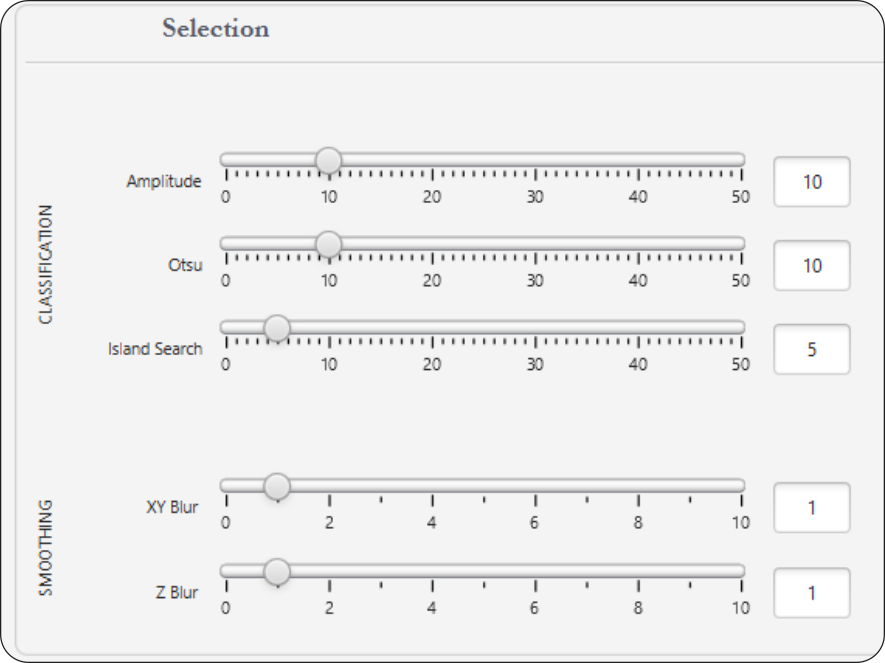
In our example, the abdominal cuticle (S3) presents a very low signal compared with the other surfaces. Therefore the double classification parameters should be set to display this low intensity signal surface. The input does not present any spurious signal : the value of Island search parameter will not impact the selection.
In our example, we have a surface with large cells (S2) so the XY blur needs to be high enough, two surfaces relatively close from each other (S1 and S2) and a surface with a very steep edge. The Z blur value has to be > 0 to smooth the edge but not too high to avoid merging S1 and S2.
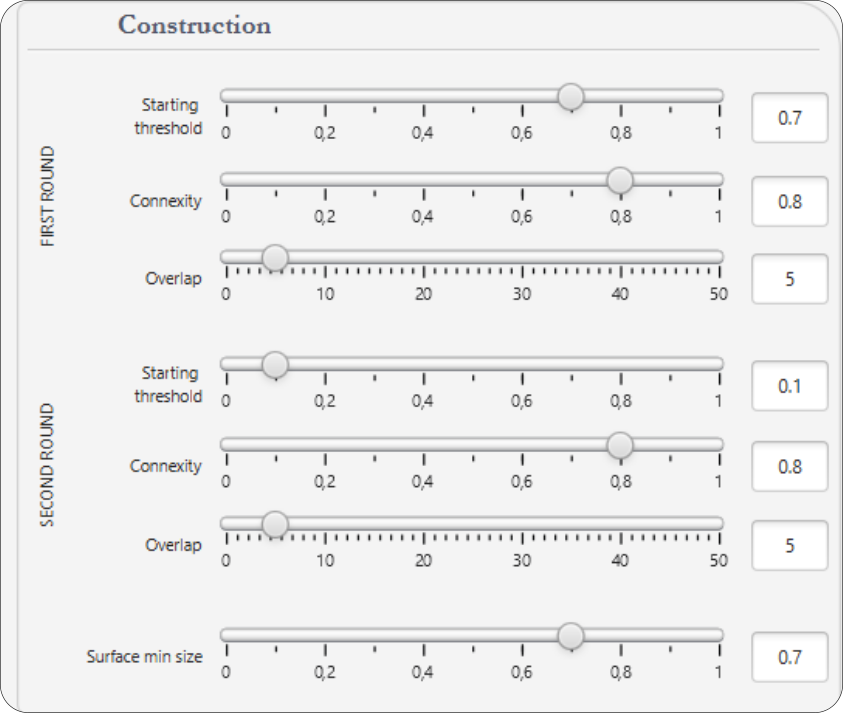
The surface construction consists of two rounds. For each round selected pixels are grouped under an orthogonal axis to form construction blocks. Then each surface is assembled with those blocks. For the first round the pixels are those selected in the selection step. For the second round the pixels correspond to each surface constructed in the first round. Both rounds are set according to 4 parameters, namely starting threshold, connexity, overlap et surface min size. The first three are specific for each round, the latter is the same for both rounds.
This example contains four surfaces one of which is smaller than the others. So in order to extract all of them including the small one, the starting threshold need to be high enough to include some construction blocks belonging to this particular small surface.
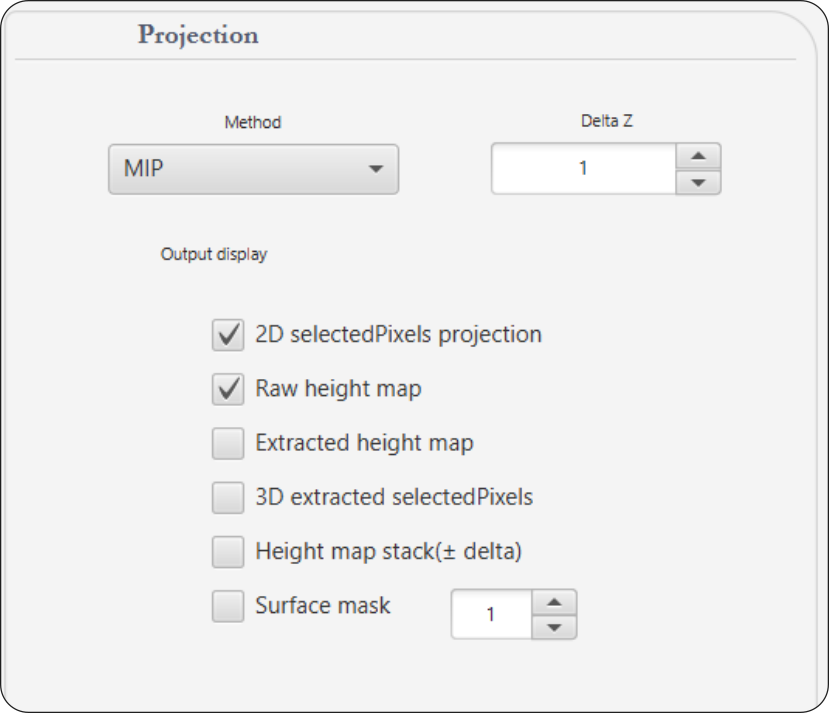
The output of the construction step is a list of height maps. The projection panel allows you to choose how you want to use those height maps to project the surfaces. You can choose the method with which you want to generate the projection via the selection field ‘Method’: only the MIP method is available for now, we will implements other methods in the near future. You can also choose the interval on which to apply the method with the parameter delta Z. The interval equals to (2 deltaZ + 1). You can display several outputs:
The state of the program is displayed on the bottom of the application next to the 'run zellige' button.
With the provided set of parameters, Zellige will generate 6 surfaces including the 4 surfaces of interest. </ul>