The TrackMate-Helper
Introduction
The TrackMate-Helper tool is a tool that can sweep over an extensive range of user-defined tracking parameters, including detectors and tracking algorithms, to define the best possible combination of tracking parameters for your tracking task. The output of parameters is compared with ground truth tracks of the same dataset. The calculated metrics are based on the Cell Tracking Challenge, which aims to develop an objective evaluation for cell segmentation and tracking algorithms. More information about the CTC is available on their website.
The TrackMate-Helper is especially useful when investigating a dynamic process over many movies. In such a case, create a ground-truth on one representative movie of the dataset. Then configure the TrackMate-Helper to run this movie over many sensible combinations of detection algorithms, linking algorithms and parameters, computing the CTC-metrics against the ground-truth. The helper will identify the optimal combination with respect to the 8 metrics of the CTC challenge. The identified optimal settings can now be used on the whole dataset.
If you are using this TrackMate module in your work, remember to cite the paper describing the Cell Tracking Challenge:
Ulman, Vladimír, Martin Maška, Klas E. G. Magnusson, Olaf Ronneberger, Carsten Haubold, Nathalie Harder, Pavel Matula, et al. 2017. ‘An Objective Comparison of Cell-Tracking Algorithms’. Nature Methods 14 (12): 1141–52. https://doi.org/10.1038/nmeth.4473.
Requirements
To use the TrackMate helper, you need to provide manually annotated ground truth tracks of your dataset exported in the CTC format. For more information on how to manually track your data using TrackMate see here. To export tracks in the CTC format see here.
Installation
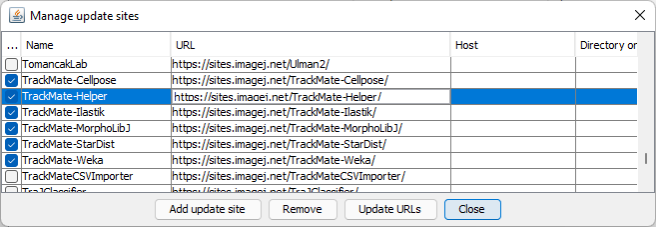
To use the Trackmate helper, you must subscribe to the CellTrackingChallenge and TrackMate-Helper Fiji update sites:
 …
…
Running the parameter sweep
-
Before launching the parameter sweep, please open the source image you would like to run the tracking and metrics on.
-
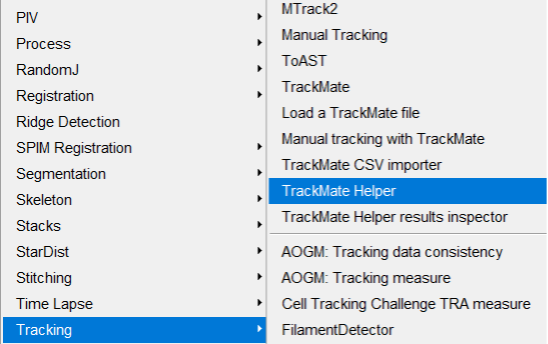
Start the plugin: Plugins > Tracking > TrackMate Helper
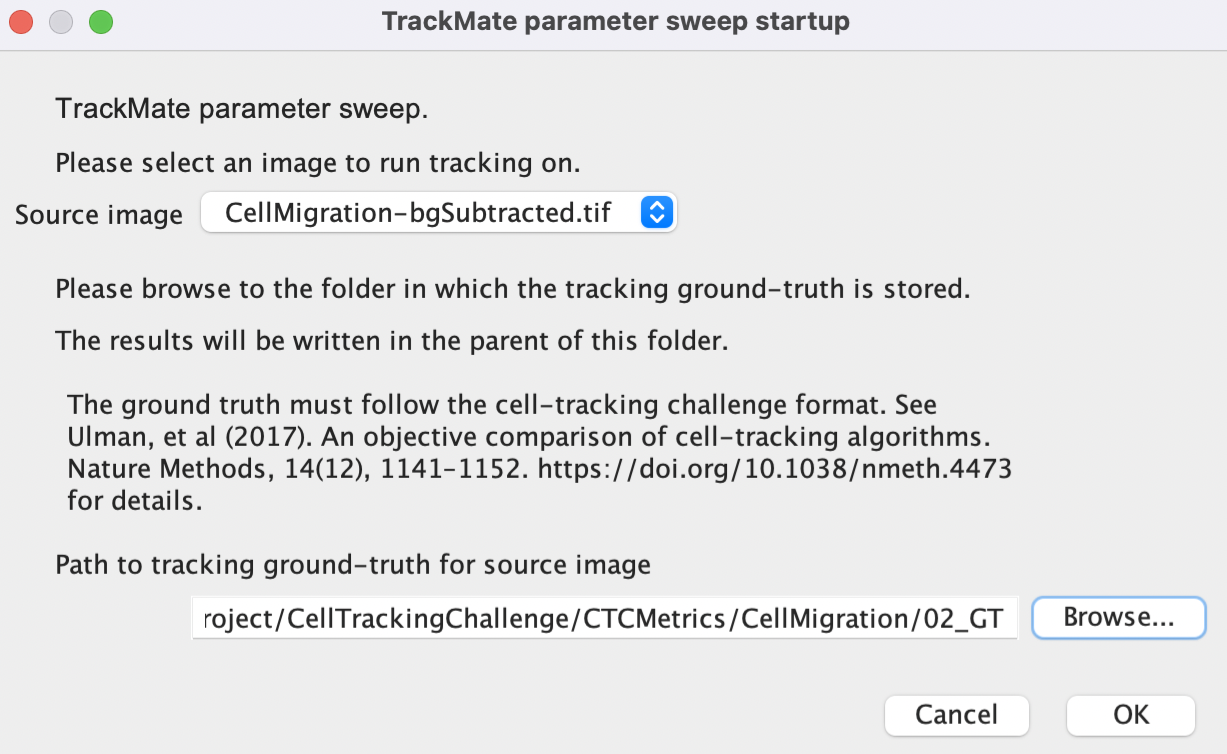
- It will ask you where the ground-truth corresponding to the source image is. It should be a path like: /Users/jpylvana/…/02_GT
-
Click Ok
-
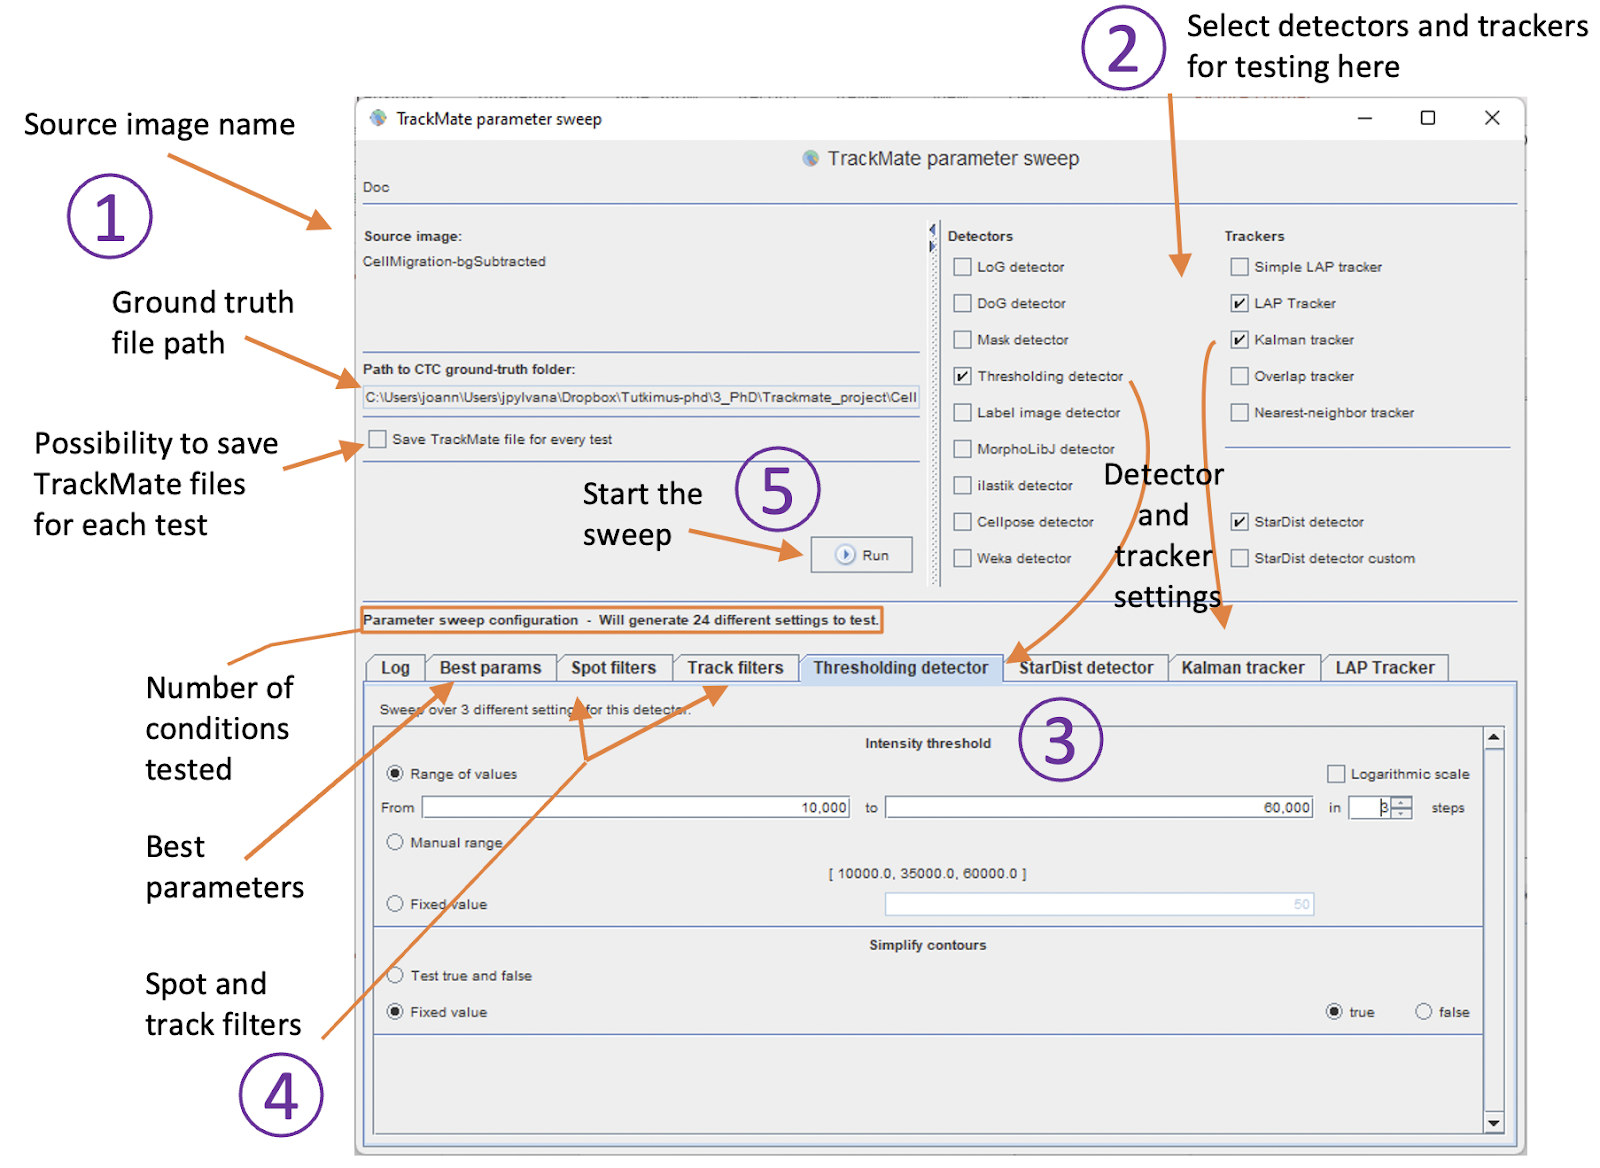
The parameter sweep UI will open with several options:
-
In the UI you will see the name of the source image and the path to the used ground truth data.
-
Start by selecting the detectors you want to assess from the detector and trackers list. For each detector and tracker, a new tab will appear on the lower part of the UI. In this example, for detection, we will assess the StarDist (pre-trained model) and the threshold detectors and for tracking, we will try the LAP and the Kalman Tracker.
If a selected module is not available in your Fiji installation (for instance if you selected the StarDist detector in the above panel, but did not subscribe to the TrackMate-StarDist update site), a message will be shown instead of the configuration panel for this module.
- Select the parameters for your chosen detector and tracker. Here in our example, the page for the Threshold detector parameters is active. Here you can define one or a range of threshold values for testing. If you select a range, enter the starting and the ending threshold values and how many steps you want to test. The threshold values to be tested will be visible below. Here you can also select to Simplify the contours for segmentation if preferred. All the other detector and tracking parameter settings work similarly.
In practice we suggest that you start running the TrackMate user-interface, to find a starting range for parameters interactively. Computation time will be shorter if you do not include problematic tracking settings in the parameter sweep.
- Filter spots and tracks if needed. On the bottom of these tabs, you will see a plus green sign that can be used to add a filter.
Spot and track filters are not part of the parameter sweep. The filters you enter in these two panels are used for all combinations tested.
- When all parameters to be tested have been defined, click Run. The parameter sweep will start. You can follow the progress in the Log tab and a progress bar after clicking on Run. Depending on the number and type of detectors and trackers tested, running the sweep might take some time.
NOTE! Sometimes in the log tab, you will encounter errors caused by the incompatibilities between CTC and TrackMate file format. Usually, they appear for problematic tracking results at the beginning or end of the sweep, where parameters are far from ideal. They are due to the fact that TrackMate and the CTC format represents tracking results in a different manner: In TrackMate, objects are represented by an overlay of polygons and in the CTC format, objects are represented by label images, pixel by pixel. This led to some incompatibilities between the two in some marginal cases:
-
The CTC file format cannot process overlapping labels, but TrackMate can represent two objects that overlap fully.If an object fully overlaps with another one, it won’t be represented by at least one pixel in the label image and the CTC metrics will generate an error. The TrackMate CTC exporter tries to bridge those cases by removing the spot that is hidden in the label image and making a link with a gap over the removed spot. But this does not always succeed, for instance when the hidden object is the last or first in a track. In that case you will see in the Helper log the message: label not found.
-
CTC format does not allow a gap after cell division, which TrackMate accepts. When such a gap happens, CTC metrics cannot be measured.
-
In the CTC file format, tracks can be made of only one spot, which is not possible with TrackMate.
When the TrackMate-Helper generates tracking results with some instances of the #1 and #2 cases above, the CTC metrics will fail to perform. In this case you will find ‘NaN’ for the metrics results in the CSV tables for the settings that generated these tracking results.
How to read the results
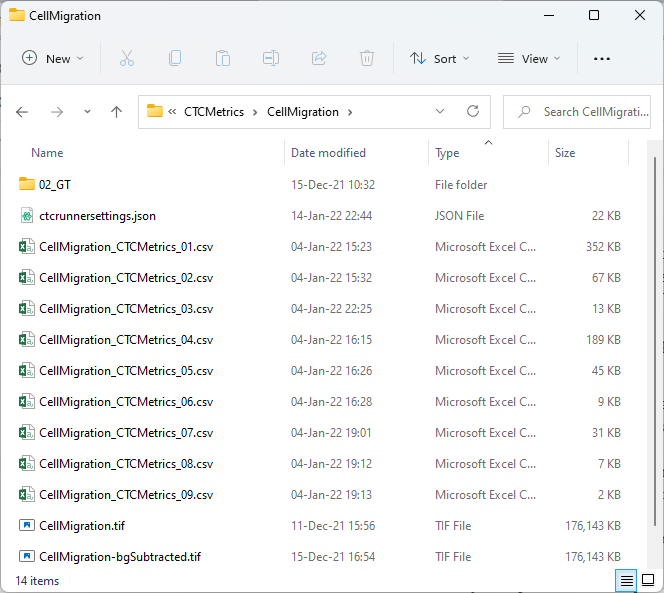
The CTC metrics are saved in CSV files in the parent directory of the ground-truth folder. There will be one CSV file per detector and tracker combination:
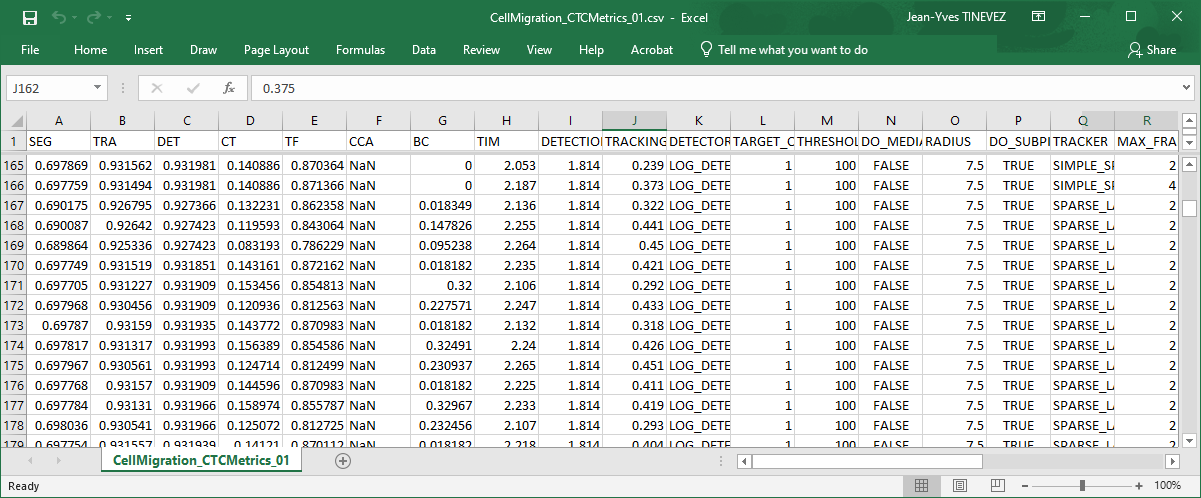
In each CSV file, there is one row per parameter set. The first columns store the CTC metrics and the subsequent one store the tracking parameters that generated these metrics:
These CSV files are parsed and processed automatically by the Helper. The parameter sweep results are visible under the Best params tab. They are updated during the parameter sweep and when the Helper is started. See the table at the end of this tutorial for more information on the metrics.
-
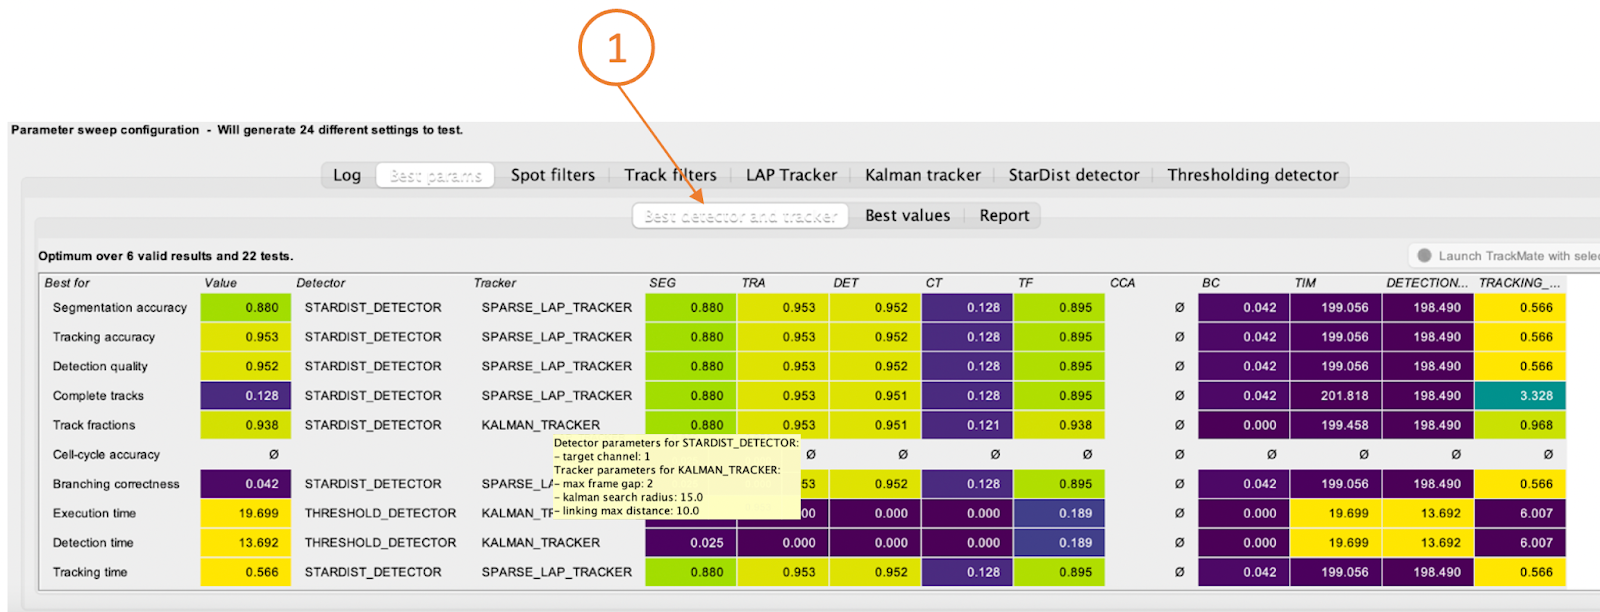
Best detector and tracker: Here, you can see the best combination of detector and tracker for each measured metric. To know the detector settings, hover your mouse over the detector/name, and the parameter will appear. For example, in the first line, the best detector and tracker for the segmentation accuracy (SEG) would be the Stardist detector and the LAP tracker. The numerical value for SEG can be found in the Value column. The values are presented in the Viridis lookup table for quick visualization.
-
Best values: Here, you can find the best value you can get for a detector and tracker combination according to a specific CTC metric. The values are presented in the Viridis lookup table for quick visualization. The CTC metric to optimize can be changed from the pulldown menu above the values. If you pick “DET” in this menu, the table will show you what is the best parameters that maximize the “DET” score for each combination of detector and tracker tested. This is helpful to compare the performance of detectors and trackers among them. For instance, the row in this table with
STARDIST_DETECTORandKALMAN_TRACKERlists the settings that give the best “DET” value over all the parameters tested with this combination. If you need to optimize the “DET” value, this is the best you can get with this detector and tracker. The lines with only a detector, or respectively only a tracker (a blank in the other column), give the optimum over all possible combinations with any tracker, respectively any detector.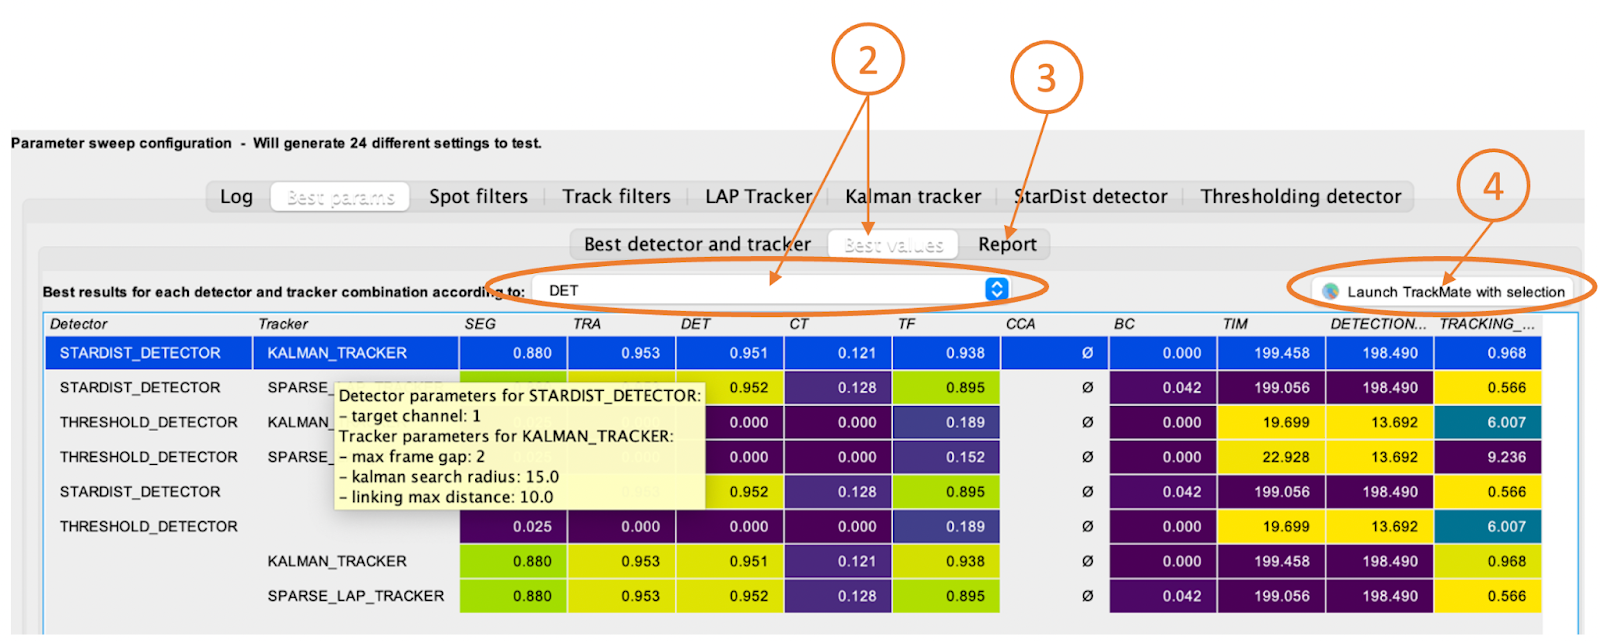
-
Report: In the report tab, you can find the details of parameters and configurations for each measured metric. For example,
-
Best configuration for Segmentation accuracy
-
Best configuration for Tracking accuracy
-
Best configuration for Detection quality
-
-
If you would like to apply the best possible tracking parameters for your tracking data, you can select one row and from the right top of the button Launch TrackMate with the parameters currently selected.
The CTC Metrics
| Metric | Signification | Range |
|---|---|---|
| Segmentation accuracy measure (SEG) | Evaluates the average amount of overlap between the segmentation and the ground truth. | 0-1 (1 is best) |
| The tracking accuracy measure (TRA) | Normalized weighted distance between the tracking solution selected by the user and the reference tracking ground truth. | 0-1 (1 is best) |
| The detection accuracy (DET) | Detection metric: Evaluate the effort required to manually correct a tracking result so that it matches the ground-truth. | 0-1 (1 is best) |
| Complete tracks (CT) | Measures the fraction of ground truth cell tracks that a given method is able to reconstruct from the frame they appear into the frame they disappear. | 0-1 (1 is best) |
| Track fractions (TF) | Averages the fractions of the longest continuously matching algorithm-generated track with respect to the reference track. | 0-1 (1 is best) |
| Cell cycle accuracy (CCA) | Measures how accurately an algorithm reconstructs the length of the cell cycle. | 0-1 (1 is best) |
| Branching correctness (BC) | Measures how efficient a selected tracking method is at detecting division events. | 0-1 (1 is best) |
| Execution time (TIM) | Time of algorithm execution. | Seconds. Lower is better. |