About MIA
The ModularImageAnalysis (MIA) plugin provides a modular framework for assembling image and object analysis workflows. Detected objects can be transformed, filtered, measured and related. Analysis workflows are batch-enabled by default, allowing easy processing of high-content datasets.
Compatible: Designed for “out-of-the-box” compatibility with spatially-calibrated 5D images, yielding measurements in both pixel and physical units.
Extensible: Functionality can be extended both internally, via integration with SciJava’s scripting interface, and externally, with Java modules that extend the MIA framework. Both have full access to all objects and images in the analysis workspace.
High-throughput: Workflows are, by default, compatible with batch processing multiple files within a single folder. Thanks to Bio-Formats, MIA has native support for multi-series image formats such as Leica .lif and Nikon .nd2.
Modular: Workflows can be automated from initial image loading through processing, object detection, measurement extraction, visualisation, and data exporting. MIA includes near 200 modules integrated with key ImageJ plugins such as Bio-Formats, TrackMate and Weka Trainable Segmentation. For a complete list of modules, please go here.
Reactive: Module(s) can be turned on/off dynamically in response to factors such as availability of images and objects, user inputs and measurement-based filters. Switches can also be added to “processing view” for easy workflow control.
MIA is developed in the Wolfson Bioimaging Facility at the University of Bristol.
Installation
Via the update site
The latest version of MIA can be installed directly into Fiji via an update site.
- Launch the ImageJ Updater from Help › Update…
- Click “Manage update sites” and in the window that opens, click “Add update site”
- Ensure the following two update sites are ticked:
- IJPB-plugins
- ModularImageAnalysis
- Close the “Manage update sites” window, then click “Apply changes” in the Updater window
Manually from GitHub
Specific versions of MIA can be downloaded from GitHub and installed into Fiji manually.
Note: If installing MIA manually, the ModularImageAnalysis update site should be disabled from the ImageJ Updater.
- Download the desired version of MIA from the Releases page.
- Place this .jar file into the /plugins directory of the your Fiji installation.
- Install MorphoLibJ using the instructions here
The MIA interface
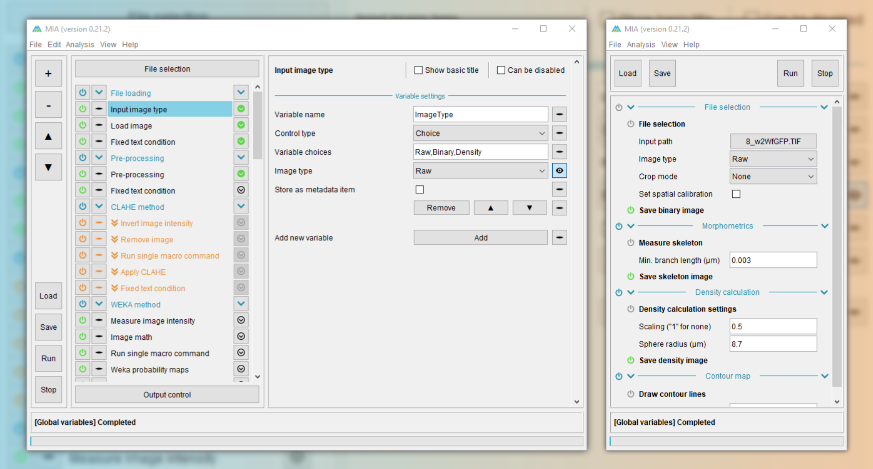
Processing view
MIA opens up in “processing view”, which is the standard view to run workflows from. This view includes controls to load workflow files and run analyses on new images. Full workflow editing can be performed in editing view. Depending on how the workflow has been configured, a select subset of parameters may be visible to the user. It is intended that these are the only parameters that need be varied to get the workflow to run on new images.
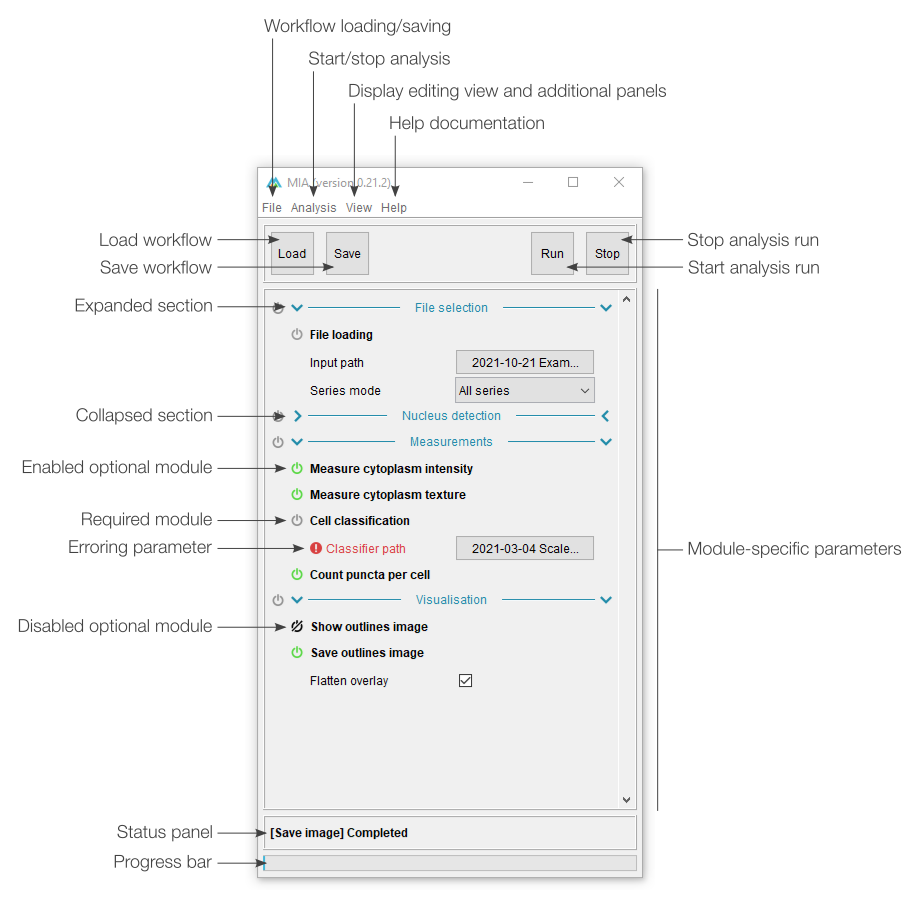
The basic processing view comprises a single main panel, showing all the available parameters. Certain modules can be set by the workflow creator to be optionally enabled ( ) or disabled (
 ), while required modules have this icon greyed out (
 ). Any parameters which are incorrect (e.g. paths to files that don’t exist) are highlighted in red with an accompanying error icon (
 ). Modules can also be grouped into sections, which can be independently expanded (
 ) or collapsed (
 ) by clicking anywhere on the associated header.
Editing view
Workflows can be constructed and tested in “editing view”. Modules are assembled into a sequential list, with parameters for each displayed when the corresponding module name is clicked. It’s also possible to control which parameters are visible to end users via processing view. In editing view, workflows can be manually run one module at a time or initiated for a full run in the same way as in processing view.
Details on constructing and editing workflows can be found in the Creating a new workflow guide.
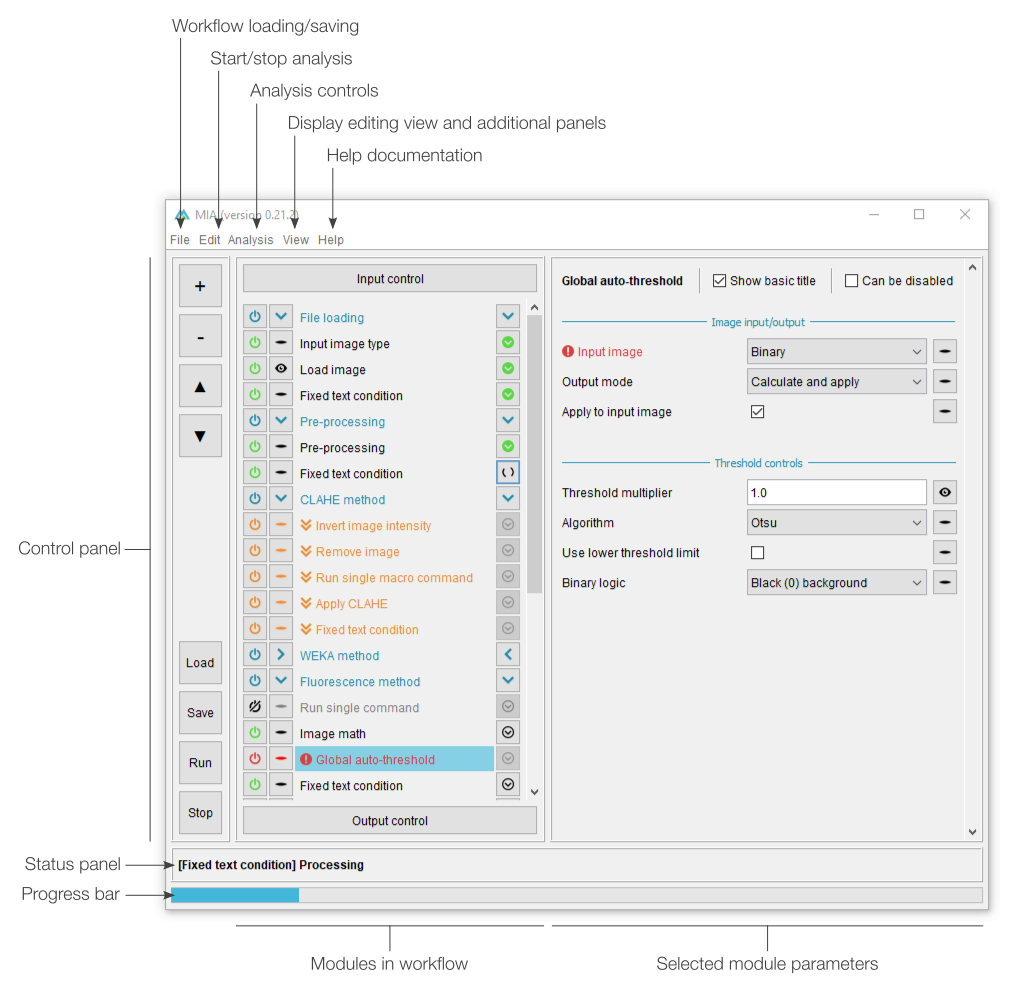
Workflow controls
The left-most section of editing view is split into two sections. The top half deals with adding, removing and sorting modules in the current workflow, while the bottom half offers shortcuts for workflow handling (e.g. loading and saving).
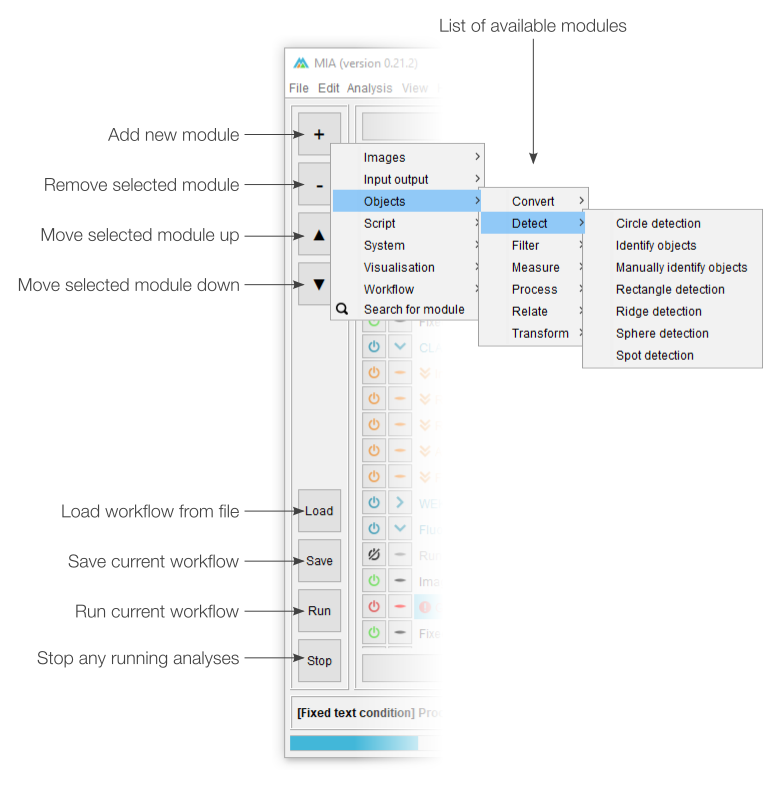
The button will open a menu listing all available modules sorted by category. Selecting a module will insert it into the current workflow (see “Modules in workflow” below). If any module is currently selected in the workflow, the new module will be inserted immediately after it, otherwise, it will be added to the bottom of the list. Similarly, the button will remove any selected modules (note: multiple modules can be selected from the current workflow). The and buttons can be used to move modules around in the workflow. A full list of modules and descriptions can be found in the module documentation.
Existing workflows can be loaded from .mia files using the button and saved with . If the workflow has been loaded from a .mia file or has been saved previously, the button will overwrite the existing file. To save to a new file, please use File › Save as…. A full analysis run can be started using the button. This will run the workflow on the file specified in “Input control” and is equivalent to starting an analysis from “processing view”. The button will terminate any active analysis runs.
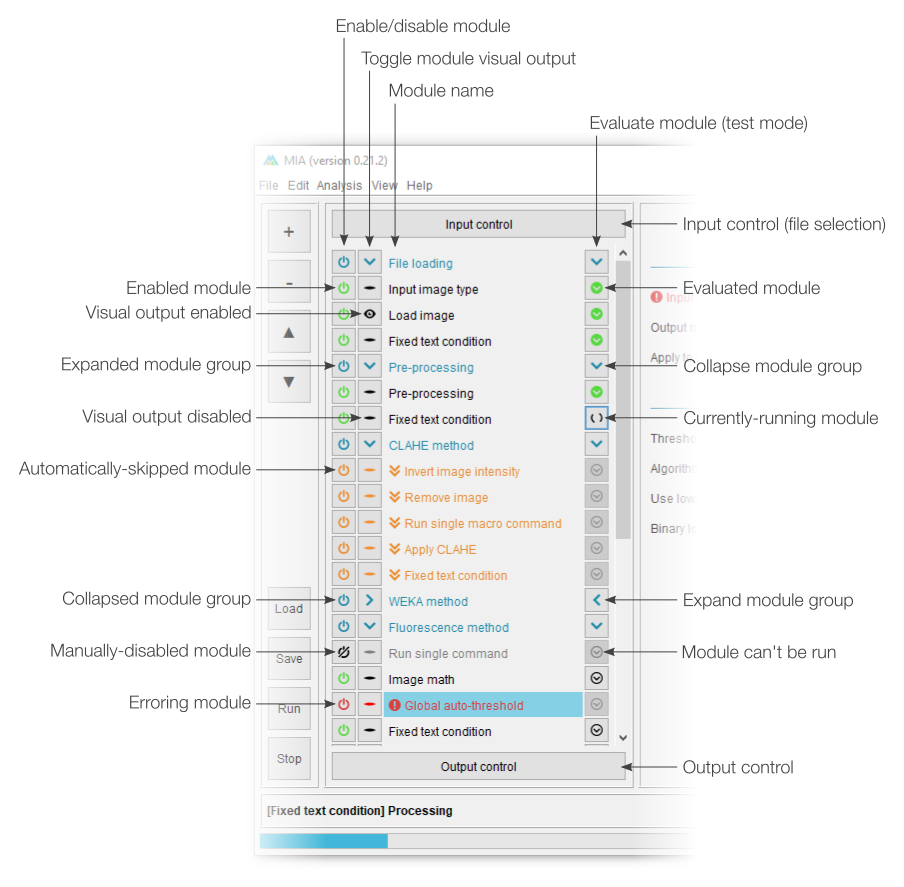
Modules in workflow
Modules forming the current workflow are assembled into a sequential list, with the first to be evaluated at the top. A pair of fixed modules, “Input control” and “Output control”, are always present at the top and bottom of the module list. These are concerned with selecting the file(s) to process and exporting results, respectively.
Each module can be enabled and disabled using the associated and buttons, where a strike-through indicates the module is currently disabled. Most modules are also able to display an immediate visual output when they have been evaluated, this visualisation can be toggled using the  (visualisation enabled) and
  (visualisation disabled) buttons.
Module parameters can be edited by selecting the associated module name (see “Module parameters” below). Modules can be moved within the workflow by selecting their name and dragging them to a new position. Multiple modules can be moved by holding down the Ctrl or Shift keyboard buttons or dragging the mouse over multiple module names. Modules can be assigned nicknames by right-clicking the name and selecting “Rename”.
Primarily for the purpose of testing, workflows can be run manually, one module at a time using the evaluation buttons. The  button indicates a module not yet run,
  a module currently being evaluated and
  a module previously run. Editing a module will cause any previously-evaluated modules downstream to reset to the “not yet run” state.
Separators can be used to break modules down into groups. Groups can be collapsed and expanded using the and buttons on the associated separator row. All modules of a group can also be simultaneously enabled or disabled using the associated separator  button.
Any modules identified as containing errors (e.g. missing input images or objects) will be shown in red with the icon. It is also possible to have optional modules which are disabled under specific conditions (see workflow modules). Skipped modules are highlighted in orange and given the  icon.
icon.
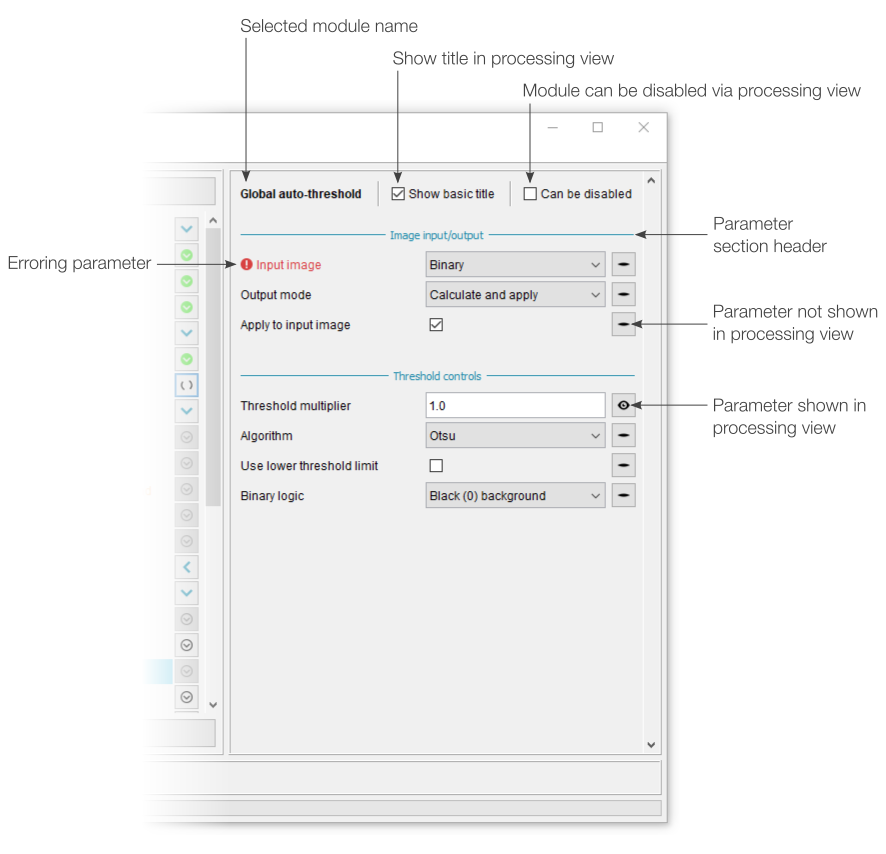
Module parameters
Each module has a set of associated parameters, which can be accessed by clicking the relevant module name in the module list (see “Modules in workflow”). These parameters are broken down into sections based on their common actions. The parameter control will depend on its type (e.g. input objects list objects available in the workspace).
By default, no modules are visible to the end user in processing view. Modules can be made editable in processing view by toggling the associated visibility button, with indicating a visible (editable) parameter and one that will not be visible. Modules with visible parameters will also have their name displayed in processing view, unless “Show basic title” is unticked.
Similarly, entire modules can be made optional by selecting “Can be disabled”. When selected, the module title will be displayed in processing view along with an or icon (depending on state of the module).
Any modules with identified errors will be highlighted in red along with the icon.
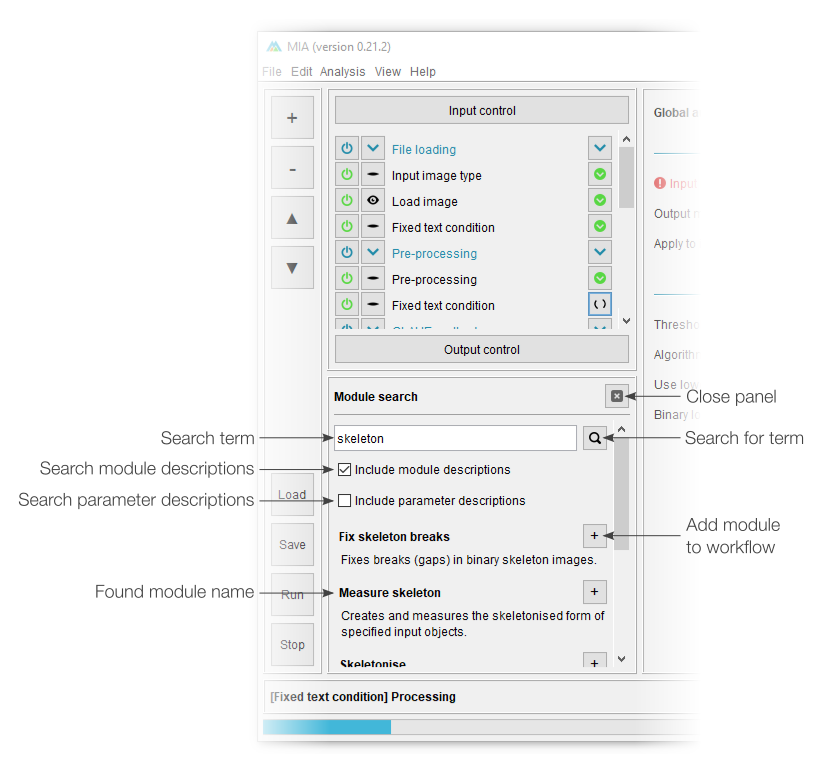
Module search
An optional search panel can be enabled by either selecting “Search for module” from the “Add new module” (+) menu or by going to View › Show module search. Here, modules can be searched based on words that may appear in the module name, module description or associated parameter descriptions. The module search will always look at module names, but module descriptions and associated parameter descriptions can be optionally included using the tick boxes.
Multiple search terms can be provided (e.g. “overlay outline”), with identified modules only needing to match one of the terms. Mandatory search terms can be included using quotation marks - all identified modules must include at least one instance of such terms.
Found modules are listed below the search controls, with the best matches (those including most search terms) at the top. Each identified module can be directly added to the current workflow using the associated button.
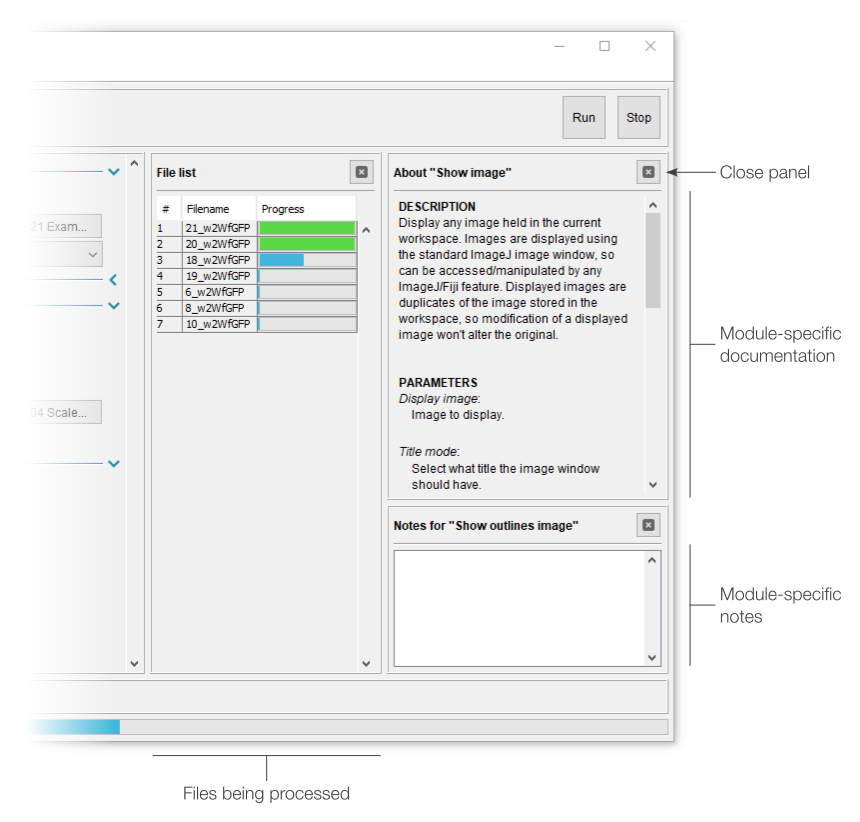
Additional panels
Additional panels are available via the “View” menu. These are present in both “processing” and “editing” views and can be closed using the cross button in the top-left corner of the panel.
The “About” panel displays the full documentation for a selected module, while the “Notes” panel offers a location to add module-specific notes. The corresponding module for both of these can be selected by clicking on the module heading. Notes could be added by the workflow creator to provide usage information for the end user, or they could be added by the end user as reminders. Notes are stored with a workflow when that workflow is saved.
The “File list” panel shows the current processing status of all queued analysis jobs. As such, it’s primarily intended for batch processing files. By default, this view displays the job number, filename and progress; however, series name and series number can be added by right-clicking the top row.
Use an existing workflow
MIA workflows are distributed as .mia files. These allow the same workflow to be stored and easily shared between different computers. They can be configured to present a small number of key parameters (e.g. input file paths or filter thresholds) to the end user in MIA’s processing view while keeping the majority of parameters (those which should remain fixed) accessible only via editing view.
Loading the workflow
- If not already started, launch MIA from the plugins menu at Plugins › ModularImageAnalysis (MIA)
- By default, MIA will load into processing view
- To make significant edits to a workflow (i.e. changes not possible using the parameters available in “processing view”) you can switch to “editing view” by going to View › Switch to editing view.
- Click and select the .mia workflow file
- Depending on workflow configuration, a number of controls may be visible.
- Since the visible parameters are determined by the workflow author, please contact them for specific information.
Configuring and running
- Typically, although not necessarily, workflows will contain a parameter to set the input file path. To do this, click the box to the right of “Input path” and select either a single file or a folder.
- Selecting a folder will automatically put MIA into “batch” mode. Here, MIA will iterate over all folders, sequentially processing.
- If multi-series files (e.g. Leica .lif) are likely to be processed, the workflow author may also have made controls to select input series available.
- When ready, click to start the analysis
- While processing, the status panel will display the number of files completed (batch mode) or a summary of the ongoing task (single file mode).
- Once finished, “Complete” will be displayed in the status panel and all results files will have been saved to their respective locations.
- Output .xlsx files will be saved in the input directory with the same name as the selected input file/folder.
Saving changes
- If changes have been made to the workflow that you’d like to retain for future runs, click to overwrite the loaded .mia file
- Alternatively, a new file can be saved by going to File › Save workflow as….
Creating a new workflow
Workflows can be created and edited from editing view. Modules are assembled into a linear sequence that forms the workflow. Each module has its own independent set of parameters which can be configured by selecting that module from the workflow list. Images and objects created by modules are available to subsequent modules in the workflow, as are other items such as measurements, metadata and object relationships.
In this guide we will cover adding modules, setting the input file, configuring modules, configuring output Excel formats and setting parameters to be visible in processing view.
If you haven’t already done so, at this point it’s also worth looking at the example workflows. These workflows include key modules used in the majority of analyses, each of which has accompanying notes, explaining its configuration.
Accessing editing view
- By default, MIA will open in “processing view”. To switch to editing view, select “View > Switch to editing view” from the MIA menu.
- The layout of editing view is covered in the “editing view” guide.
Adding and arranging modules
- A list of available modules can be viewed by clicking the button in the top-left corner of the MIA interface.
- Modules are grouped into general categories and sub-categories.
- To view a description of each module, hover the mouse over its name.
- Full documentation of each module can be found in the Modules pages.
- Click a module to add it to current workflow.
- If any modules in the current workflow are selected, the new module will be inserted immediately after them. Otherwise, it will be added to the bottom of the list.
- Modules can also be discovered and added using the module search feature.
- Access search via either the menu bar (View › Show module search) or by clicking “Search for module” in the available module list.
- Search will always match modules based on the module name, but can optionally be set to also search in the module and/or parameter descriptions using the “Include module/parameter descriptions” checkboxes.
- Detected modules need only match one search word; however, mandatory words can be specified using quotation marks.
- Add detected modules to the current workflow using the button to their right.
- Selected module(s) can be removed using the button and moved up and down with the and buttons.
- Modules can also be moved by dragging them to a new position in the workflow.
Selecting files to process
- Files or folders being processed are specified in the always-present Input control module, which can be found above the current workflow.
- The “Input path” parameter specifies either a file or folder that the analysis will be run on.
- The selected file only acts to provide a root path from which the analysis runs. The image at this location isn’t automatically loaded into the MIA workspace, instead this is done by a variety of image loading modules (see Input/output modules).
- This fine-grain control over image loading allows us to load sub-sets of image stacks (e.g. a single channel) and gives greater control of the images stored in memory at any given time.
- A copy of the Load image module is automatically included with all new workflows.
- If a folder is selected, all files contained within (and within sub-folders) can be processed.
- In this “batch” mode, only files matching specified filters will be processed.
Configuring modules
- View the parameters associated with a module by clicking its name in the current workflow.
- Parameters are grouped into sections, divided by blue headers.
- Parameters can have many different types (e.g. text inputs, available objects or choices).
- Generally, each parameter should only allow valid inputs. For example, object selectors will only show objects detected by preceding modules, but not those from subsequent modules.
- Specific parameters can be added to “processing view” by toggling the visibility button to the right of the parameter.
- The icons indicates a visible (editable) parameter and one that will not be visible.
- It’s also possible to allow modules to be disabled from processing view by selecting “Can be disabled” from the top of the parameter window.
- When selected, a power icon ( or ) will be displayed next to the module name in processing view.
- Modules and parameters can be renamed by right-clicking on their name.
Configuring output results format
- The generated results spreadsheet can be configured in the always-present Output control module, which can be found above the current workflow.
- Results spreadsheets will typically be stored in the same folder as the selected input file or within a selected input folder.
- By default, all measurements will be included in the spreadsheet. These can be enabled/disabled individually from the “Measurement selection” section.
- Each exported object collection will be given a separate sheet in the worksheet.
- Measurement names, which will be displayed at the top of each column, can be changed by right-clicking on the measurement name.
- Measurements will also be summarised in a separate “Summary” sheet. This sheet can be enabled/disabled in the “Summary sheet” section.
- A single summary is prepared for each processed image; however, this can be split down per timepoint.
- Each measurement can be summarised as the mean, minimum, maximum, standard deviation and sum.
- Individual measurement summaries can be enabled/disabled in the “Measurement selection” section.
Contributing
We welcome any contributions to the MIA project. If you’d like to get involved, there are a few ideas on how you could do so in our get involved guide, but any involvement, big or small, would be greatly appreciated.
If you’d like to include the latest version of MIA in your project, you can add the following dependency to your pom.xml file:
<dependency>
    <groupId>io.github.mianalysis</groupId>
    <artifactId>mia</artifactId>
    <version>1.4.0</version>
</dependency>
The JavaDoc for MIA is available here.
Acknowledgements
The plugin makes use of a combination of plugins packaged with Fiji as well as others that can be installed via the updater.
Required plugins pre-packaged with Fiji: AnalyzeSkeleton, Auto Threshold, bUnwarpJ, Bio-Formats, Colour Deconvolution, Correct Bleach, Feature Extraction, TrackMate, Weka Trainable Segmentation. Required plugins that need installing via the ImageJ updater: MorphoLibJ. Plugins bundled with MIA: Stack Focuser.
A list of bundled dependencies along with their respective licenses can be found here.
Special thanks to all MIA users who have provided vital feedback over the years. In particular, big thanks to Dr. Dominic Alibhai for his many suggestions and ideas.
Citing MIA
We hope you find MIA useful. If you’ve used MIA in your research, please cite it using the Zenodo DOI for that version of the plugin. Zenodo DOIs for MIA can be found here. Alternatively, the following reference covers any version of the plugin:
Publications
MIA has been used in a variety of different analyses, a few published examples of which are listed below. For a more complete list, please go to Publications.
doi:10.1038/s42003-021-02972-8
doi:10.1038/s41413-021-00156-y
Ongoing development
This plugin is still in development and test coverage is currently incomplete. Please keep an eye on results and add an issue if any problems are encountered.