Balloon Segmentation for multicellular images
Introduction
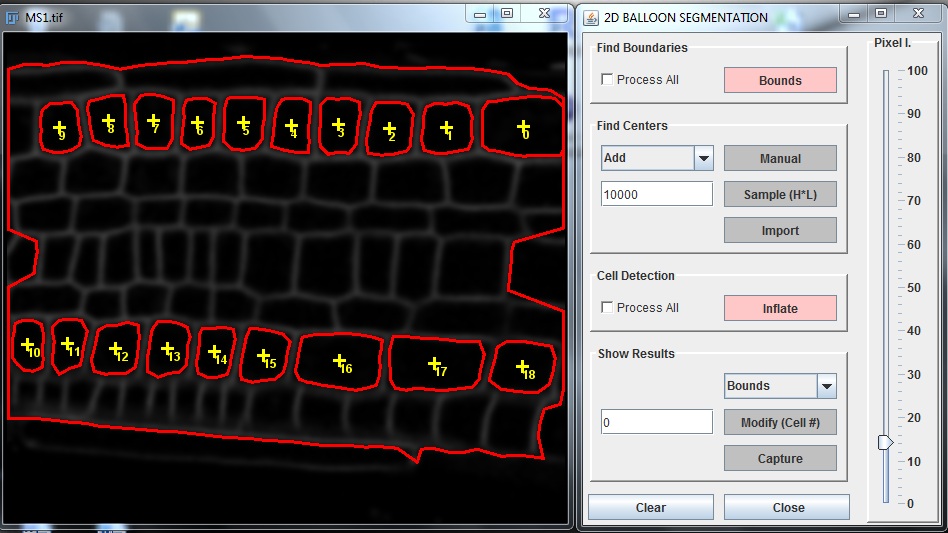
A plugin1 that allows the segmentation off cell wall boundaries from microscopy images and to extract cell architectures. It uses a physical “balloon inflation” algorithm for finding the cell boundaries from 8bits images. Features include:
- Extraction of lists of individual cell shapes
- The determination of the cells being in contact each other
- All previous segmentation steps are automatic, but it is possible to make manual modifications at each step;
- Settings are saved in properties files for different types of images to be segmented

Segmentation process
Pre-processing of the image
1. Image filtering: a smooth image is very important for the algorithm to work because. Different filters can be found in Fiji. Classically, a Gaussian filter can be used to process the image
2. Background subtraction: It is often useful to reduce long-range modulations of the background intensity. This can be achieved with Fiji’s background subtraction function.
3. Enhance contrast: it is generally useful to find the right setting for the balloon inflation to normalized the range of pixel intensity. This can be done using the enhance contrast function of Fiji.
Segmentation Stage
1. Find image boundaries: this stage is compulsory, even if a pixel limit of 0 can be set if boundaries are those of the image. The function is based on a watershed algorithm to find the boundaries of the tissue to be segmented. It is used for example in the automatic sampling of cell interior point (3.b) or to stop balloons from expanding outside the region.
2. Find cell centres: the algorithm needs to be initiated with a seed placed inside each cell of interest. There are three options to carry out this step:
a. select the cells manually with the mouse by pressing the edit button and choosing one of the options add / move / delete points.
b. use the automatic sampling algorithm provided by the plugin. It uses the path between a of pair point to determine if they are contained within the same cell (in which case one of them is removed). This decision is based on the indicator h*l. h is the peak of image intensity along the path and l is the distance between the points. Therefore, if the value entered is too small, more than one point will be allowed to be in the same cell. If the value is too large, some cells won’t be detected. Running the algorithm several time can improve the results and find cells that were not detected in the first instance
c. import points from a file. The file is simply be a list of X Y values separated by a tabulation, one set of coordinate per line and saved with the .tab extension. You can download the text file of the cell center for fig. 2 here.
4. Inflate the balloon: Inflation of the balloons is achieved by specifying a pressure inside balloons (equivalent to pixel intensity) and pressing the inflate button. This operation is interactive can be repeated until the balloon occupies the area of the cell. Inflation consist of a first step where pressure is added into the balloon and to triger expansion, and a fitting stage where pressure in the balloon is removed and forces are derived from the laplacian of the image.
5. Visualize the results. The results of the segmentation (cell centres, neighbouring cells …) can be visualized using the show button. The report option prints the geometrical properties of balloons either as ROI or as a result table.
Input parameters
The plugin is started with a set of predefined parameter values. e.g. initial number of balloon verticies, number of neighbours to check for contact, default values in the interface etc… The values are specified in the BalloonSegmentation.properties file, in the same folder than the plugin, and are read once at the start of the plugin. This file can be edited with any text editor, and it is recommended to keep a copy of the settings obtained for a specific type of image for further reuse. In future version of the plugin, such parameters will have to be controlled through the user interface
TODOS
The plugin is still work in progress. Things to be done includes use of threading, connection with a particle search algorithm to automate selection of seeds, improved interface etc… Any comments to improve the plugin are much welcome.