This plugin install and run cellpose on an image (2D/3D/multi-colors/time) in Fiji. Two version of cellpose are available:
- Cellpose (v3, doi:10.1038/s41592-025-02595-5)
- Cellpose-SAM (v4, doi:10.1101/2025.04.28.651001)
This plugin is based on Appose, that automatically install python environment and allows python script execution with shared objects with Fiji.
Installation
You can install the plugin for the unliste update site Appose-Playground:
- In Fiji, go to
Help>Update... - Select
Manage Update Sitesin the window that opens. - Click
Add unliste update site, name itAppose-Playgroundand write its addresshttps://sites.imagej.net/Appose-Playground. - Select the Appose-Cellpose
.jarfile to install only this plugin, or keep all proposed plugins. - Press
Apply changesand restart Fiji when it’s done.
You should have a recent version of Fiji, based on Java 21 or more. Download a new version here (Latest downloads column) if you’re current installation is too old.
Usage
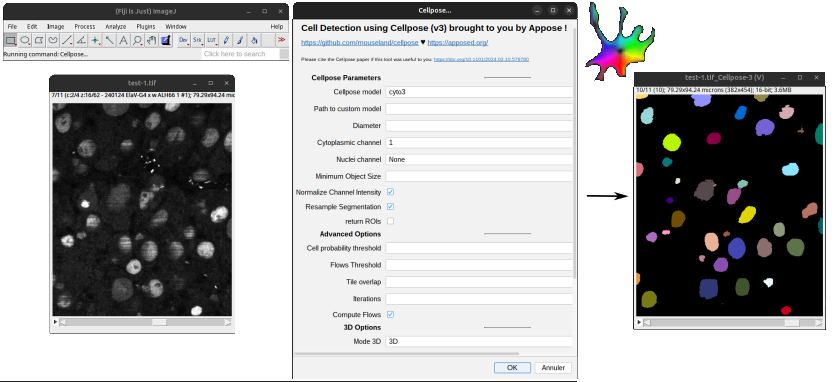
The plugin handles images or movies that are 2D or 3D, that contains or not multiple channels. It can also have a temporal dimension. First open an image and then run the plugin. If you have several images opened when you launch the plugin, it will run on the active one.
From Fiji:
- Open the image that you want to process.
- Launch one of the cellpose version available in the plugin:
Plugins>Segmentation>Cellpose-Appose>Cellpose...This option allows to run CellPose v3. The full official Cellpose 3 documentation is available here.Plugins>Segmentation>Cellpose-Appose>Cellpose-SAM...This option allows to run CellPose v4 with SAM. The full official Cellpose 4 documentation is available here.
- Configure your Cellpose run through the Graphic Interface. see here for documentation
- Press “Ok” and Enjoy!
Optionnaly, you can use the plugin from a Fiji macro, which allows you to run it automatically on several images or integrate it in a bigger pipeline. See here for more informations.
The first time you run each option of this plugin, a python environment with the requested Cellpose version will be automatically installed in your home .local\shared\appose directory, which will take some time. The next time you use the same option, the environment will be directly activated from the plugin when needed so it will be much faster.
Cellpose-SAM relies on a much bigger neural network than Cellpose3. Thus computation with this version takes longer and it is advised to have a GPU available.
For movie
If the image is a movie, the time points will be processed sequentially. The resulting labels are thus unique (one label=one object) for each time point, but not accross time point: you can have the same label in several time points, without it being the same cell/object.
If you wish to have the same label for the same object accross time points, you will have to perform tracking using this segmented image. You can use TrackMate to track your labels after the segmentation.
Parameters
After you selected a version of Cellpose, a graphical interface will pop-up to let you choose the parameters to run cellpose. See the Cellpose documentation for full description of the parameters.
If you put your mouse pointer above a parameter, a small text indicating the parameter meaning appears. More details are given for each parameter in the following.
Cellpose parameters
-
Cellpose model: Select a pretrained model from Cellpose website. These models have been trained on dataset with specific biological objects, as for example nuclei fornucleimodel. Select the model that corresponds the best to your data. -
Path to custom model: if you have fine-tuned or trained your own cellpose model, write here the full path to the directory containing the model files. -
Diameter: The prediction is sensitive to the size of the objects to detect, so you need to indicate the average diameter of the objects (cell or nuclei), in pixels. This parameter strongly affects the segmentation results for Cellpose v3, while Cellpose-SAM can handle a much bigger range of object sizes. Cellpose will resize your image(s) to have an average object size compatible to the one of the training data (30 pixels for most models), and resize back the results to your initial image size.
⚙ Default value is 30 pixel. Channel selection: Choose the color channel on the image to do the segmentation on (that contain the staining of your objects). The number of the channel to select are the same one as in the Fiji interface, starting at one for the first channel.- For Cellpose 3: you can select one or two channels, one for the main object to segment (
Cytoplasmic channel) and an optional one for the nuclei staining (Nuclei chanel). When you have both stainings, selecting also the nuclei channel can help the segmentation of the contour of the cell by giving more information. - For Cellpose-SAM: Cellpose-SAM can use information from up to 3 channels to segment the objects. So select the number of channels that are relevant to segment your objects of interest.
- For Cellpose 3: you can select one or two channels, one for the main object to segment (
-
Minimum Object Size: At the end of the segmentation process, objects that are smaller in size (total area in pixel) from this parameter will be removed. This allows to get rid off small errors segmentation of only a few pixel.
⚙ Default value is 15 pixels^2. -
Normalize Channel Intensity: whether to use Cellpose’s normalization or not. The normalization allows to put the images in the same range of pixel values than the one used for training to get better results. This is recommended, except if you perform your own normalization before.
⚙ Default to True (checked). -
Resample Segmentation: This allows to have more accurate boundaries when your object size is bigger than the model’s size (usual 30 pixels, seediameterparameter), but will be slower to compute. Indeed, when this option is selected the “dynamics”, i.e. the post-processing specific from cellpose to reconstruct the cells from the network’s output, will be run at your original image size (at full resolution then). If it’s not checked, these “dynamics” will be run on the resized image, which will be smaller if yourdiameterparameter is bigger than 30 pixels.
⚙ Default value to True (checked). return ROIs(not for 3D images): the default output (segmentation) that you get is a label image: each object is assigned a unique identity (label), displayed in different color. If you check this option, you will also have a Region Of Interest for each object, added to the ROIManager.
⚙ Unselected by default
Advanced options parameters
-
Cell probability threshold: Cellpose runs a neural network to predict the probability of a pixel to be part of an object and the direction from this pixel to the center of this object (the flows). This threshold allows to tune which pixels to keep in the final segmentation: increasing the threshold will reduce the size of detected objects, keeping only most probable pixels, while decreasing it allows to find larger and more objects.
⚙ This parameter range from -6 to 6 and is 0 by default. -
Flows threshold(not for 3D images): Cellpose runs a neural network to predict the probability of a pixel to be part of an object and the direction from this pixel to the center of this object (the flows). The error between the segmentation mask and the calculated flow is calculated, and pixels with an error smaller than the threshold will be kept. Increasing this threshold will thus increase the size/number of objects kept and also allows less regular shape.
⚙ This parameter range from 0 to 1 and is 0.4 by default. -
Tile overlap: Cellpose is dividing the input images into tiles of (256*256) and computing the neural networks in each tile, then putting back the results together. A small overlap between neighboring tiles allows to reconstruct well the cells that are on the boundaries.
⚙ This parameter range from 0 (no overlap) to 1 (full overlap, doesn’t make sense). Default value is 0.1 (10% overlap). -
Compute flows: Cellpose runs a neural network to predict the probability of a pixel to be part of an object and the direction from this pixel to the center of this object (the flows). By default, you only get the resulting image of cell segmented with a label assigned to each cell. Checking this option allows to also get the flows images as a results. This could be usefull to change the postprocessing step for example.
⚙ Not selected by default. -
Iterations: The number of iterations computed by Cellpose when calculating the cell shapes from the flows (niterparameter in Cellpose). If the value is set toNone(0 in the interface), Cellpose will automatically calculate it based on the cell diameter. Increase it for detecting elongated objects.
⚙ 0 by default (None, automatic calculation).
3D Options
These options can be modified only if the image is a 3D stack (contains more than 1 slice).
If your image should be 3D but is not detected as such (the 3D parameters cannot be modified), check that the metadata are correct: go to Image>Properties... and check that the number of slices is more than 1. If you have several frames and only 1 slice and the image should be 3D instead of temporal, exchange the values of number of slices and of frames and click Ok.
-
Mode 3D: To segment cells in 3D, Cellpose proposes 2 ways to do it. First option2D+stitchis computing the segmentation in each 2D slice, and then reconstructing the 3D cells by linking the probable same cell accross slices. Second option3Dis not really running in 2D: Cellpose will run on the image onx,ydirection,x,zand theny,z. The 3D results will then be reconstructed by combining the flows calculated with each direction. -
Stitch threshold(2D+stitch mode): If you selected the2D+stitchoption, Cellpose will predict the cells in each 2D slice and then will reconstruct the 3D cells by linking together cells that overlap enough between consecutive slices. This threshold controls how much cells in consecutive slices should overlap (intersection over union score). If you put 0, the cells will not be linked from one slice to another. If 1, cells would be linked as the same cell only if they are exactly the same from one slice to the next one. Decreasing this threshold allows to linked more cells together.
⚙ This parameter range from 0 (no overlap) to 1 (full overlap: the cells are exactly the same). Default value is 0.0 (no 3D reconstruction). -
Flow 3d smooth(3D mode): If you selected the3D modeoption, this parameter allows to smooth the flows calculated by cellpose in 3D. The smoothing will be done with a gaussian filter with a stddev of the given parameter. This allows to have more regular 3D shapes.
⚙ Default value to 0.0 (no smoothing).
GPU handling
Cellpose relies on pytorch to compute on GPU. Depending on your operating system and on you GPU drivers, the version of cuda installed will not be the same.
Torch version: allows you to select the cuda versions that fits your system. On top of this parameter, the plugin prints a message with the information of your GPU driver. You can choose betweencputo not rely on cuda (if you don’t have GPU or for MacOS system which handles it differently). Otherwise, choose the versioncu126orcu130depending on the version that is printed above (same major version12->126or13->130). If it doesn’t work, you can try the other 2 versions.
Run from macro
The plugin is compatible with Fiji macro.
Macro from scratch
To write a new macro, you can:
- go to
File>New>Script...that will opens the macro editor. - In
Language, selectImageJ Macro - In the file, write:
run("Cellpose...", "cp_model=cyto3 custom_model= cell_diameter=30 cyto_channel=1 nuclei_channel=None min_size=15 normalize=true resample=true return_rois=false cellprob_threshold=0.0 flow_threshold=0.4 tile_overlap=0.1 niter=0 compute_flows=false mode_3d=2D+stitch stitch_threshold=0.1 flow3d_smooth=0 torchversion=cpu usegpu=true");
Macro from recorder
You can also first use the plugin on one image, while recording your action:
- go to
Plugins>Macro>Record... - open your image
- start cellpose-appose (in
Plugins>Segmentation>Cellpose-Appose>Cellpose...) - choose the parameters relevant for your case
- run it
- when it’s done, you will see in the recorder the command line that you did.
- Click
Createto directly create a new macro in the editor with your command line.
Macro to run on all .tif of a folder
For example, here’s a macro that will process all .tif files in a folder and save the resulting label image for each image in the same folder.
// Let you choose the folder to process
directory = getDir("Choose folder to process");

// get the list of all files in the selected directory
filelist = getFileList(directory);
for (i = 0; i < lengthOf(filelist); i++)
{
	// process only files that are tif files
    if (endsWith(filelist[i], ".tif"))
    {
    	// open the image
        open(directory + File.separator + filelist[i]);
        raw_img = getImageID();
        // run cellpose
        run("Cellpose...", "cp_model=cyto3 custom_model= cell_diameter=30 cyto_channel=1 nuclei_channel=None min_size=15 normalize=true resample=true return_rois=false cellprob_threshold=0.0 flow_threshold=0.4 tile_overlap=0.1 niter=0 compute_flows=false mode_3d=2D+stitch stitch_threshold=0.1 flow3d_smooth=0 torchversion=cpu usegpu=true");
		// define the name of the label file to save it
        label_file = directory+File.separator+substring( filelist[i], 0, lengthOf(filelist[i])-4 ) + "_labels.tif";
        saveAs("Tiff", label_file);
		// close the results and the raw image
		close();
		selectImage( raw_img );
		close();
    }
}
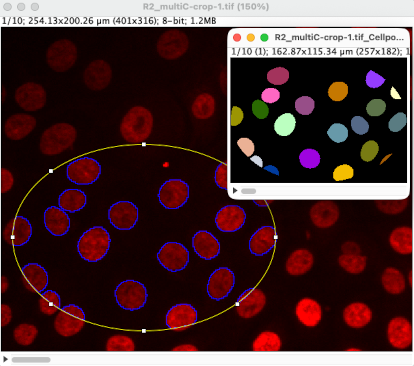
Segment only in a Region Of Interest
It is possible to run Cellpose only in a region of the image by first drawing a ROI in the image.
Then run Cellpose_Appose in the same way as you would do for a whole image.
Cellpose will segment only the objects within the selected ROI and returns the labels in a smaller image cropped around the ROI.
If you select the option return ROIs, the resulting ROIs will be placed in the original image (full size), as you can see in the example image below.
Alternatives
For other way to run Cellpose from Fiji, see this page that links several options: https://imagej.net/plugins/cellpose.
Issue/FAQ
If you encountered a problem using the plugin, or to ask for a new feature, please fill an issue on the github repository.Please give as many details as possible.
You can also post a new question on the imagesc forum, mentionning that the question is related to cellpose-appose plugin.