Wavelet Denoise
| Wavelet_Denoise (ImageJ/Fiji) | |
|---|---|
| Author | Martin Čapek |
| Maintainer | Martin Čapek |
| Source | on GitHub |
| Initial release | 04/09/2020 |
| Latest version | 05/21/2020 |
Contents
Plugin for wavelet-based denoising/filtering image data
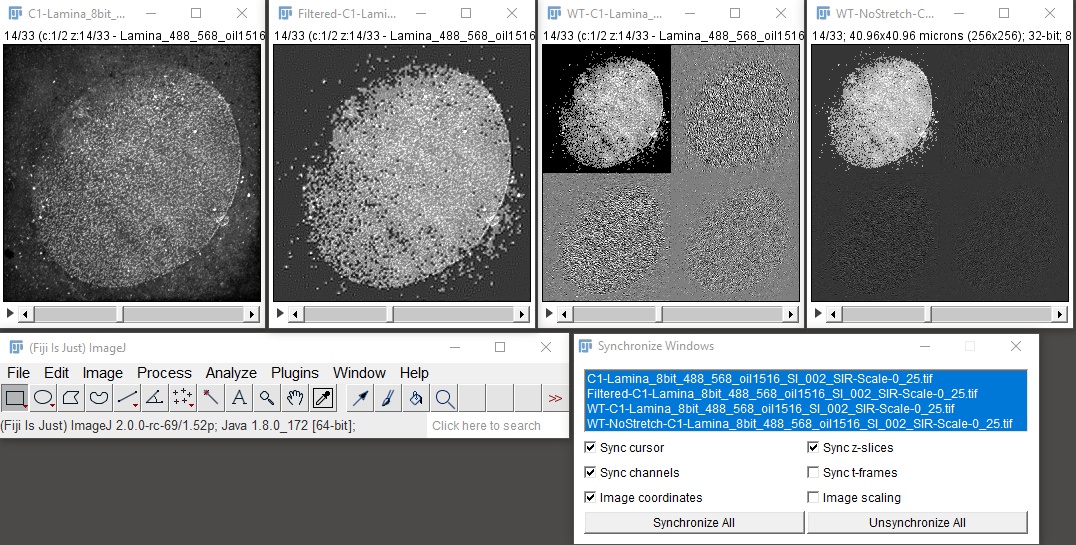
When starting the plugin, pictures and Sync Wins dialog appear, like in the picture above, together with the plugin dialog. The first picture is the input image, the second one is the filtered picture (“Filtered-” prefix), the third one contains the wavelet coefficients (“WT-“ prefix), that are converted to 8-bit and are intensity scaled for good visualization, the fourth picture (“WT-NoStretch-” prefix) contains float values of the wavelet coefficients without intensity scaling. The third and fourth pictures appear only after checking corresponding boxes in the main dialog. Applying Synchronize All in the Sync Wins dialog is helpful when navigating through image stacks.
We should mention here that sizes of input image matrices must be of power of 2, common sizes are: 64, 128, 256, 512, 1024, 2048 etc., otherwise the plugin will not start and a warning message appears again. This is due to the proper computation of levels of wavelet decomposition of images, see below.
Description of functionality of items in the plugin window
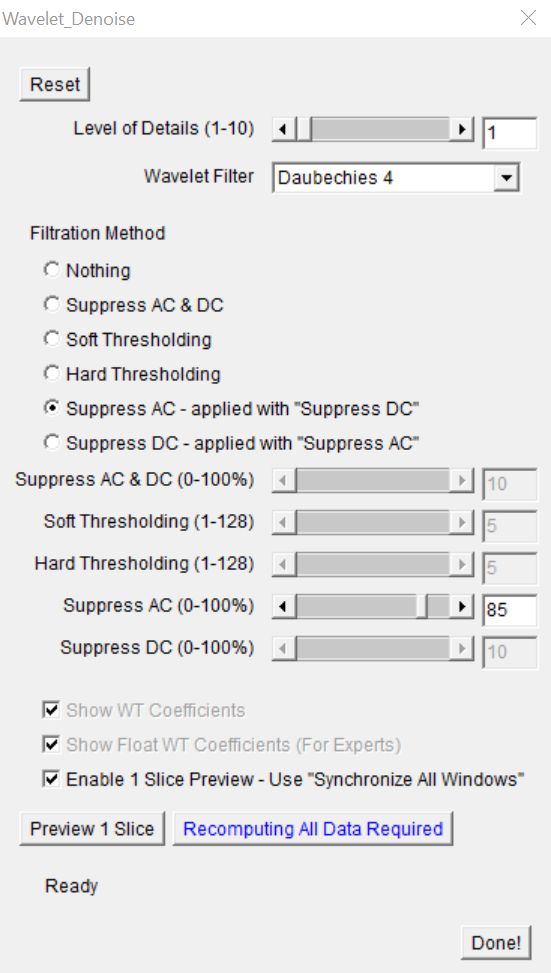
Refresh button – returns all items in the dialog to default values.
Level of Details – number of levels of decomposition of images.
Wavelet Filter – wavelet family and a kind of the applied filter (Haar 1, Daubechies 1-20, Symlets 2-20, Coiflets 1-5, Biorthogonal 1.1-6.8, Reverse Biorthogonal 1.1-6.8, Discrete Meyer 1).
Filtration Method:
• Nothing – no filtration applied.
• Suppress Approx. & Detail. Coeffs. (AC & DC) – suppresses some amount of the smallest coefficients, i.e. coefficients are ranked according to absolute value of their amplitude. User can set the level of suppression that equals the percentage of the coefficients to be removed (i.e., 0% means no values are suppressed, 100% means all the values are suppressed). Here, both Approximation and Detailed Coefficients are taken together as a one set when doing suppression.
• Soft Thresholding – soft VisuShrink thresholding;
• Hard Thresholding – hard VisuShrink thresholding: These two tools demonstrate another use of wavelet transform for image denoising/filtering. It is accomplished using VisuShrink thresholding method and the user defines the threshold by selecting the level of denoising (that equals Sigma value of the Universal threshold; Sigma takes values 1-128) in the dialog. It can also be selected to do either Soft Thresholding or Hard Thresholding [1-2]. Soft thresholding generally gives a smoother image.
• Suppress Approx. Coeffs. (AC) – applied with “Suppress DC”;
• Suppress Detail. Coeffs. (DC) – applied with “Suppress AC”: Here the plugin suppresses coefficients separately, i.e. only Approximation Coefficients can be suppressed (0-100%) or only Detailed Coefficients (0-100%). However, it is possible to combine settings of both coefficients together, i.e. to set, e.g., AC to 5% and DC to 50% and both suppressions will be applied to the image simultaneously.
Explanation of details of the wavelet transform and parameters mentioned can be found in the text below [2].
Show WT Coefficients
If user wants to inspect values of wavelet coefficients, checking this checkbox shows a picture depicting the coefficients that are converted to 8-bit and are intensity scaled for good visualization (the image with the “WT-” prefix).
Show Float WT Coefficients (For Experts)
If user wants to see real values of wavelet coefficients, checking this checkbox shows another picture depicting the coefficients in float precision (the image with the “WT-NoStretch-” prefix). That can be used, e.g., for analysis in Matlab.
Enable 1 Slice Preview – Use “Synchronize All Windows”
In a standard way, when changing any parameter or method in the dialog, “Filtered” images, and also “WT” and “WT-NoStretch-” pictures if these are opened, are recomputed instantly. This may become time-consuming when filtering big stacks with large image matrices. Then checking this box stops immediate recomputation of the stacks and Preview 1 Slice button is enabled. Now, after changing a parameter and/or a method these are applied to the data only after pressing this button. But only a slice that is active in the original stack is updated.
After pressing Preview 1 Slice another Recomputing All Data Required button becomes active as well. After pressing this button parameters that were previously applied to one slice only are used for updating the whole stack of images. This button is active only if parameters set were not applied to the whole stack. It is highly useful here to apply Synchronize All in the Sync Wins dialog when going through the stack to see corresponding slices in all image stack windows.
When unchecking this checkbox, the whole stack, is also recomputed according to the method and parameters set. Then plugin returns to the mode of immediate recomputation of the whole image/stack after changing parameters and both buttons (Preview 1 Slice, Recomputing All Data Required) are disabled.
Status Message
Below the buttons (Preview 1 Slice, Recomputing All Data Required) there is a status message showing the progress of computation or warning messages from the plugin.
Done! button closes the dialog, but all image windows stay open for possible next processing.
Additional remarks
• Plugin dialog is modeless. It is possible to process the input image prior applying any wavelet denoising/filtration, e.g., by smoothing, sharpening, contrast. In such cases the Refresh button can be useful. However, the size of the input image matrix, number of slices and the bit depth cannot be changed.
• When you close any image window joined with the dialog (Input, WT, Filtered, WT-NoStretch) during running, the dialog will not continue and a warning message appears.
• If you do not see data in image windows well, use Image › Adjust-Brightness/Contrast › Auto. Do not press Apply for pixel intensity value recomputation.
Step-by-step manuals
How to use the plugin for denoising/filtering small data:
(SIM_Lamina_32bit_488_Honeycomb_StrongBckg_Scale-0_25.tif - 7 MB)
1. Open an image/stack.
2. Run Plugins › Wavelet_Denoise.
3. Arrange positions of Wavelet_Denoise main window and Synchronize Windows dialog in the screen.
4. Run Window › Tile.
5. Press Synchronize All in Synchronize Windows dialog. Or select the input image and its “WT-“ and “Filtered-“ versions for syncing if more images are opened in Fiji/Imagej.
6. Find a slice of interest in a stack image with multiple slices (if such is opened).
7. By CTRL+SHIFT+C and pressing Auto adjust contrast in all images if it is useful. Do not press Apply.
8. Apply denoising/filtration of your data. If any method or parameter is changed, “Filtered-“ (and “WT-“ and “WT-NoStretch-” if these are opened) image windows are immediately recomputed.
9. Play iteratively with parameters until you are satisfied with the result of denoising/filtration. It is possible to return back to default values of the dialog by pressing Refresh.
10. If you are satisfied with the result, press Done! This closes the dialog, but all image windows stay open for possible next processing.
How to use the plugin for denoising/filtering big data:
(SIM_Lamina_32bit_488_Honeycomb_StrongBckg.tif - 73 MB)
1. Open an image/stack.
2. Run Plugins › Wavelet_Denoise.
3. Arrange positions of Wavelet_Denoise main window and Synchronize Windows dialog in the screen.
4. Run Window › Tile.
5. Press Synchronize All in Synchronize Windows dialog. Or select the input image and its “WT-“ and “Filtered-“ versions for syncing if more images are opened in Fiji/Imagej.
6. Find a slice of interest in a stack image with multiple slices (if such is opened).
7. By CTRL+SHIFT+C and pressing Auto adjust contrast in all images if it is useful. Do not press Apply.
8. Mark Enable 1 Slice Preview to avoid immediate recomputation of images after changing any parameter in the main dialog.
9. Choose a filtration method and its power by using a corresponding slider.
10. Press Preview button. The method and its power are applied to the data, but only to a selected slice!
11. Play iteratively with parameters until you are satisfied with the result of denoising/filtration. It is also possible to go to various slices to check the quality of filtering there.
12. Important: If you are satisfied with the result, press Recomputing All Data Required button (or uncheck Enable 1 Slice Preview). This recomputes the whole data according to active set method and its power.
13. If you are satisfied with the result, press Done! This closes the dialog, but all image windows stay open for possible next processing.
Installation
Two possibilities, how to do it:
1. Use LMCF-IMG update site in Fiji. More about installing Fiji plugins using update sites can be found here.
2. Download Wavelet_Denoise.jar file from GitHub and put it into plugins in ImageJ/Fiji folder.
References
1. Rangarajan, P. et al. Image Denoising Using Wavelets: Wavelets & Time Frequency. University of Michigan, 2002.
2. https://dsp.stackexchange.com/questions/15464/wavelet-thresholding
3. Čapek, M., Efenberková, M., Novotný, I., Horváth, O. The wavelet-based denoising of images in Fiji/ImageJ, with example applications in structured illumination microscopy. In: Advances in Disease Models, Edited by Petr Bartůněk, Institute of Molecular Genetics AS CR, 2019, 1th publication, ISBN 978-80-88011-06-4 Publisher: OPTIO CZ.


