FAST
Contents
Fluorescence image AnalysiS Tool: FAST
Description
This ImageJ macro automates tasks (open, set threshold, save Region Of Interest, measure) to process a set of single-channel fluorescence images.
Installation
Requirements:
- ImageJ v1.49o or newer.
- Bio-Formats 5.x or newer.
Use the ImageJ Updater and see the instructions How to follow a 3rd party update site select FAST (http://sites.imagej.net/FAST) from the available site list.
New commands should then appear in ImageJ ' Plugins › FAST ' menu.
Image Processing
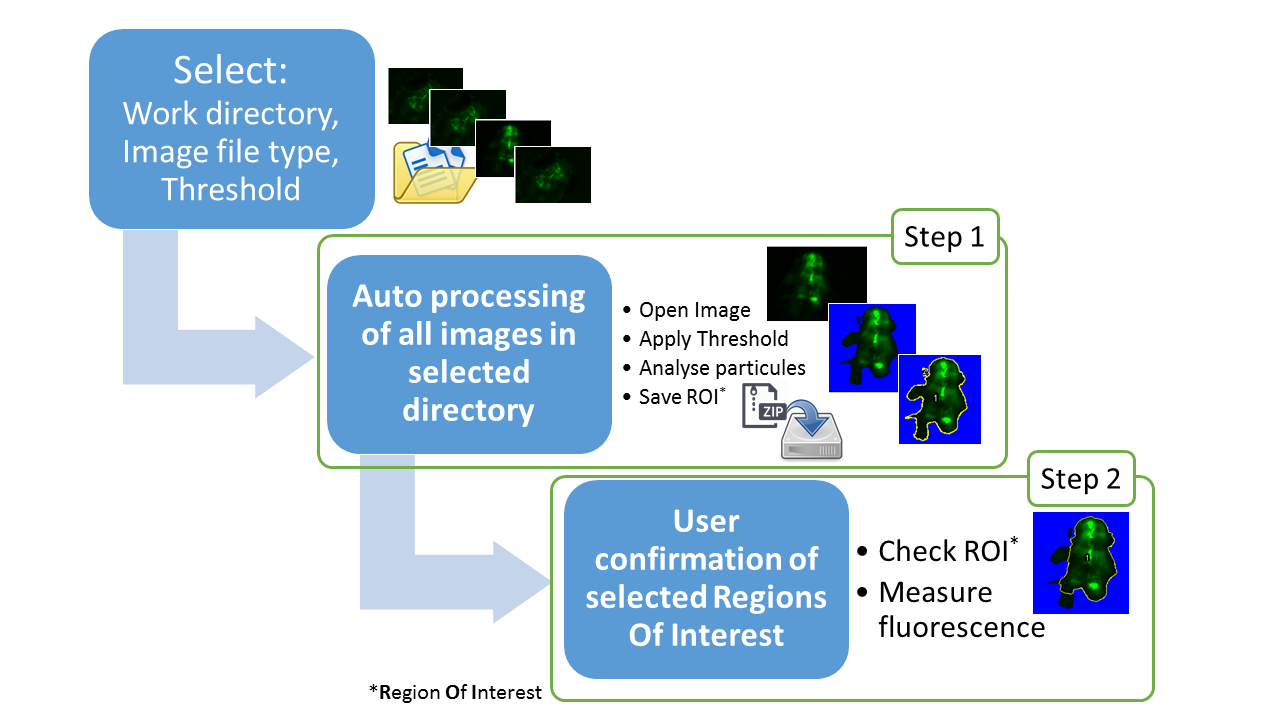
Step 1: Auto processing of images within the selected work directory
- List all files containing user-defined extension (e.g. czi - zvi - tif - nd2) within selected directory and sub-directories.
- Apply the user-defined threshold (default 290) then analyse pixels above the threshold.
- Group pixels above the threshold in one Region Of Interest and save this ROI in a zip file in the image directory.
Step 2: User confirmation of selected Regions Of Interest and measure
- Open images one by one to check the auto-selected ROI.
- User can confirm the ROI, modify it directly or remove image from further analysis.
- Measure of fluorescence in selected ROI.
Startup Options
The macro displays a dialog box to set analysis options:
- File type
- Select image type between CZI (Carl Zeiss Image), ZVI (Zeiss Vision Image), ND2 (Nikon) or TIFF (Tagged Image File Format).
'Other' allow to enter a specific file extension. - Threshold value
- Set threshold value for pixel intensity, segmenting the image into features of interest (above threshold) and background.
- Create ROIs
- Step 1, analyses pixels above the user-defined threshold value and automatically saves Regions Of Interest zip file in the image directory.
- Measure ROIs
- Step 2 of image analysis to check individually and measure previously created ROIs. (With Step 1 unchecked and Step 2 checked, user can reanalyse previous data).
- Overwrite existing ROIs
- If selected, the macro will overwrite ROIs zip files without prompting the user every time.
- Silent Mode
- If selected, the macro will measure the ROI of all images without prompting the user every time. Useful for reanalysis of previous data.
- Restart Mode
- When auto processing is cancelled accidentally, this mode checks the last ROI created and restart analysis from this point.
Validation of selected Regions Of Interest
After completion of Step 1 of image processing, images and their corresponding ROIs need to be validated by the user.
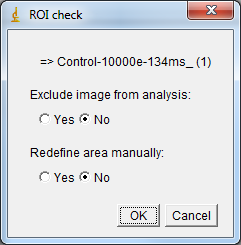
Each image and the corresponding ROI are opened automatically. An options dialog box is displayed.
- If the area is correct the user must click OK to proceed with next image.
- If the area contains non-specific signal, select Yes to redefine area manually and edit the ROI.
- The dialog box allows to exclude current image from analysis (e.g. blurred image).
Just select the radio button option needed then click OK or ⏎ENTER to continue.
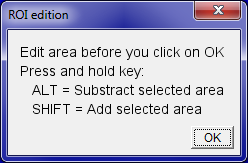
If you selected to redefine area manually, a new dialog box is displayed to get access to the ImageJ toolbar and modify the selection. The user-defined threshold is then automatically applied.
Select the appropriate tool in ImageJ toolbar:- To remove non-specific fluorescence, use selected tool and hold ⎇ Alt while unwanted area to remove it from ROI.
- To add area to the previously selected ROI, hold ⇧ Shift while selecting new area to add.
Click OK to confirm the new ROI.
Fluorescence is then measured and the ROI zip file is automatically updated.
After completion of Step 2, a list of all measured images with filename is displayed in the Result Table window of ImageJ.
This table is automatically saved as a csv file in the work directory selected at startup.
Related Resources
This program is free software; you can redistribute it and/or modify it under the terms of the GNU General Public License as published by the Free Software Foundation. Comments or improvements are welcome. It is distributed in the hope that it will be useful, but "AS IS" without warranty of any kind. See the GNU General Public License for more details.
This program has been developed within the framework of the OECD Work plan for the Test Guidelines Programme (TGP) - Project 2.46: New Test Guideline for the Detection of Endocrine Active Substances, acting through estrogen receptors using transgenic cyp 19a1b-GFP Zebrafish Embryos (EASZY assay).


